> ## Documentation Index
> Fetch the complete documentation index at: https://docs.chainbase.com/llms.txt
> Use this file to discover all available pages before exploring further.
# Json Web Token(JWT)
## What is a JWT?
JSON Web Tokens (JWTs), also known as JOTs, were created to establish a standard and secure method for two parties to communicate. They offer the advantage of stateless session management, eliminating the need for communication between a backend server and an authorization server.
JWTs can be transmitted via an HTTP header, URL, or POST parameter, and their compact size contributes to their efficiency. A JWT comprises three parts: a **Header**, **Payload**, and **Signature**, each separated by a period and derived from a JSON object that is encoded into a text string using BASE64. Further information on this standard is available in [RFC-7519](https://tools.ietf.org/html/rfc7519).
## How to use JWT in Chainbase?
Chainbase now provides users with the option to safeguard their blockchain nodes using the JWT authentication method. This feature can be utilized either as a stand-alone security measure or in conjunction with other protective methods offered by Chainbase, including IP whitelisting and domain whitelisting. It should be noted that if multiple authentication services are activated on a project, each method must successfully pass its security check, or the user request will result in an error.
### Generate your RSA-256 keys
Chainbase supports JWTs created from key pairs using the **RS256** algorithm.
Generate your own **RSA-256** public and private key with 2048 length. Below is the example using OpenSSL.
```bash theme={null}
# generate rsa key
openssl genrsa -out jwtRSA256-private.pem 2048
openssl rsa -in jwtRSA256-private.pem -pubout -outform PEM -out jwtRSA256-public.pem
```
### Add public key to a Chainbase Project
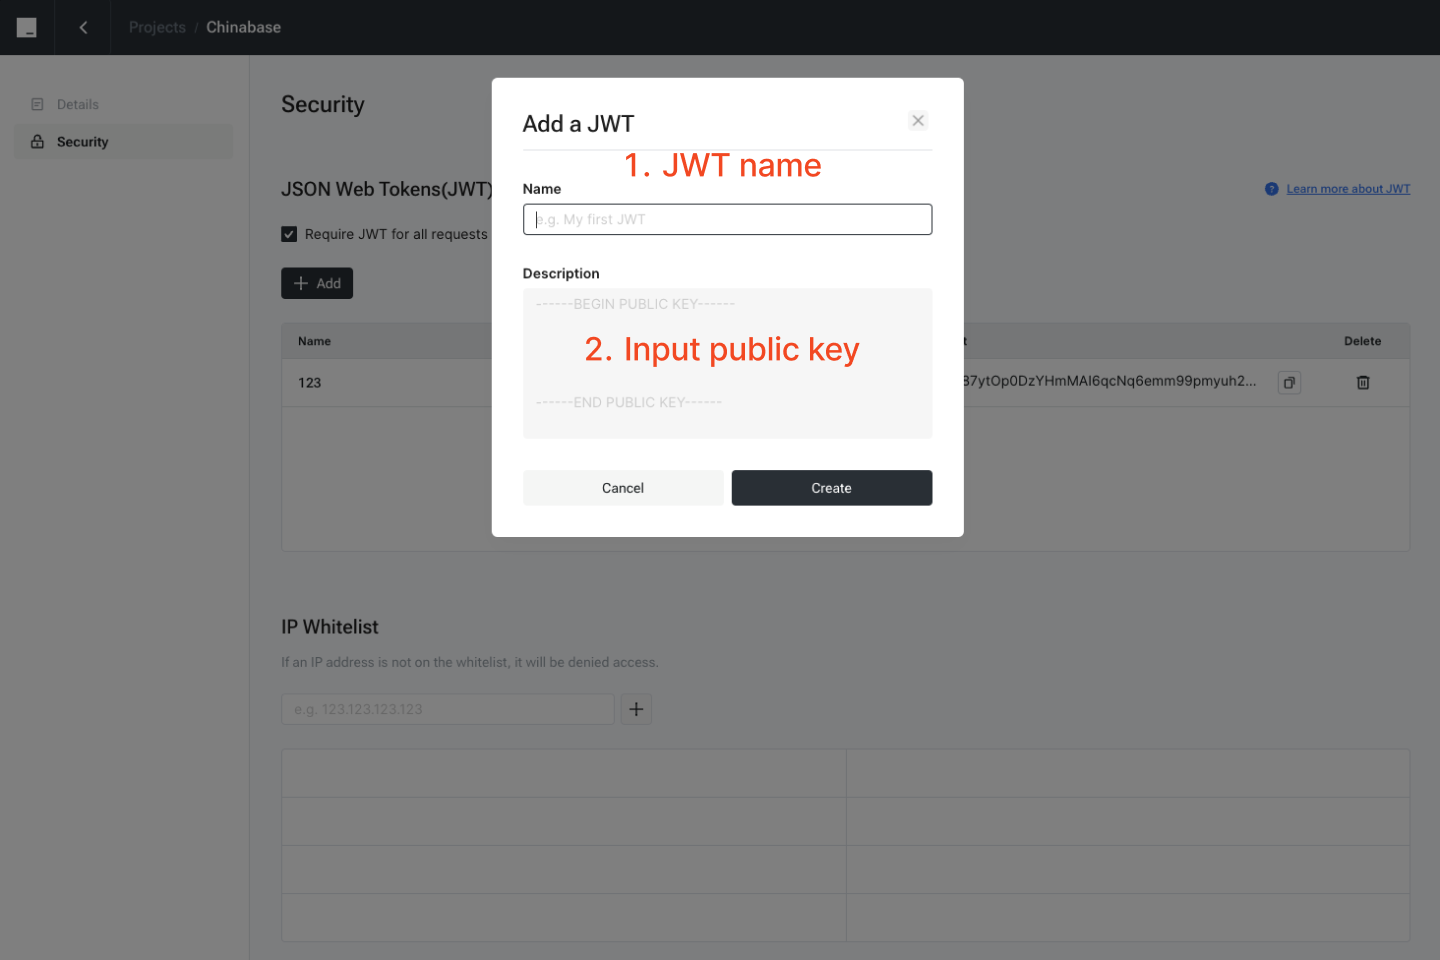
Step 1: Login -> Dashboard -> Choose a project -> Security (tab)
Step 2: Click "Add" button and Input the public key generated in the previous step.
Step 3: You will obtain the public key ID after clicking "Create" button.
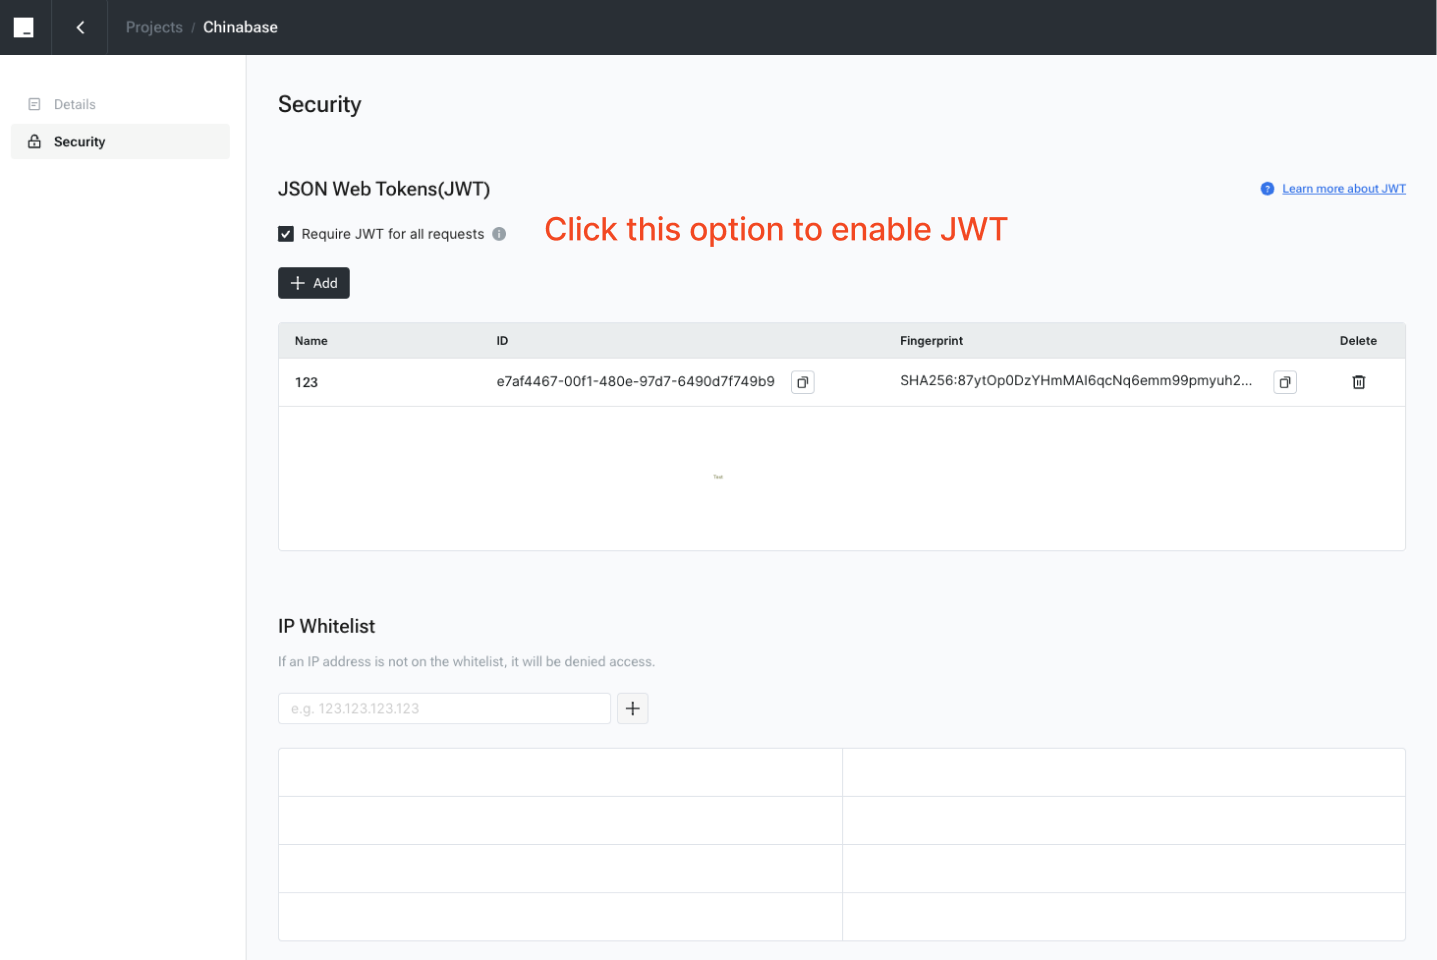
 ### Enable JWT feature
After enabling the JWT feature, it is mandatory to include the JWT in the header of all subsequent requests.
### Enable JWT feature
After enabling the JWT feature, it is mandatory to include the JWT in the header of all subsequent requests.
 ### Generate the JWT
To generate a JWT, the following components are required: **Header**, **Payload**, and **Signature**.
An example of how to generate a JWT using [https://jwt.io/](https://jwt.io/) is provided below.
### Generate the JWT
To generate a JWT, the following components are required: **Header**, **Payload**, and **Signature**.
An example of how to generate a JWT using [https://jwt.io/](https://jwt.io/) is provided below.
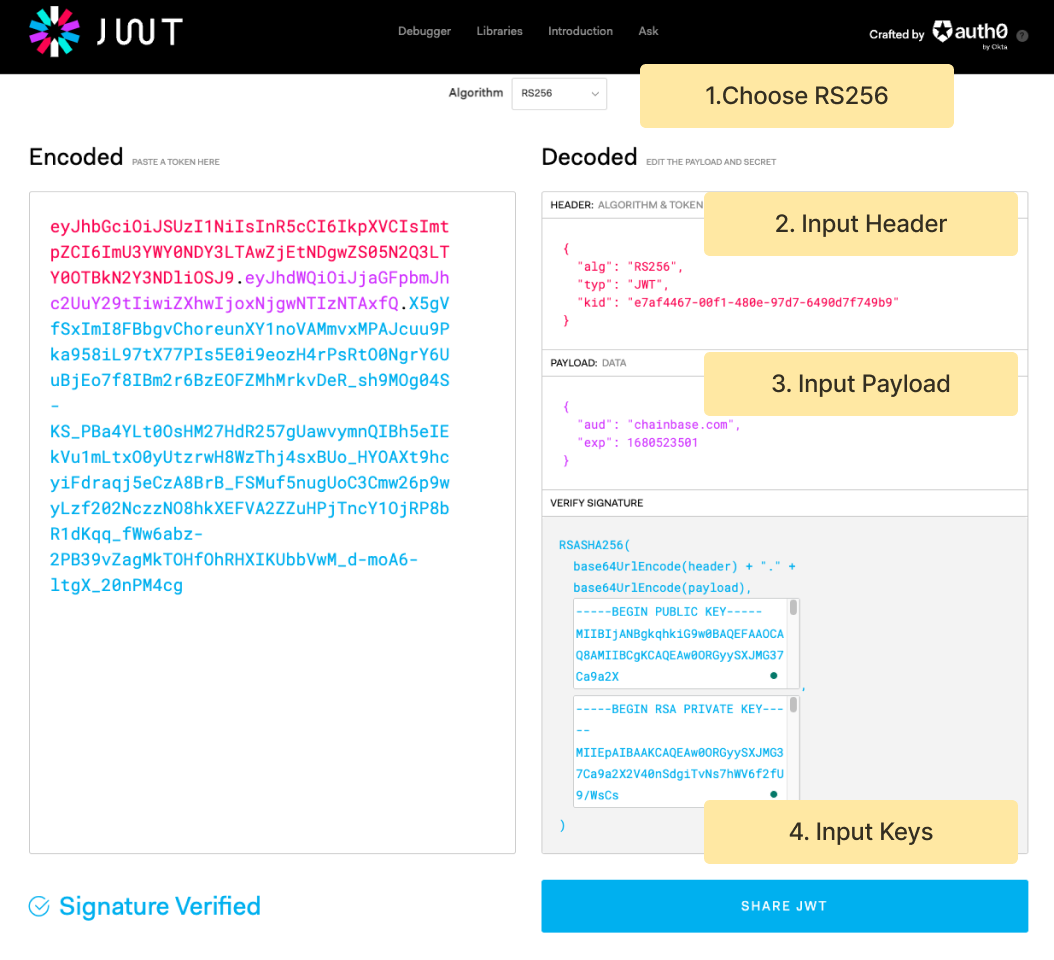 Step 1: Choose **RS256** algorithm
Step 2: Paste the following JSON to the JWT tool to encode the **Header** component.
```json theme={null}
{
"alg": "RS256",
"typ": "JWT",
"kid": "e7af4467-00f1-480e-97d7-6490d7f749b9"
}
```
Here are the meanings of the fields:
| Field | Description | Example |
| :---- | :------------------------------- | :------ |
| alg | The signing algorithm being used | RS256 |
| typ | The type of the token | JWT |
| kid | The key id copied from Chainbase | XXX |
Step 3: Paste the following JSON to the JWT tool to encode the **Payload** component.
```json theme={null}
{
"aud": "chainbase.com",
"exp": 1690523501
}
```
Here are the meanings of the fields:
| Field | Description | Example |
| :---- | :-------------------------------------- | :------------ |
| aud | The audience of this JWT | chainbase.com |
| exp | The expiry time. Unix timestamp format. | 1690523501 |
Step 4: Input your private key to generate the **Signature** component.
Congrats! Now you get the encoded JWT. You can verify your token by providing your public key to the JWT debugger.
### Send requests with JWT
After generating the JWT, you would need to add the JWT as a part of your request header `-H "Authorization: Bearer` entry.
```bash theme={null}
curl -X POST \
-H "Content-Type: application/json" \
-H "Authorization: Bearer " \
--data '{"jsonrpc": "2.0", "id": 1, "method": "eth_blockNumber", "params": []}' \
"https://ethereum-mainnet.s.chainbase.online/v1/"
```
In the event that the JWT feature has been activated but requests are sent without a JWT or with an invalid JWT, an HTTP **401** error status code will be returned along with the following response.
## FAQ
> Q: Which APIs are JWT supported on?
>
> A: JWT is supported on all Chainbase API services.
> Q: How do I discard a JWT before it expires?
>
> A: If your JWT might have been exposed and you want to prevent it from being used, you can remove the public key from the security tab.
> Q: Can I add multiple JWTs to a project?
>
> A: Yes. If multiple JWTs are active, the request should only match one of the available keys to succeed. Chainbase now supports up to 3 keys.
> Q: Which cipher does Chanbase support?
>
> A: RSA 256 (RS256) is supported at this time.
> Q: What expiration date should I choose?
>
> A: You can set any expiration date in the future you'd like. Generally, the shorter the expiration time, the more secure your JWT is.
Step 1: Choose **RS256** algorithm
Step 2: Paste the following JSON to the JWT tool to encode the **Header** component.
```json theme={null}
{
"alg": "RS256",
"typ": "JWT",
"kid": "e7af4467-00f1-480e-97d7-6490d7f749b9"
}
```
Here are the meanings of the fields:
| Field | Description | Example |
| :---- | :------------------------------- | :------ |
| alg | The signing algorithm being used | RS256 |
| typ | The type of the token | JWT |
| kid | The key id copied from Chainbase | XXX |
Step 3: Paste the following JSON to the JWT tool to encode the **Payload** component.
```json theme={null}
{
"aud": "chainbase.com",
"exp": 1690523501
}
```
Here are the meanings of the fields:
| Field | Description | Example |
| :---- | :-------------------------------------- | :------------ |
| aud | The audience of this JWT | chainbase.com |
| exp | The expiry time. Unix timestamp format. | 1690523501 |
Step 4: Input your private key to generate the **Signature** component.
Congrats! Now you get the encoded JWT. You can verify your token by providing your public key to the JWT debugger.
### Send requests with JWT
After generating the JWT, you would need to add the JWT as a part of your request header `-H "Authorization: Bearer` entry.
```bash theme={null}
curl -X POST \
-H "Content-Type: application/json" \
-H "Authorization: Bearer " \
--data '{"jsonrpc": "2.0", "id": 1, "method": "eth_blockNumber", "params": []}' \
"https://ethereum-mainnet.s.chainbase.online/v1/"
```
In the event that the JWT feature has been activated but requests are sent without a JWT or with an invalid JWT, an HTTP **401** error status code will be returned along with the following response.
## FAQ
> Q: Which APIs are JWT supported on?
>
> A: JWT is supported on all Chainbase API services.
> Q: How do I discard a JWT before it expires?
>
> A: If your JWT might have been exposed and you want to prevent it from being used, you can remove the public key from the security tab.
> Q: Can I add multiple JWTs to a project?
>
> A: Yes. If multiple JWTs are active, the request should only match one of the available keys to succeed. Chainbase now supports up to 3 keys.
> Q: Which cipher does Chanbase support?
>
> A: RSA 256 (RS256) is supported at this time.
> Q: What expiration date should I choose?
>
> A: You can set any expiration date in the future you'd like. Generally, the shorter the expiration time, the more secure your JWT is.