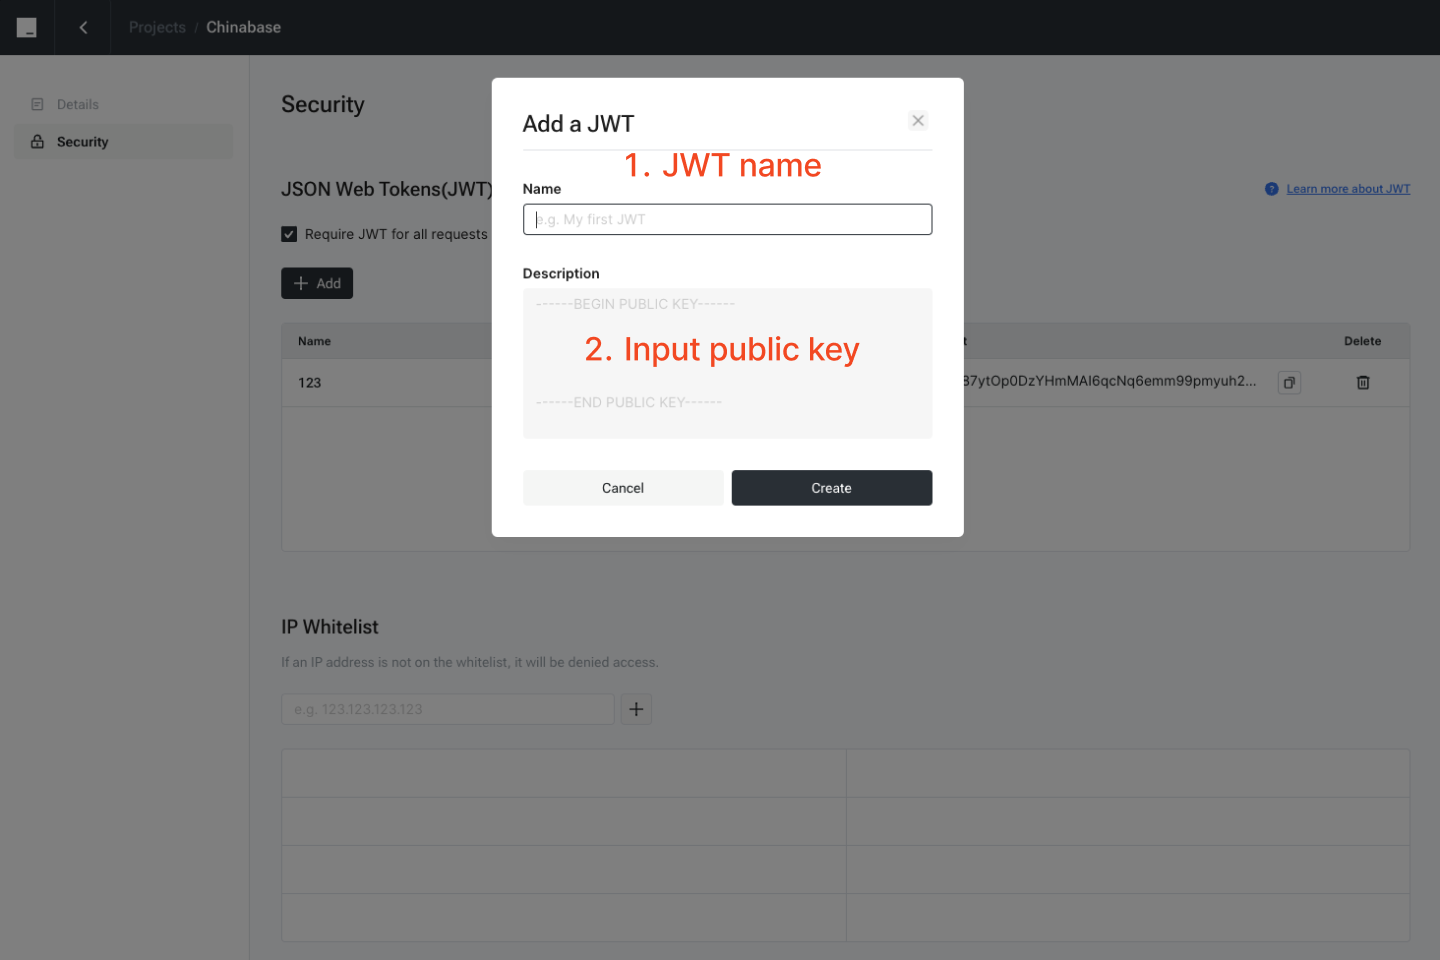
 ### Enable JWT feature
After enabling the JWT feature, it is mandatory to include the JWT in the header of all subsequent requests.
### Enable JWT feature
After enabling the JWT feature, it is mandatory to include the JWT in the header of all subsequent requests.
 ### Generate the JWT
To generate a JWT, the following components are required: **Header**, **Payload**, and **Signature**.
An example of how to generate a JWT using [https://jwt.io/](https://jwt.io/) is provided below.
### Generate the JWT
To generate a JWT, the following components are required: **Header**, **Payload**, and **Signature**.
An example of how to generate a JWT using [https://jwt.io/](https://jwt.io/) is provided below.
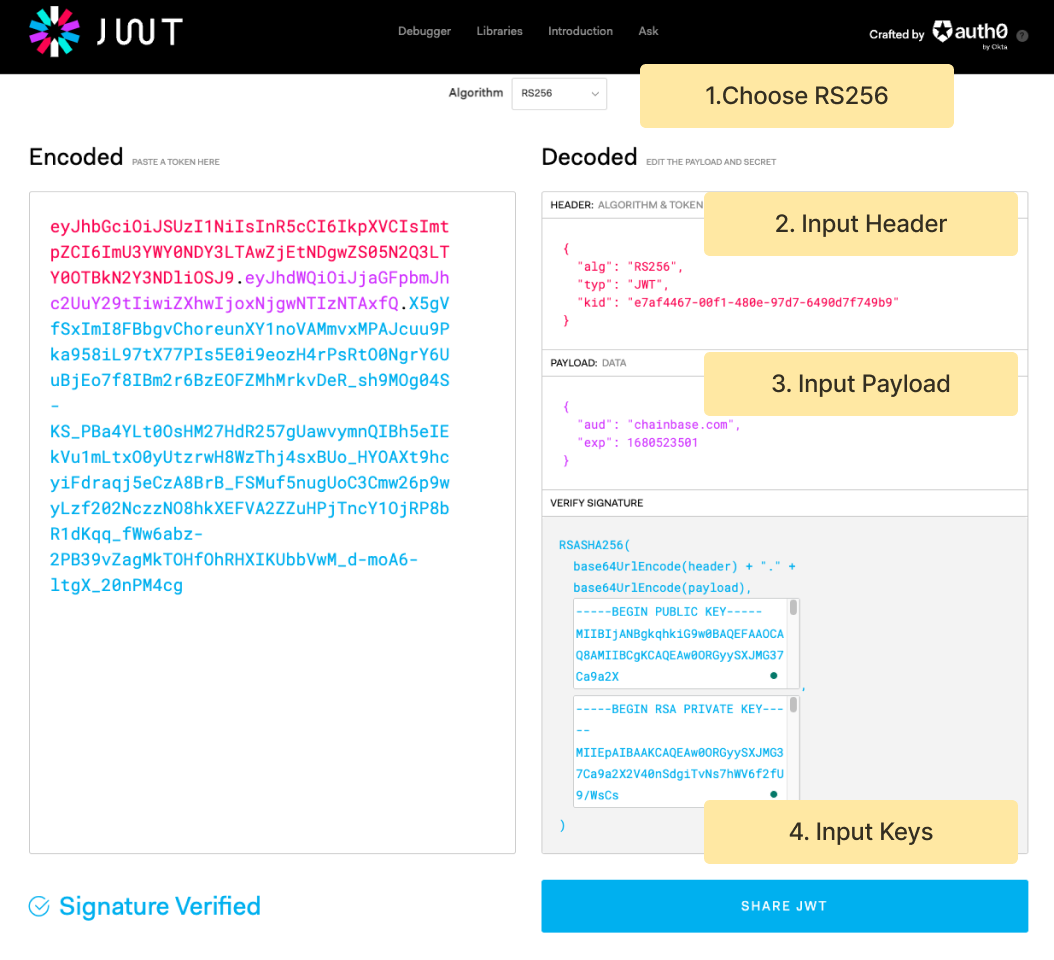 Step 1: Choose **RS256** algorithm
Step 2: Paste the following JSON to the JWT tool to encode the **Header** component.
```json
{
"alg": "RS256",
"typ": "JWT",
"kid": "e7af4467-00f1-480e-97d7-6490d7f749b9"
}
```
Here are the meanings of the fields:
| Field | Description | Example |
| :---- | :------------------------------- | :------ |
| alg | The signing algorithm being used | RS256 |
| typ | The type of the token | JWT |
| kid | The key id copied from Chainbase | XXX |
Step 3: Paste the following JSON to the JWT tool to encode the **Payload** component.
```json
{
"aud": "chainbase.com",
"exp": 1690523501
}
```
Here are the meanings of the fields:
| Field | Description | Example |
| :---- | :-------------------------------------- | :------------ |
| aud | The audience of this JWT | chainbase.com |
| exp | The expiry time. Unix timestamp format. | 1690523501 |
Step 4: Input your private key to generate the **Signature** component.
Congrats! Now you get the encoded JWT. You can verify your token by providing your public key to the JWT debugger.
### Send requests with JWT
After generating the JWT, you would need to add the JWT as a part of your request header `-H "Authorization: Bearer` entry.
```bash
curl -X POST \
-H "Content-Type: application/json" \
-H "Authorization: Bearer
Step 1: Choose **RS256** algorithm
Step 2: Paste the following JSON to the JWT tool to encode the **Header** component.
```json
{
"alg": "RS256",
"typ": "JWT",
"kid": "e7af4467-00f1-480e-97d7-6490d7f749b9"
}
```
Here are the meanings of the fields:
| Field | Description | Example |
| :---- | :------------------------------- | :------ |
| alg | The signing algorithm being used | RS256 |
| typ | The type of the token | JWT |
| kid | The key id copied from Chainbase | XXX |
Step 3: Paste the following JSON to the JWT tool to encode the **Payload** component.
```json
{
"aud": "chainbase.com",
"exp": 1690523501
}
```
Here are the meanings of the fields:
| Field | Description | Example |
| :---- | :-------------------------------------- | :------------ |
| aud | The audience of this JWT | chainbase.com |
| exp | The expiry time. Unix timestamp format. | 1690523501 |
Step 4: Input your private key to generate the **Signature** component.
Congrats! Now you get the encoded JWT. You can verify your token by providing your public key to the JWT debugger.
### Send requests with JWT
After generating the JWT, you would need to add the JWT as a part of your request header `-H "Authorization: Bearer` entry.
```bash
curl -X POST \
-H "Content-Type: application/json" \
-H "Authorization: Bearer 

| Chain |
|---|
| Blast |
| Fantom |
| Avalanche |
| Flare |
| Bnb |
| Base |
| Bsc |
| Mantle |
| Linea |
| Solana |
| Arbitrum |
| Optimism |
| Tron |
| Bitcoin |
| Polygon |
| Gnosis |
| Chain |
|---|
| Ethereum |
| Polygon |
| BSC |
| Avalanche |
| Arbitrum One |
| Optimism |
| Base |
| zkSync |
| **Ecosystem** | **Blockchains Supported** | **Raw Data** | **Freshness** |
|---|---|---|---|
| **EVM** | Ethereum | ✔ | \<3s |
| Binance Smart Chain (BSC) | ✔ | \<5s | |
| Polygon | ✔ | \<5s | |
| Avalanche (C-Chain) | ✔ | \<5s | |
| Fantom | ✔ | \<8s | |
| Tron | ✔ | \<10s | |
| **EVM Layer 2** | Arbitrum | ✔ | \<5s |
| Optimism | ✔ | \<5s | |
| Base | ✔ | \<5s | |
| Blast | ✔ | \<5s | |
| ZkSync | ✔ | \<5s | |
| **Non EVM** | Bitcoin | ✔ | \<60s |
| Sui | ✔ | \<10s | |
| Ton | ✔ | \<10s | |
| Merlin | ✔ | \<30s | |
| *Solana\** | \* | \* |
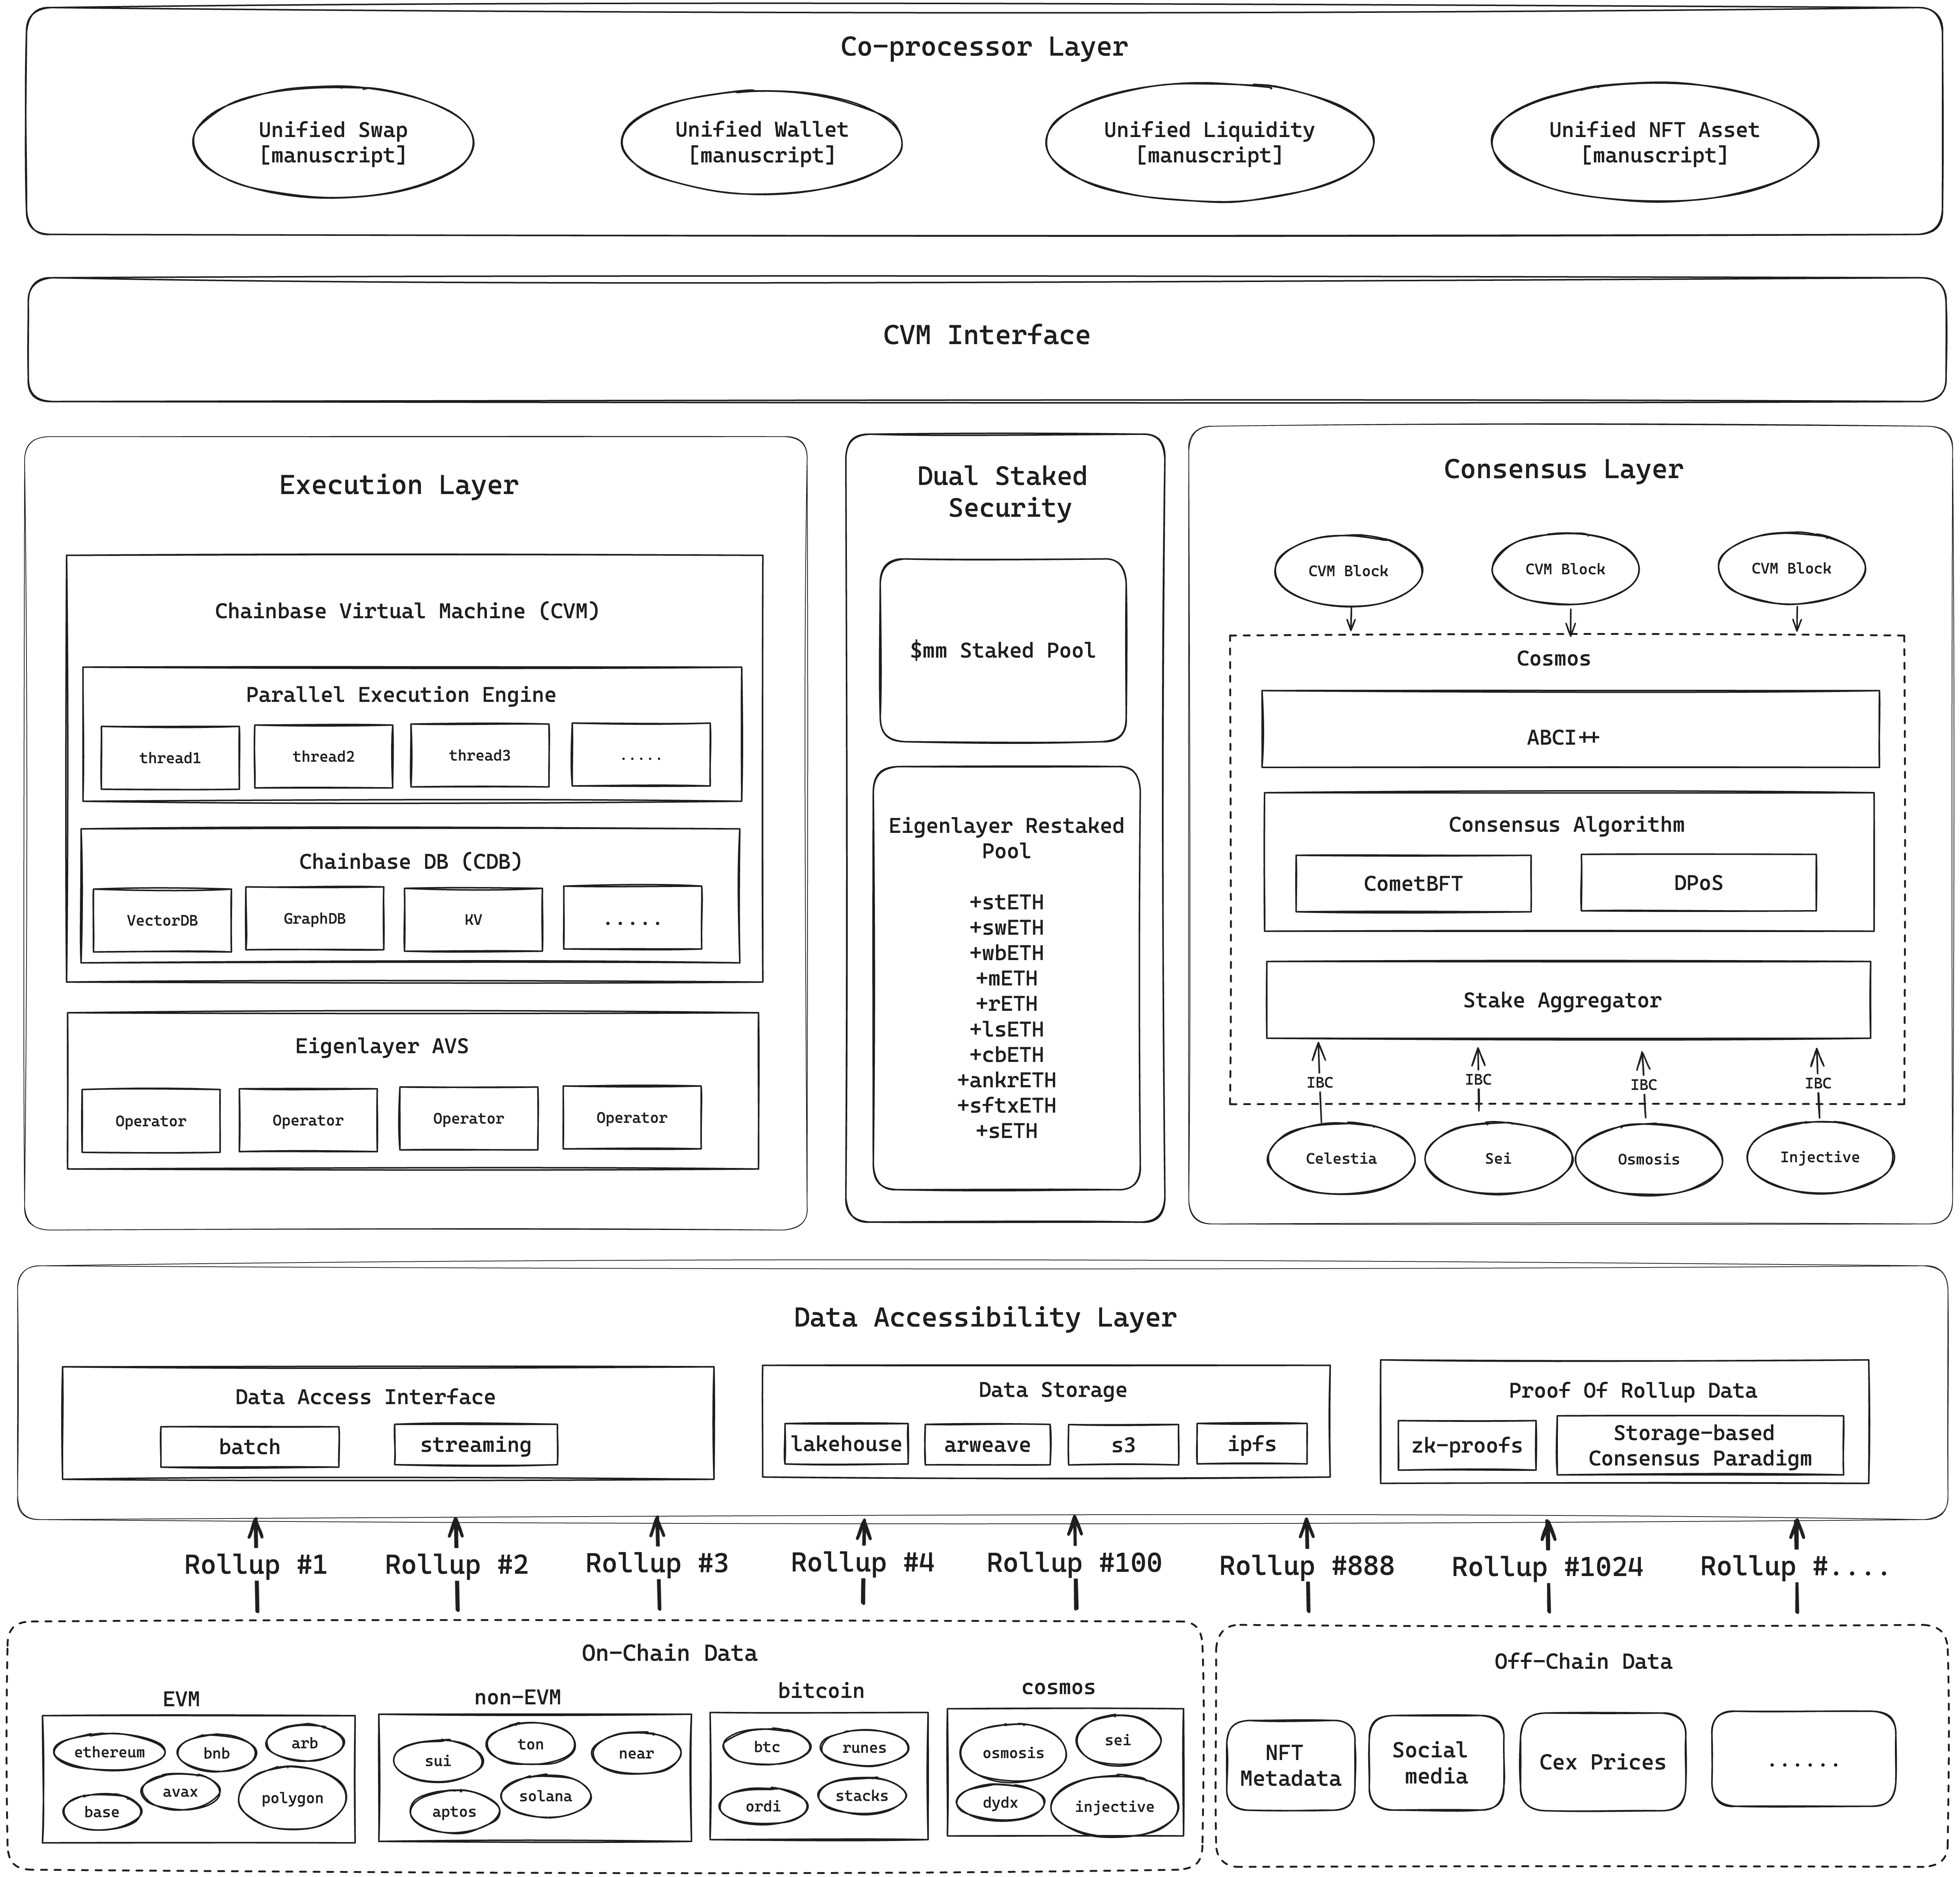 # Module Introduction
### **Data Accessibility Layer**
[Data Accessibility Layer](/core-concepts/architecture/data_accessibility_layer) manages data access and storage in the network, is compatible with data access interfaces for both streaming and batch scenarios, and provides data validity verification. It includes:
* **Data Access Interface:** Provides access to both batch and streaming data.
* **Data Storage:** Supports various storage solutions, including Lakehouse, Arweave, S3, and IPFS.
* **Data Proof:** Implements zk-proofs and storage-based consensus paradigms to ensure data integrity and availability.
### **Consensus Layer**
[Consensus Layer](/core-concepts/architecture/consensus_layer) ensures that all nodes in the network reach a consensus on data and status consistency, based on CometBFT's instant finality, achieving second-level data freshness. Including:
* **Consensus Algorithm:** Based on CometBFT and DPoS (Delegated Proof of Stake) to achieve efficient and secure consensus.
* **ABCI++:** An extension of Cosmos network's ABI, responsible for converting the state of the Chainbase Virtual Machine (CVM) to a format compatible with the CometBFT consensus engine.
* **Stake Aggregator:** Aggregates staked tokens from various Cosmos ecosystem sources to ensure network security.
### **Execution Layer**
[Execution Layer](/core-concepts/architecture/execution_layer) is responsible for large-scale data processing and execution of Manuscripts' data transformation logic. Including:
* **Chainbase Virtual Machine (CVM):** A virtual machine that provides parallel computing capabilities to execute Manuscripts
* **Parallel Execution Engine:** Utilizes multithreading for parallel data processing, enhancing performance and throughput.
* **ChainbaseDB (CDB):** A database system that supports multiple data storage engines, including VectorDB, GraphDB, and KV storage.
* **Eigenlayer AVS (Proof Verification System):** Introducing the Ethereum economic security brought by Restake, making the CVM running environment fully decentralized
### **Co-processor Layer**
Chainbase has introduced the [Co-processor Layer](/core-concepts/architecture/co_processor_layer) to facilitate user collaboration in data processing and AI expertise. This layer allows users to transform their specialized knowledge into tradeable assets, managed and incentivized through the \$C token system, creating a dynamic ecosystem. This design enhances data accessibility and encourages developer collaboration, accumulating knowledge and generating collective intelligence, thereby unlocking greater potential for blockchain technology.
### **Dual Staked Security**
This module enhances the network security of the consensus layer and execution layer in the dual-chain architecture through a double staked mechanism. Including:
* Shared Staked Pool:
* Native Token Stake: \$C native token captures network value
* Eigenlayer Restake: Introduces Ethereum tokens with low volatility and deep liquidity
* Double Staked Model: By aggregating all validators' stake and their power mapping for various assets, the total cryptographic economic security is calculated.
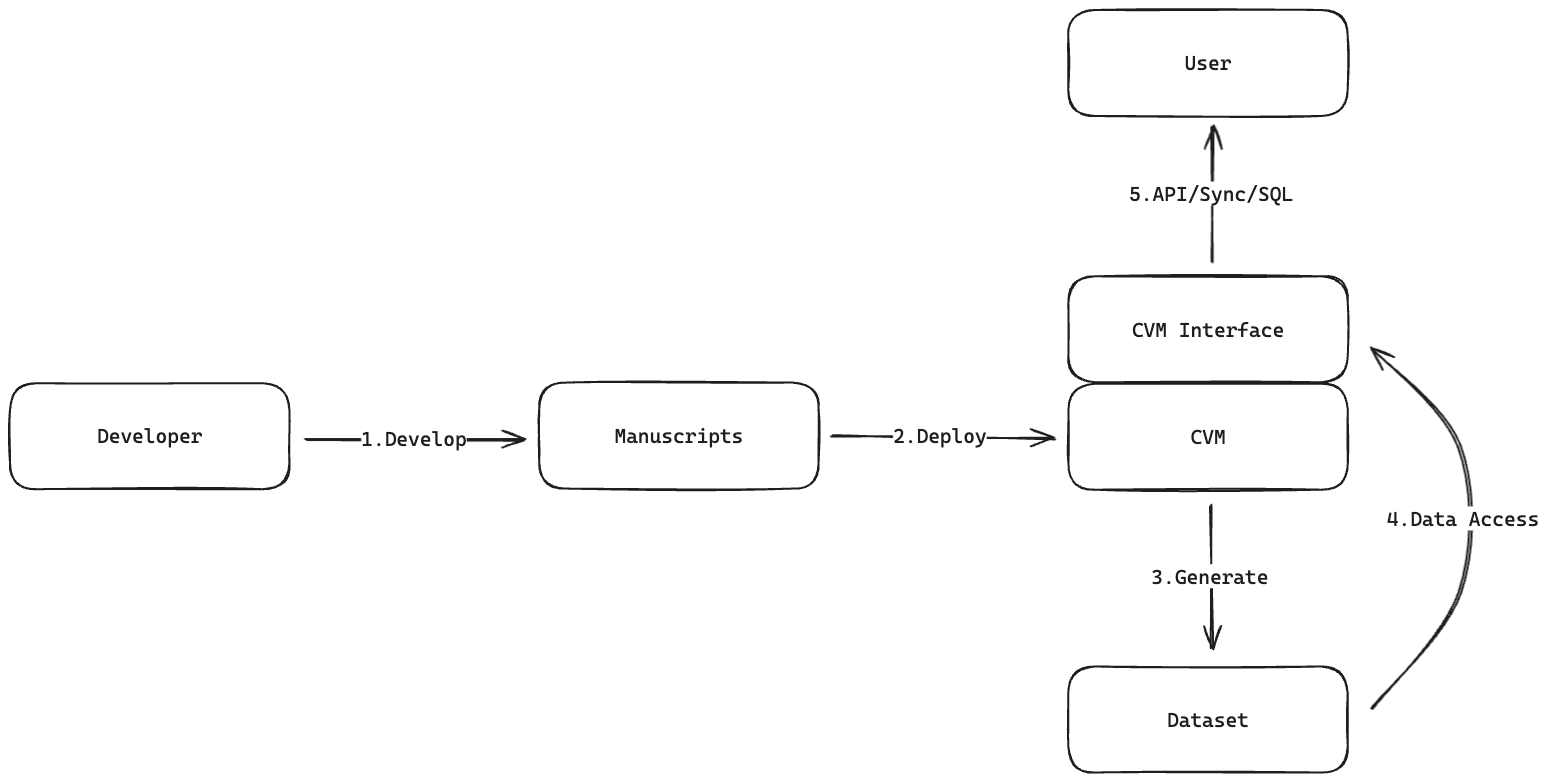
### Manuscript
[Manuscript](/core-concepts/manuscript/overview) defines the standard schema that different data sources need to follow when converting into datasets.
### CVM Interface
The CVM Interface provides a set of standardized interface protocols for interacting and communicating with CVM, allowing developers to write and manage Manuscripts on the network, as well as access Dataset in the data network.
# Chainbase Network AVS Design
Source: https://docs.chainbase.com/core-concepts/avs-design
## **Overview**
EigenLayer's AVS is a cornerstone of its high-performance execution layer. Details to be specified [here](/core-concepts/data-processing-based-on-avs).
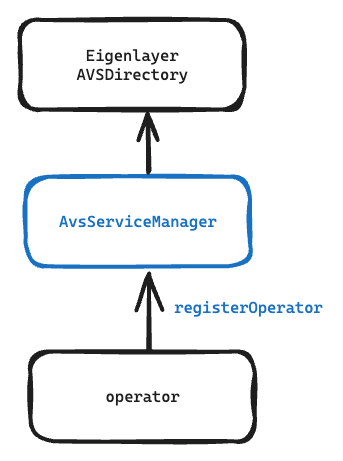
## **Integration with EigenLayer Core (AVS Directory)**
To integrate with EigenLayer Core, Chainbase Network implements an instance of ECDSAServiceManagerBase or ServiceManagerBase (BLS). This integration allows operators to register by sending transactions to the AvsServiceManager, completing the registration process
## **On-Chain Verification Challenges**
Chainbase Network requires a stable and efficient group of operators to form a decentralized and trusted data processing network. The Coordinator component needs a mechanism to measure the operational quality of these operators, ensuring they meet the network's standards. This is achieved through an on-chain consensus game involving slashing for non-compliance.
The Coordinator periodically generates a challenge task, which involves calculating the block hash of a specific block within the blockchain data integrated into Chainbase Network. This task has a clear answer and expected outcome. The challenge is sent to operators' manuscript-node nodes, where they execute the task and return the signed result along with the recorded task execution time. This information is used to evaluate the operators' efficiency, and the results are verified on the AVS chain.
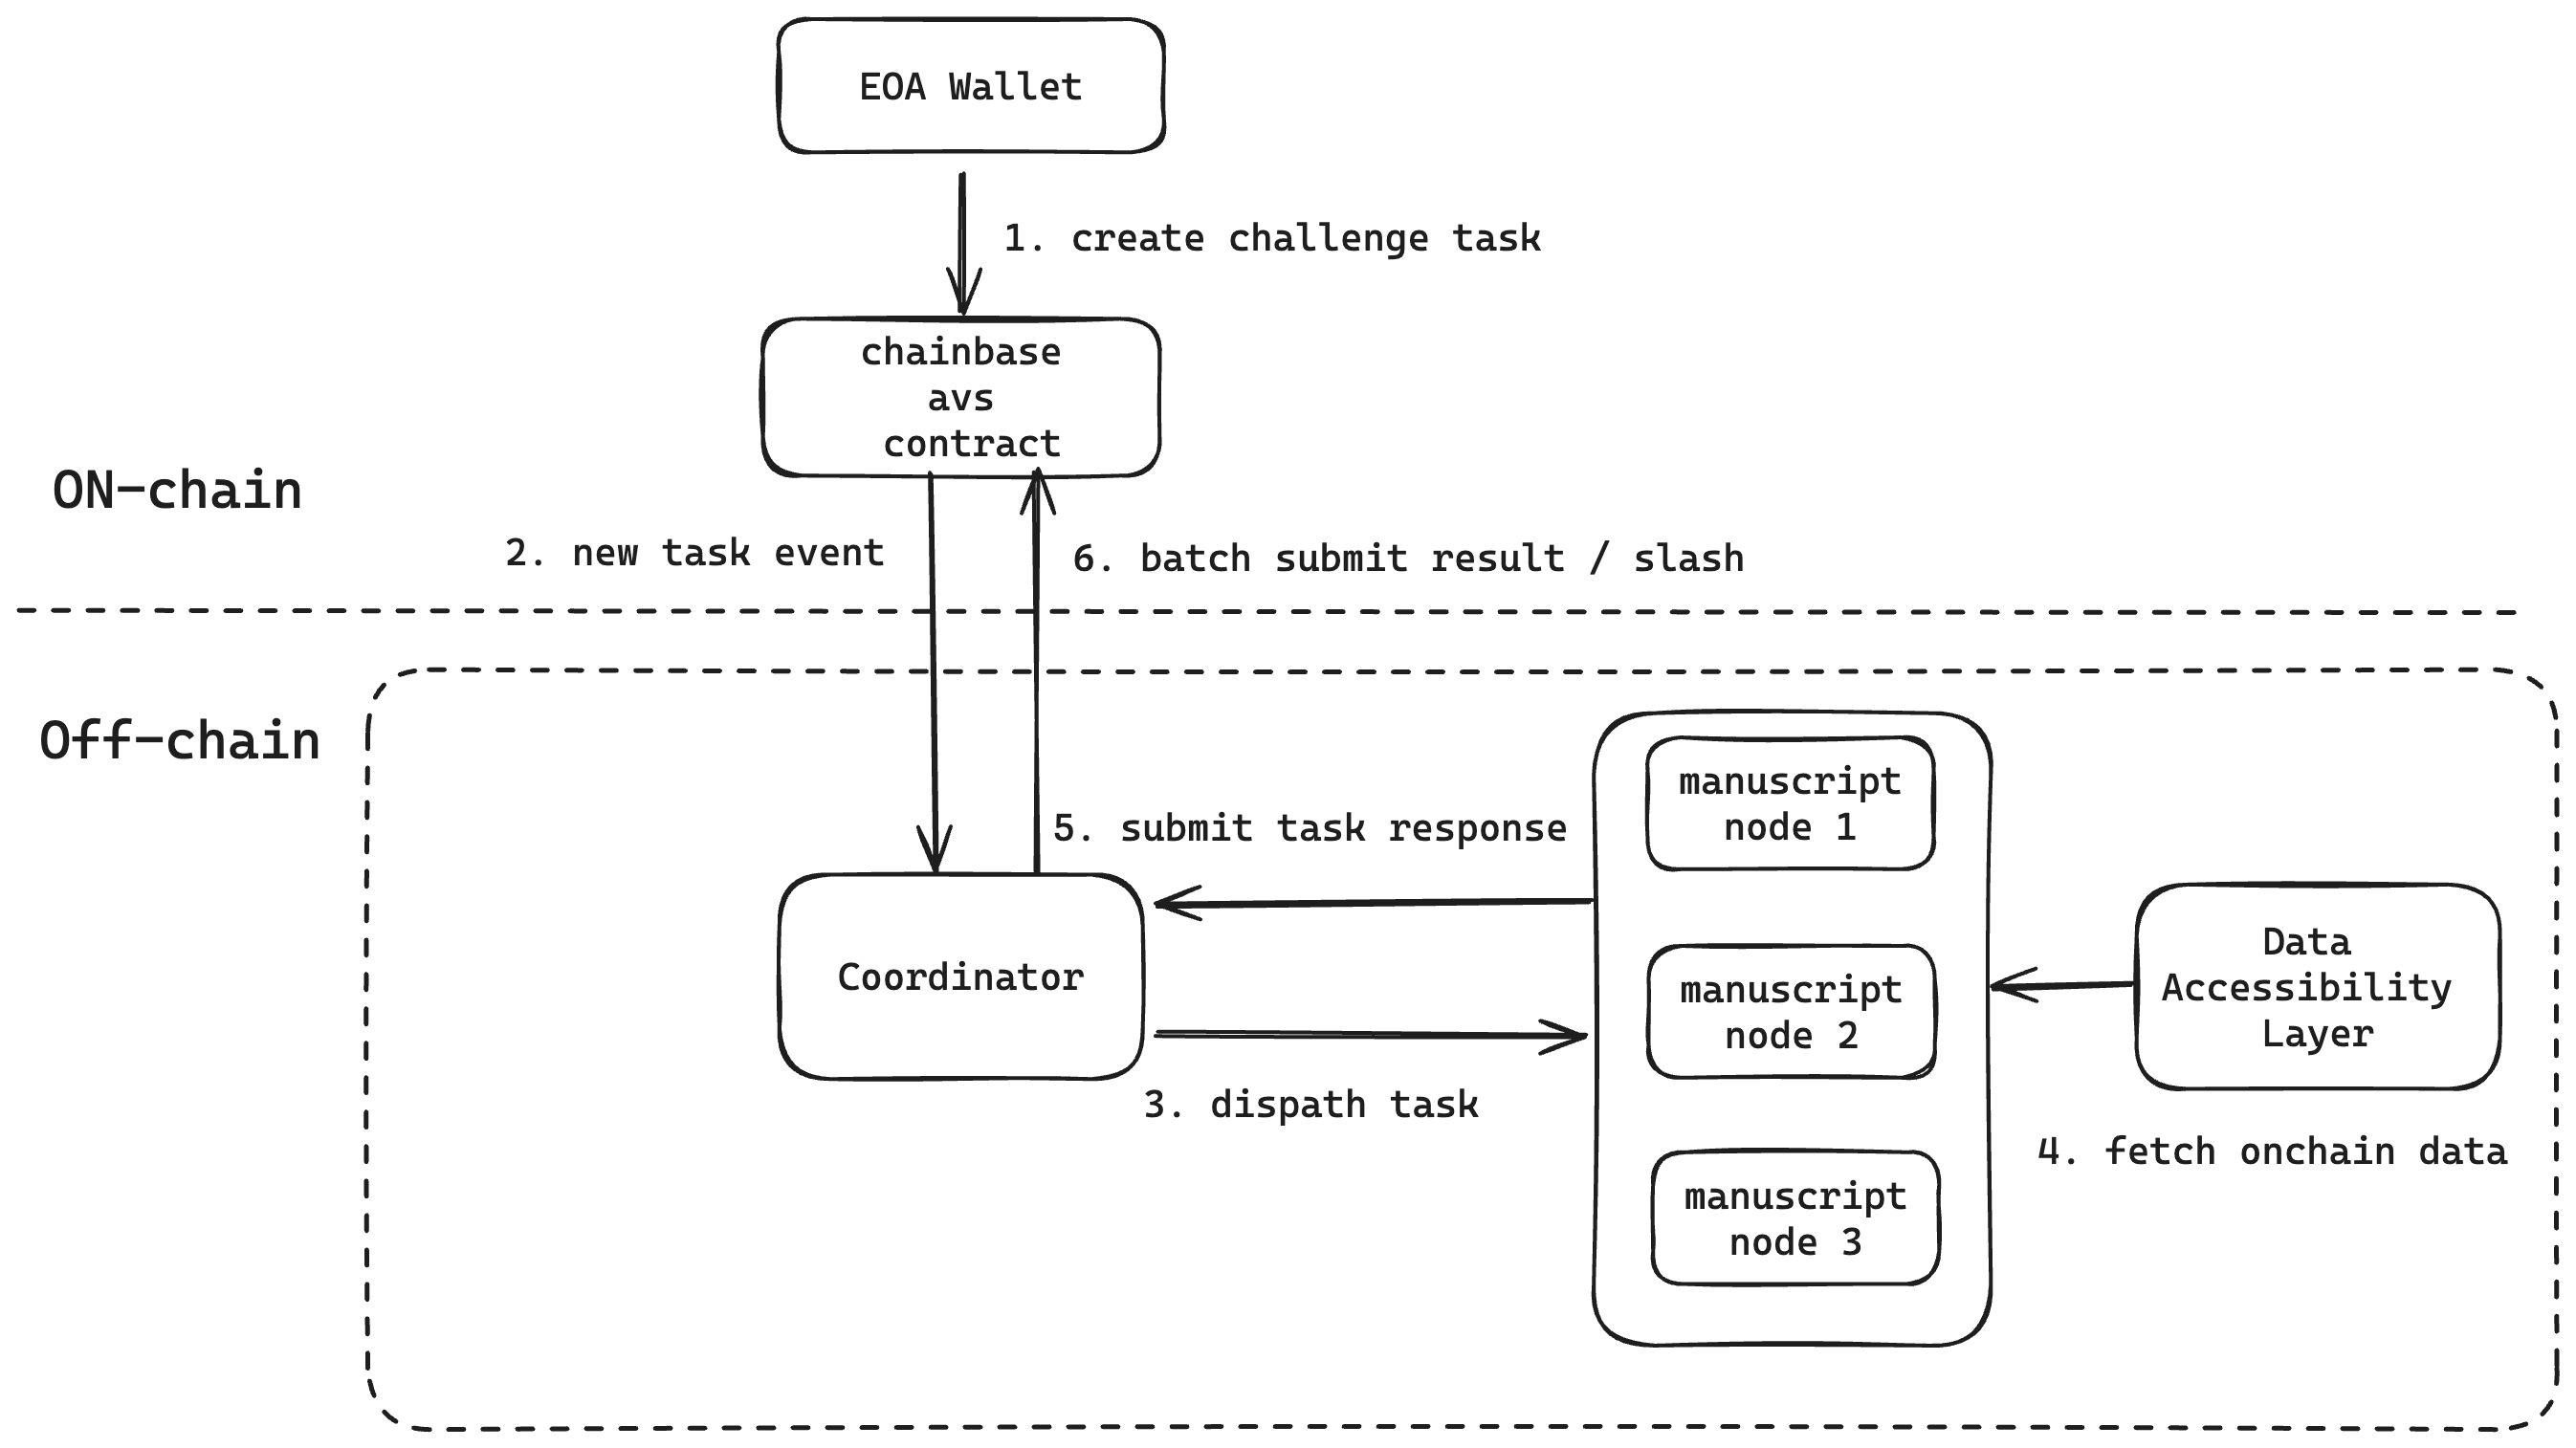
## **Implementation Details**
**Coordinator:**
1. Listens to the on-chain contract `ChainbaseServiceManager` events.
2. Sends tasks to `Manuscript Node` via an RPC interface.
3. Receives task responses from `Manuscript Node` via the RPC interface.
4. Aggregates responses from multiple `Manuscript Nodes` and submits the results to the on-chain contract `ChainbaseServiceManager`.
**Manuscript Node:**
1. Registers the operator by calling `RegisteryCoordinator`.
2. Receives tasks from the Coordinator via the RPC interface.
3. Executes tasks, signs the task response.
4. Sends the signed task response back to the Coordinator.
**Contracts:**
1. The `ChainbaseServiceManager` contract includes functions for `createNewTask` and `respondToTask`, facilitating the creation of tasks and the submission of task responses for verification.
# Data Processing Based on AVS
Source: https://docs.chainbase.com/core-concepts/data-processing-based-on-avs
## **Overview**
Chainbase Network is an hyperdata network powered by a [dual-chain](/core-concepts/dual-chain) architecture using Cosmos and EigenLayer, enabling trustworthy and transparent on-chain data processing. Through the [Manuscript protocol](/core-concepts/manuscript) on the Chainbase Virtual Machine (CVM), the network ensures seamless data interoperability. By integrating [EigenLayer’s](https://www.eigenlayer.xyz/) staking mechanism, Chainbase leverages Ethereum's economic security to build a high-performance AVS for its [Execution Layer](/core-concepts/architecture/execution_layer). This ensures large-scale data processing while maintaining security, decentralization, and scalability, supporting the growing demands of blockchain applications.
## Execution layer node based on AVS
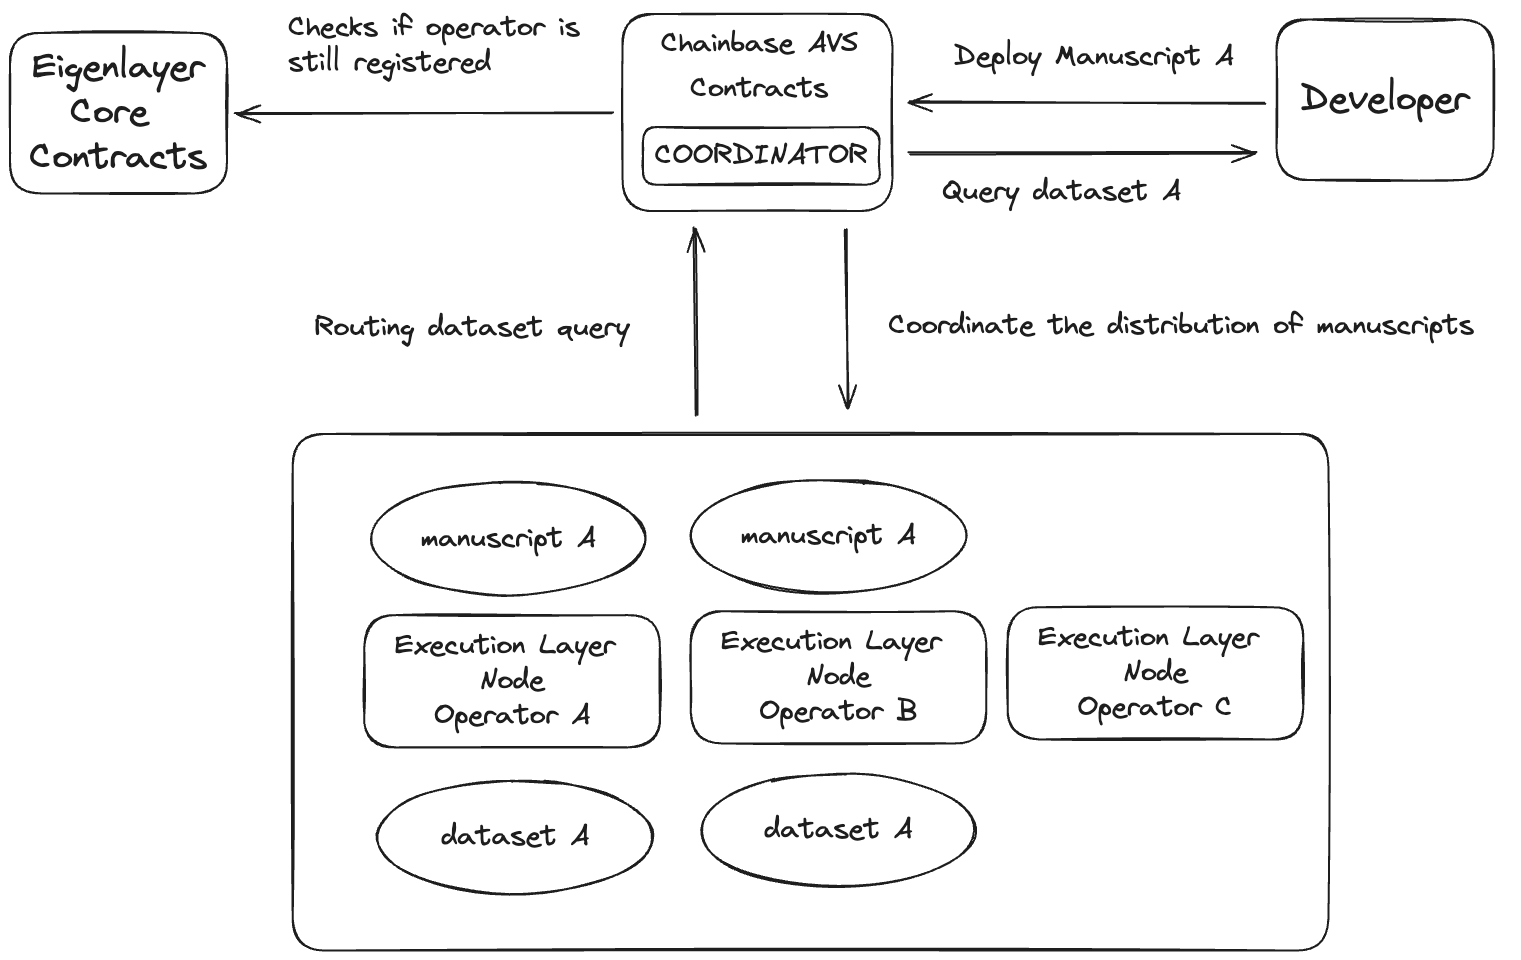
The execution layer nodes of Chainbase Network are built on EigenLayer, providing users with a node network for on-chain data processing. Developers can submit Manuscript data processing programs and request the final result dataset. EigenLayer operators with computational resources can restake and register as execution layer nodes of Chainbase Network, providing the required computing resources. As Chainbase Network integrates data query fees, restakers will generate income from it.
As more and more Manuscripts run on Chainbase Network, more high-quality computing resources are needed. To achieve elastic scaling of resources while maintaining high throughput, on-chain computing tasks need to be routed to the best provider according to the running preferences of Manuscript. Key factors include node geographic location (latency), computing hardware, and network environment. EigenLayer will support Chainbase Network through diversified operators and routing strategies to meet these needs.
### **Summary**
Chainbase Network is a full-chain data network supported by the dual-chain architecture of Cosmos and EigenLayer, aiming to provide a trustworthy and transparent data processing environment. To achieve interoperability, the Manuscript protocol was developed and runs on the Chainbase Virtual Machine (CVM), designed for large-scale data processing.
By combining EigenLayer's staking mechanism, Chainbase Network enhances economic and safety guarantees and builds a high-performance execution layer. EigenLayer operators can register as nodes of Chainbase Network, provide computing resources, and profit through integrated data query fees.
With the increase of Manuscript operations, the system needs more high-quality computing resources, and EigenLayer provides diversified operators and routing strategies to support this demand.
# Dual-Chain
Source: https://docs.chainbase.com/core-concepts/dual-chain
### Consensus Layer + Execution Layer

Chainbase introduces an innovative dual-chain architecture that enhances the programmability and composability of cross-chain data, supporting high throughput, low latency, and finality. This architecture achieves higher network security through a dual staking model.
#### What Does the Dual-Chain Architecture Bring?
1. **Performance Optimization**: As the largest distributed data engine of the future, it needs to support high-throughput data processing. The CVM in the Execution Layer supports parallel computing capabilities, while the Consensus Layer utilizes CometBFT optimized for performance.
2. **Programmability**: Manuscripts define the standard schema that different data sources need to follow when converting into datasets. The redesigned Execution Layer provides a runtime environment for these Manuscripts.
3. **Composability**: The redesigned Execution Layer can handle data streams from multiple sources for joint processing. For example, aggregating data sources from various chain lending protocols can create a universal lending rate.
4. **Enhanced Crypto-Economic Security**: Traditional public chain projects often compromise security to optimize performance and compatibility. By introducing the dual-chain architecture of Eigenlayer and Cosmos, Chainbase incorporates a dual staking model, ensuring game-theoretic security for the hyperdata network.
#### Consensus Layer
The Consensus Layer ensures data and state consistency among all nodes in the network. Its main advantages include:
* **Instant Finality**: Using CometBFT, once data is processed and included in a block, it is considered final visible data without the need for additional confirmations or data reorganization.
* **Proven Robustness**: CometBFT is battle-tested and has successfully protected billions of dollars across various blockchain networks, proving its robustness and reliability.
#### Execution Layer
The Execution Layer excels in large-scale data processing and complex data transformation tasks. Its main advantages include:
* **Parallelization**: Through data parallelism and task parallelism, the Execution Layer can handle large-scale data, enhancing overall performance and throughput.
* **Decentralized Environment Based on Eigenlayer AVS**: The introduction of Eigenlayer not only enhances the system's decentralization but also provides additional economic security, balancing high performance and high security in the Execution Layer.
* **Programmable Runtime Environment**: By providing a powerful computational logic execution environment, the Execution Layer offers developers an efficient and flexible platform that supports complex data processing tasks and application scenarios.
### Conclusion
Through its innovative dual-chain architecture, Chainbase successfully combines the advantages of the Consensus Layer and the Execution Layer to achieve high performance, low latency, and finality. This architecture not only enhances the network's programmability and composability but also provides higher economic security through a dual staking model. With instant transaction finality and proven robustness, Chainbase sets new standards in blockchain performance and interoperability, providing a solid foundation for data processing and applications in the AI era.
# Dual-Staking
Source: https://docs.chainbase.com/core-concepts/dual-staking
# Why dual staking?
* Early PoS (Proof of Stake) networks can face a "death spiral" problem. If the token's value decreases, it weakens the network's security, leading to a decline in Total Value Locked (TVL), which further depresses the token price, thus creating a death spiral.

capture:[https://www.blog.eigenlayer.xyz](https://www.blog.eigenlayer.xyz)
# How it works
Protect the same PoS network using two tokens, one of which can be a low-volatility, deep-liquidity, more accessible external network token such as Ethereum (ETH). Also use network native tokens to capture network value
# Different method
**Modular Dual Staking**: Local operators and ETH-backed operators are required to reach a quorum respectively.
**Native Dual Staking**: Similar to mesh security, two sets of operators are treated as one, each operator's stake is converted into unified units based on an external oracle, and the user then validates the response based on the combined quorum.
**Veto Dual Staking**: The local operator is first individually quorate and the ETH-backed operator acts as a safeguard to check the behavior of the local operator. If the local operator makes a mistake, the ETH-supported operator has the right to veto a valid response sent by them.
### Impl architecture
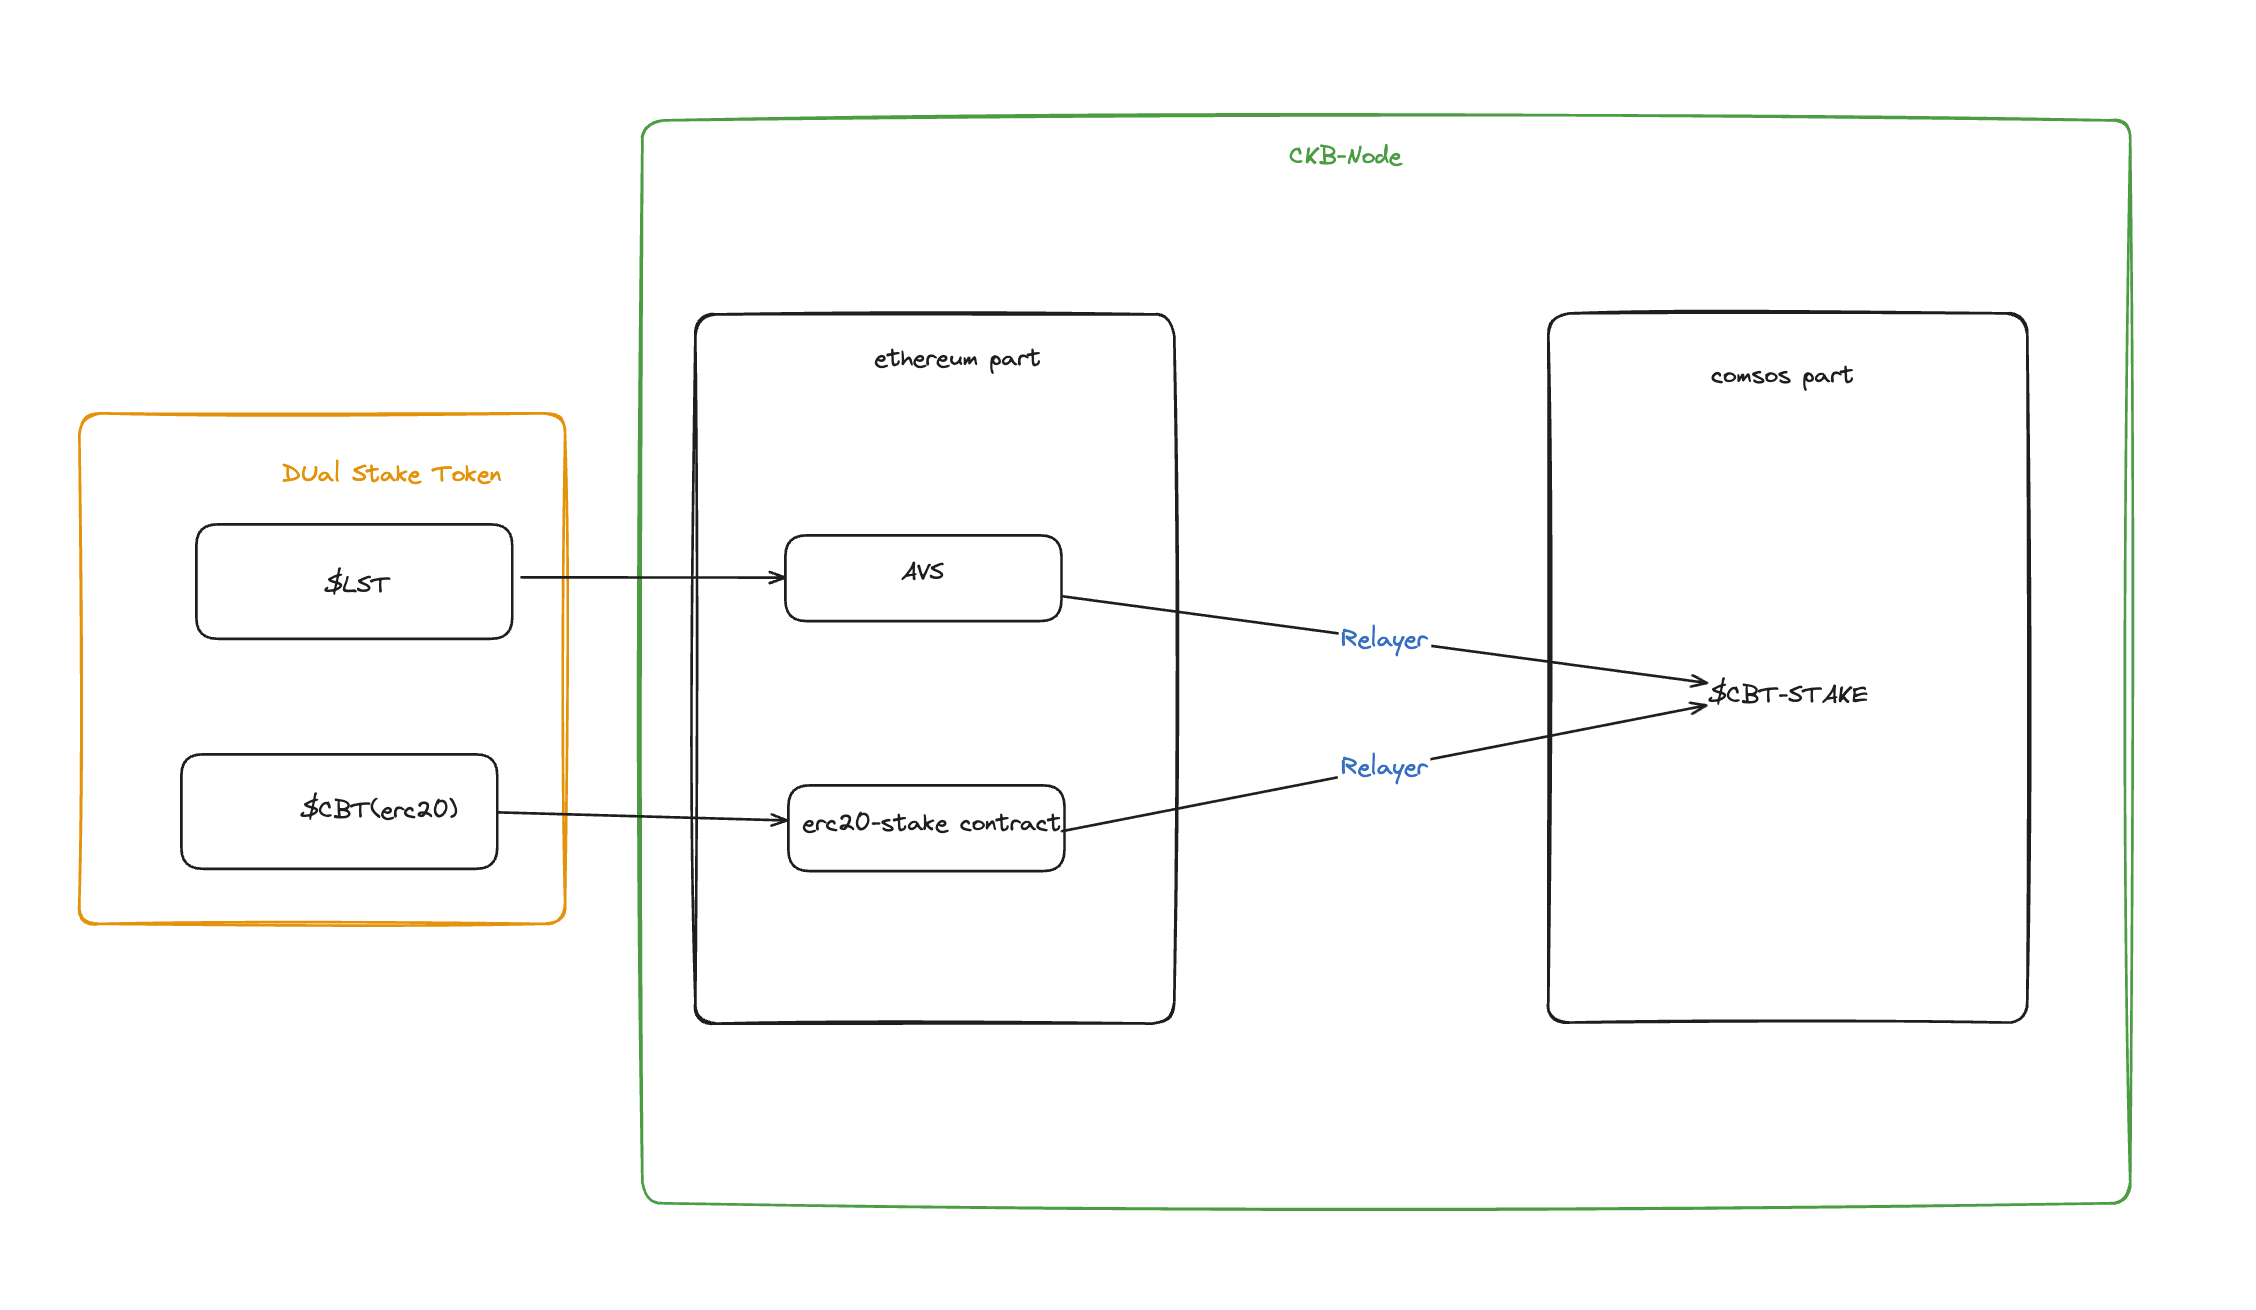
1. support LST && native token stake
for supported LST please check:[https://app.eigenlayer.xyz/restake](https://app.eigenlayer.xyz/restake)
\$C is our native token, for more detail TBD
2. how to manage stake token
* for LST part, staker first stake to operator then operator register to our AVS. offline relayer watch && sync avs’s operator stake & delegations(eg.`sync(CainbaseAVS.Operator[] calldata operators`)) info with cosmos part(maybe call xxx chain ?)
* For the \$C part, stakers interact with erc20-stake contract to emit a `Stake(bytes operator_pubkey, uint256 amount)` event. The relayer then watches for this event and syncs the information with the Cosmos part.
* We choose the Native Dual Staking model where an oracle ensures fair price conversion of both `$LST` and `$C` into `$C-Stake` units.
# **Reference**
* [Eigenlayer:Dual Staking: secure a PoS network with two tokens](https://www.blog.eigenlayer.xyz/dual-staking/)
* [osmosis-labs:Mesh Security Architecture](https://github.com/osmosis-labs/mesh-security/blob/main/docs/README.md)
* [dual staking and Espresso](https://youtu.be/o9y_pZUr0Nc?t=1727)
* [You Could've Invented EigenLayer | Kydo 0x - Eigen Labs](https://youtu.be/fCl_PucMytU?si=afSo2MK5oWJPeE69)
# Glossary
Source: https://docs.chainbase.com/core-concepts/glossary
## Common Terms
* ⚗️**Alchemist** - a developer or technical contributor who creates, manipulates, or alters manuscripts.
* 📜**Manuscript** - an executable that runs on the Chainbase Virtual Machine (CVM). Manuscripts define the standard schema that different data sources need to follow when converting into datasets.
* ⚙️**Chainbase Virtual Machine (CVM)** - a virtual execution environment, complete with interface, that allows for the execution of sophisticated data queries.
* 💾**Data Set -** a structured collection of aggregated, validated, and indexed data comprised of data tables and stored in the Chainbase Warehouse.
* 🏭**Chainbase Warehouse** - a storeplace for all pre-built datasets on the Data Platform.
* 💽**Data Network** - the intersection of CVM/Eigenlayer AVS (execution), IBC, ABCI++, and CometBFT (consensus), with a proprietary Data Availability Layer composed of roll ups/network participants.
* 💿**Data Platform** - the suite of developer tools which allow streamlined access to information available on the Data Network.
* 🤖**TheiaChat** - an AI agent, based on Theia, offering streamlined access point to the data network with built-in knowledge bases.
* 🗺️**Theia** - the proprietary Crypto World Model which uses causal reasoning on crypto patterns to create verifiable reasoning chains on crypto data.
# 4. Advanced Options
Source: https://docs.chainbase.com/core-concepts/manuscript/QuickStart/advanced_options
# Overview
The datasets in the Chainbase Network is like base metals, and the alchemists (developers) can use Manuscripts to process this data, extracting greater value from the existing data.
# Protocol
Chainbase Network is committed to making data (on-chain & off-chain) more accessible, so Manuscripts allow users and developers to query and process data using SQL.
Manuscripts mainly consist of two parts.
* Schema: The definition of dataset.
* Operators: The extract, transform, and load methods which being used to extract greater value from the existing data.
## Schema
Schema can be defined like this.
```sql
CREATE TABLE ethereum.blocks (
block_number bigint NOT NULL COMMENT 'Block number uniquely identifying the block',
hash varchar(66) NOT NULL COMMENT 'Hash value representing the unique identity of the block(with bloom filter)',
parent_hash varchar(66) NOT NULL COMMENT 'Hash value of the parent block(with bloom filter)',
nonce varchar(78) COMMENT 'Nonce value associated with the block',
sha3_uncles varchar(66) NOT NULL COMMENT 'SHA3 hash of the blocks uncle data(with bloom filter)',
logs_bloom varchar COMMENT 'Logs bloom filter for events emitted in transactions',
transactions_root varchar(66) NOT NULL COMMENT 'Root hash of the Merkle Patricia Trie for transactions(with bloom filter)',
state_root varchar(66) NOT NULL COMMENT 'Root hash of the Merkle Patricia Trie for the state(with bloom filter)',
receipts_root varchar(66) NOT NULL COMMENT 'Root hash of the Merkle Patricia Trie for receipts(with bloom filter)',
miner varchar(42) NOT NULL COMMENT 'Address of the miner who mined the block(with bloom filter)',
difficulty varchar(78) NOT NULL COMMENT 'Difficulty value representing the mining difficulty',
total_difficulty varchar(78) COMMENT 'Total accumulated difficulty of the blockchain',
size bigint COMMENT 'Size of the block in bytes',
extra_data varchar NOT NULL COMMENT 'Extra data included in the block',
gas_limit varchar(78) COMMENT 'Maximum gas limit allowed for transactions in the block',
gas_used varchar(78) COMMENT 'Total gas used by transactions in the block',
block_timestamp timestamp(3) NOT NULL COMMENT 'Timestamp of when the block was mined',
transaction_count bigint COMMENT 'Number of transactions included in the block',
base_fee_per_gas varchar(78) COMMENT 'Base fee per gas unit for transactions in the block',
withdrawals_root varchar(66) COMMENT 'Root hash of the Merkle Patricia Trie for withdrawals',
parent_beacon_block_root varchar COMMENT 'The hash tree root of the parent beacon block for the given execution block',
excess_blob_gas bigint COMMENT 'The blob gas pricing.',
blob_gas_used bigint COMMENT 'The total amount of blob gas consumed by transactions in the block'
);
```
Developers need to define the schema of the result table, including field names, field types, and field descriptions.
## Data Types
| Data Type | Remarks for Data Type |
| --------------- | ----------------------------------- |
| `CHAR` | |
| `VARCHAR` | |
| `STRING` | |
| `BOOLEAN` | |
| `BINARY` | |
| `VARBINARY` | |
| `BYTES` | |
| `DECIMAL` | Supports fixed precision and scale. |
| `TINYINT` | |
| `SMALLINT` | |
| `INTEGER` | |
| `BIGINT` | |
| `FLOAT` | |
| `DOUBLE` | |
| `DATE` | |
| `TIMESTAMP` | |
| `TIMESTAMP_LTZ` | |
## Operators
### SELECT & WHERE clause
The general syntax of the `SELECT` statement is:
```sql
select select_list from table_expression [where boolean_expression]
```
The `table_expression` refers to any data set in Chainbase Network. It could be an existing table, or VALUES clause, the joined results of multiple existing tables, or a subquery. The following would read all rows from `blocks`.
```sql
select * from blocks;
```
The `select_list` specification `*` means the query will resolve all columns.
Instead, a `select_list` can specify a subset of available columns or make calculations using said columns. For example, if `token_transfers` has columns name `token_id`, `token_value` and `token_decimal` you could write the following query:
```sql
select token_id, token_value / token_decimal from token_transfers;
```
Rows can be filtered based on a `WHERE` clause:
```sql
select * from ethereum.blocks where block_number = 19938860;
```
### ORDER BY clause
The `ORDER BY` clause causes the result rows to be sorted according to the specified expression(s). If two rows are equal according to the leftmost expression, they are compared according to the next expression and so on. If they are equal according to all specified expressions, they are returned in an implementation-dependent order.
```sql
select * from blocks order by block_timestamp, block_number;
```
### LIMIT clause
`LIMIT` clause constrains the number of rows returned by the `SELECT` statement. In general, this clause is used in conjunction with `ORDER BY` to ensure that the results are deterministic.
The following example selects the latest 10 blocks on blocks table.
```sql
select * from blocks order by block_timestamp limit 10;
```
### SELECT DISTINCT
If `SELECT DISTINCT` is specified, all duplicate rows are removed from the result set (one row is kept from each group of duplicates).
```sql
select distinct contract_address from token_transfer;
```
### Group Aggregation
An aggregate function computes a single result from multiple input rows. For example, there are aggregates to compute the `COUNT`, `SUM`, `AVG(average)`, `MAX(maximum)` and `MIN(minimum)` over a set of rows.
```sql
select count(1) from blocks
```
The standard `GROUP BY` clause is also supported for aggregating data.
```sql
select count(*) from token_transfer group by contract_address
```
### Joins
INNER Equi-JOIN:
```sql
select *
, token_metas.token_decimal
from token_transfer
inner join token_metas
on token_transfer.contract_address = token_metas.contract_address
```
OUTER Equi-JOIN:
```sql
select *
, token_metas.token_decimal
from token_transfer
left join token_metas
on token_transfer.contract_address = token_metas.contract_address
```
### INSERT Statement
`INSERT` statements are used to add rows to a dataset.
Syntax:
```sql
insert into table_name select_statement
```
Examples:
```sql
create table latest_10_blocks (
block_number bigint NOT NULL COMMENT 'Block number uniquely identifying the block',
hash varchar(66) NOT NULL COMMENT 'Hash value representing the unique identity of the block(with bloom filter)',
parent_hash varchar(66) NOT NULL COMMENT 'Hash value of the parent block(with bloom filter)',
nonce varchar(78) COMMENT 'Nonce value associated with the block',
sha3_uncles varchar(66) NOT NULL COMMENT 'SHA3 hash of the blocks uncle data(with bloom filter)',
logs_bloom varchar COMMENT 'Logs bloom filter for events emitted in transactions',
transactions_root varchar(66) NOT NULL COMMENT 'Root hash of the Merkle Patricia Trie for transactions(with bloom filter)',
state_root varchar(66) NOT NULL COMMENT 'Root hash of the Merkle Patricia Trie for the state(with bloom filter)',
receipts_root varchar(66) NOT NULL COMMENT 'Root hash of the Merkle Patricia Trie for receipts(with bloom filter)',
miner varchar(42) NOT NULL COMMENT 'Address of the miner who mined the block(with bloom filter)',
difficulty varchar(78) NOT NULL COMMENT 'Difficulty value representing the mining difficulty',
total_difficulty varchar(78) COMMENT 'Total accumulated difficulty of the blockchain',
size bigint COMMENT 'Size of the block in bytes',
extra_data varchar NOT NULL COMMENT 'Extra data included in the block',
gas_limit varchar(78) COMMENT 'Maximum gas limit allowed for transactions in the block',
gas_used varchar(78) COMMENT 'Total gas used by transactions in the block',
block_timestamp timestamp(3) NOT NULL COMMENT 'Timestamp of when the block was mined',
transaction_count bigint COMMENT 'Number of transactions included in the block',
base_fee_per_gas varchar(78) COMMENT 'Base fee per gas unit for transactions in the block',
withdrawals_root varchar(66) COMMENT 'Root hash of the Merkle Patricia Trie for withdrawals',
parent_beacon_block_root varchar COMMENT 'The hash tree root of the parent beacon block for the given execution block',
excess_blob_gas bigint COMMENT 'The blob gas pricing.',
blob_gas_used bigint COMMENT 'The total amount of blob gas consumed by transactions in the block'
);
insert into latest_10_blocks
select * from blocks order by block_number desc limit 10;
```
## GPL
For experienced alchemists, a General-perpose Programming Language (GPL), such as Python or JavaScript, can be used to extract and process data. GPL will provides the most flexible and powerful data extraction capabilities
**Coming Soon…**
# 2. Create a manuscript
Source: https://docs.chainbase.com/core-concepts/manuscript/QuickStart/create_manuscript
## 1. 🏄🏼 Getting Started
Great news! You’ve decided to create your first Manuscript. 🎉
# Module Introduction
### **Data Accessibility Layer**
[Data Accessibility Layer](/core-concepts/architecture/data_accessibility_layer) manages data access and storage in the network, is compatible with data access interfaces for both streaming and batch scenarios, and provides data validity verification. It includes:
* **Data Access Interface:** Provides access to both batch and streaming data.
* **Data Storage:** Supports various storage solutions, including Lakehouse, Arweave, S3, and IPFS.
* **Data Proof:** Implements zk-proofs and storage-based consensus paradigms to ensure data integrity and availability.
### **Consensus Layer**
[Consensus Layer](/core-concepts/architecture/consensus_layer) ensures that all nodes in the network reach a consensus on data and status consistency, based on CometBFT's instant finality, achieving second-level data freshness. Including:
* **Consensus Algorithm:** Based on CometBFT and DPoS (Delegated Proof of Stake) to achieve efficient and secure consensus.
* **ABCI++:** An extension of Cosmos network's ABI, responsible for converting the state of the Chainbase Virtual Machine (CVM) to a format compatible with the CometBFT consensus engine.
* **Stake Aggregator:** Aggregates staked tokens from various Cosmos ecosystem sources to ensure network security.
### **Execution Layer**
[Execution Layer](/core-concepts/architecture/execution_layer) is responsible for large-scale data processing and execution of Manuscripts' data transformation logic. Including:
* **Chainbase Virtual Machine (CVM):** A virtual machine that provides parallel computing capabilities to execute Manuscripts
* **Parallel Execution Engine:** Utilizes multithreading for parallel data processing, enhancing performance and throughput.
* **ChainbaseDB (CDB):** A database system that supports multiple data storage engines, including VectorDB, GraphDB, and KV storage.
* **Eigenlayer AVS (Proof Verification System):** Introducing the Ethereum economic security brought by Restake, making the CVM running environment fully decentralized
### **Co-processor Layer**
Chainbase has introduced the [Co-processor Layer](/core-concepts/architecture/co_processor_layer) to facilitate user collaboration in data processing and AI expertise. This layer allows users to transform their specialized knowledge into tradeable assets, managed and incentivized through the \$C token system, creating a dynamic ecosystem. This design enhances data accessibility and encourages developer collaboration, accumulating knowledge and generating collective intelligence, thereby unlocking greater potential for blockchain technology.
### **Dual Staked Security**
This module enhances the network security of the consensus layer and execution layer in the dual-chain architecture through a double staked mechanism. Including:
* Shared Staked Pool:
* Native Token Stake: \$C native token captures network value
* Eigenlayer Restake: Introduces Ethereum tokens with low volatility and deep liquidity
* Double Staked Model: By aggregating all validators' stake and their power mapping for various assets, the total cryptographic economic security is calculated.
### Manuscript
[Manuscript](/core-concepts/manuscript/overview) defines the standard schema that different data sources need to follow when converting into datasets.
### CVM Interface
The CVM Interface provides a set of standardized interface protocols for interacting and communicating with CVM, allowing developers to write and manage Manuscripts on the network, as well as access Dataset in the data network.
# Chainbase Network AVS Design
Source: https://docs.chainbase.com/core-concepts/avs-design
## **Overview**
EigenLayer's AVS is a cornerstone of its high-performance execution layer. Details to be specified [here](/core-concepts/data-processing-based-on-avs).
## **Integration with EigenLayer Core (AVS Directory)**
To integrate with EigenLayer Core, Chainbase Network implements an instance of ECDSAServiceManagerBase or ServiceManagerBase (BLS). This integration allows operators to register by sending transactions to the AvsServiceManager, completing the registration process

## **On-Chain Verification Challenges**
Chainbase Network requires a stable and efficient group of operators to form a decentralized and trusted data processing network. The Coordinator component needs a mechanism to measure the operational quality of these operators, ensuring they meet the network's standards. This is achieved through an on-chain consensus game involving slashing for non-compliance.
The Coordinator periodically generates a challenge task, which involves calculating the block hash of a specific block within the blockchain data integrated into Chainbase Network. This task has a clear answer and expected outcome. The challenge is sent to operators' manuscript-node nodes, where they execute the task and return the signed result along with the recorded task execution time. This information is used to evaluate the operators' efficiency, and the results are verified on the AVS chain.

## **Implementation Details**
**Coordinator:**
1. Listens to the on-chain contract `ChainbaseServiceManager` events.
2. Sends tasks to `Manuscript Node` via an RPC interface.
3. Receives task responses from `Manuscript Node` via the RPC interface.
4. Aggregates responses from multiple `Manuscript Nodes` and submits the results to the on-chain contract `ChainbaseServiceManager`.
**Manuscript Node:**
1. Registers the operator by calling `RegisteryCoordinator`.
2. Receives tasks from the Coordinator via the RPC interface.
3. Executes tasks, signs the task response.
4. Sends the signed task response back to the Coordinator.
**Contracts:**
1. The `ChainbaseServiceManager` contract includes functions for `createNewTask` and `respondToTask`, facilitating the creation of tasks and the submission of task responses for verification.
# Data Processing Based on AVS
Source: https://docs.chainbase.com/core-concepts/data-processing-based-on-avs
## **Overview**
Chainbase Network is an hyperdata network powered by a [dual-chain](/core-concepts/dual-chain) architecture using Cosmos and EigenLayer, enabling trustworthy and transparent on-chain data processing. Through the [Manuscript protocol](/core-concepts/manuscript) on the Chainbase Virtual Machine (CVM), the network ensures seamless data interoperability. By integrating [EigenLayer’s](https://www.eigenlayer.xyz/) staking mechanism, Chainbase leverages Ethereum's economic security to build a high-performance AVS for its [Execution Layer](/core-concepts/architecture/execution_layer). This ensures large-scale data processing while maintaining security, decentralization, and scalability, supporting the growing demands of blockchain applications.
## Execution layer node based on AVS

The execution layer nodes of Chainbase Network are built on EigenLayer, providing users with a node network for on-chain data processing. Developers can submit Manuscript data processing programs and request the final result dataset. EigenLayer operators with computational resources can restake and register as execution layer nodes of Chainbase Network, providing the required computing resources. As Chainbase Network integrates data query fees, restakers will generate income from it.
As more and more Manuscripts run on Chainbase Network, more high-quality computing resources are needed. To achieve elastic scaling of resources while maintaining high throughput, on-chain computing tasks need to be routed to the best provider according to the running preferences of Manuscript. Key factors include node geographic location (latency), computing hardware, and network environment. EigenLayer will support Chainbase Network through diversified operators and routing strategies to meet these needs.
### **Summary**
Chainbase Network is a full-chain data network supported by the dual-chain architecture of Cosmos and EigenLayer, aiming to provide a trustworthy and transparent data processing environment. To achieve interoperability, the Manuscript protocol was developed and runs on the Chainbase Virtual Machine (CVM), designed for large-scale data processing.
By combining EigenLayer's staking mechanism, Chainbase Network enhances economic and safety guarantees and builds a high-performance execution layer. EigenLayer operators can register as nodes of Chainbase Network, provide computing resources, and profit through integrated data query fees.
With the increase of Manuscript operations, the system needs more high-quality computing resources, and EigenLayer provides diversified operators and routing strategies to support this demand.
# Dual-Chain
Source: https://docs.chainbase.com/core-concepts/dual-chain
### Consensus Layer + Execution Layer

Chainbase introduces an innovative dual-chain architecture that enhances the programmability and composability of cross-chain data, supporting high throughput, low latency, and finality. This architecture achieves higher network security through a dual staking model.
#### What Does the Dual-Chain Architecture Bring?
1. **Performance Optimization**: As the largest distributed data engine of the future, it needs to support high-throughput data processing. The CVM in the Execution Layer supports parallel computing capabilities, while the Consensus Layer utilizes CometBFT optimized for performance.
2. **Programmability**: Manuscripts define the standard schema that different data sources need to follow when converting into datasets. The redesigned Execution Layer provides a runtime environment for these Manuscripts.
3. **Composability**: The redesigned Execution Layer can handle data streams from multiple sources for joint processing. For example, aggregating data sources from various chain lending protocols can create a universal lending rate.
4. **Enhanced Crypto-Economic Security**: Traditional public chain projects often compromise security to optimize performance and compatibility. By introducing the dual-chain architecture of Eigenlayer and Cosmos, Chainbase incorporates a dual staking model, ensuring game-theoretic security for the hyperdata network.
#### Consensus Layer
The Consensus Layer ensures data and state consistency among all nodes in the network. Its main advantages include:
* **Instant Finality**: Using CometBFT, once data is processed and included in a block, it is considered final visible data without the need for additional confirmations or data reorganization.
* **Proven Robustness**: CometBFT is battle-tested and has successfully protected billions of dollars across various blockchain networks, proving its robustness and reliability.
#### Execution Layer
The Execution Layer excels in large-scale data processing and complex data transformation tasks. Its main advantages include:
* **Parallelization**: Through data parallelism and task parallelism, the Execution Layer can handle large-scale data, enhancing overall performance and throughput.
* **Decentralized Environment Based on Eigenlayer AVS**: The introduction of Eigenlayer not only enhances the system's decentralization but also provides additional economic security, balancing high performance and high security in the Execution Layer.
* **Programmable Runtime Environment**: By providing a powerful computational logic execution environment, the Execution Layer offers developers an efficient and flexible platform that supports complex data processing tasks and application scenarios.
### Conclusion
Through its innovative dual-chain architecture, Chainbase successfully combines the advantages of the Consensus Layer and the Execution Layer to achieve high performance, low latency, and finality. This architecture not only enhances the network's programmability and composability but also provides higher economic security through a dual staking model. With instant transaction finality and proven robustness, Chainbase sets new standards in blockchain performance and interoperability, providing a solid foundation for data processing and applications in the AI era.
# Dual-Staking
Source: https://docs.chainbase.com/core-concepts/dual-staking
# Why dual staking?
* Early PoS (Proof of Stake) networks can face a "death spiral" problem. If the token's value decreases, it weakens the network's security, leading to a decline in Total Value Locked (TVL), which further depresses the token price, thus creating a death spiral.

capture:[https://www.blog.eigenlayer.xyz](https://www.blog.eigenlayer.xyz)
# How it works
Protect the same PoS network using two tokens, one of which can be a low-volatility, deep-liquidity, more accessible external network token such as Ethereum (ETH). Also use network native tokens to capture network value
# Different method
**Modular Dual Staking**: Local operators and ETH-backed operators are required to reach a quorum respectively.
**Native Dual Staking**: Similar to mesh security, two sets of operators are treated as one, each operator's stake is converted into unified units based on an external oracle, and the user then validates the response based on the combined quorum.
**Veto Dual Staking**: The local operator is first individually quorate and the ETH-backed operator acts as a safeguard to check the behavior of the local operator. If the local operator makes a mistake, the ETH-supported operator has the right to veto a valid response sent by them.
### Impl architecture

1. support LST && native token stake
for supported LST please check:[https://app.eigenlayer.xyz/restake](https://app.eigenlayer.xyz/restake)
\$C is our native token, for more detail TBD
2. how to manage stake token
* for LST part, staker first stake to operator then operator register to our AVS. offline relayer watch && sync avs’s operator stake & delegations(eg.`sync(CainbaseAVS.Operator[] calldata operators`)) info with cosmos part(maybe call xxx chain ?)
* For the \$C part, stakers interact with erc20-stake contract to emit a `Stake(bytes operator_pubkey, uint256 amount)` event. The relayer then watches for this event and syncs the information with the Cosmos part.
* We choose the Native Dual Staking model where an oracle ensures fair price conversion of both `$LST` and `$C` into `$C-Stake` units.
# **Reference**
* [Eigenlayer:Dual Staking: secure a PoS network with two tokens](https://www.blog.eigenlayer.xyz/dual-staking/)
* [osmosis-labs:Mesh Security Architecture](https://github.com/osmosis-labs/mesh-security/blob/main/docs/README.md)
* [dual staking and Espresso](https://youtu.be/o9y_pZUr0Nc?t=1727)
* [You Could've Invented EigenLayer | Kydo 0x - Eigen Labs](https://youtu.be/fCl_PucMytU?si=afSo2MK5oWJPeE69)
# Glossary
Source: https://docs.chainbase.com/core-concepts/glossary
## Common Terms
* ⚗️**Alchemist** - a developer or technical contributor who creates, manipulates, or alters manuscripts.
* 📜**Manuscript** - an executable that runs on the Chainbase Virtual Machine (CVM). Manuscripts define the standard schema that different data sources need to follow when converting into datasets.
* ⚙️**Chainbase Virtual Machine (CVM)** - a virtual execution environment, complete with interface, that allows for the execution of sophisticated data queries.
* 💾**Data Set -** a structured collection of aggregated, validated, and indexed data comprised of data tables and stored in the Chainbase Warehouse.
* 🏭**Chainbase Warehouse** - a storeplace for all pre-built datasets on the Data Platform.
* 💽**Data Network** - the intersection of CVM/Eigenlayer AVS (execution), IBC, ABCI++, and CometBFT (consensus), with a proprietary Data Availability Layer composed of roll ups/network participants.
* 💿**Data Platform** - the suite of developer tools which allow streamlined access to information available on the Data Network.
* 🤖**TheiaChat** - an AI agent, based on Theia, offering streamlined access point to the data network with built-in knowledge bases.
* 🗺️**Theia** - the proprietary Crypto World Model which uses causal reasoning on crypto patterns to create verifiable reasoning chains on crypto data.
# 4. Advanced Options
Source: https://docs.chainbase.com/core-concepts/manuscript/QuickStart/advanced_options
# Overview
The datasets in the Chainbase Network is like base metals, and the alchemists (developers) can use Manuscripts to process this data, extracting greater value from the existing data.

# Protocol
Chainbase Network is committed to making data (on-chain & off-chain) more accessible, so Manuscripts allow users and developers to query and process data using SQL.
Manuscripts mainly consist of two parts.
* Schema: The definition of dataset.
* Operators: The extract, transform, and load methods which being used to extract greater value from the existing data.
## Schema
Schema can be defined like this.
```sql
CREATE TABLE ethereum.blocks (
block_number bigint NOT NULL COMMENT 'Block number uniquely identifying the block',
hash varchar(66) NOT NULL COMMENT 'Hash value representing the unique identity of the block(with bloom filter)',
parent_hash varchar(66) NOT NULL COMMENT 'Hash value of the parent block(with bloom filter)',
nonce varchar(78) COMMENT 'Nonce value associated with the block',
sha3_uncles varchar(66) NOT NULL COMMENT 'SHA3 hash of the blocks uncle data(with bloom filter)',
logs_bloom varchar COMMENT 'Logs bloom filter for events emitted in transactions',
transactions_root varchar(66) NOT NULL COMMENT 'Root hash of the Merkle Patricia Trie for transactions(with bloom filter)',
state_root varchar(66) NOT NULL COMMENT 'Root hash of the Merkle Patricia Trie for the state(with bloom filter)',
receipts_root varchar(66) NOT NULL COMMENT 'Root hash of the Merkle Patricia Trie for receipts(with bloom filter)',
miner varchar(42) NOT NULL COMMENT 'Address of the miner who mined the block(with bloom filter)',
difficulty varchar(78) NOT NULL COMMENT 'Difficulty value representing the mining difficulty',
total_difficulty varchar(78) COMMENT 'Total accumulated difficulty of the blockchain',
size bigint COMMENT 'Size of the block in bytes',
extra_data varchar NOT NULL COMMENT 'Extra data included in the block',
gas_limit varchar(78) COMMENT 'Maximum gas limit allowed for transactions in the block',
gas_used varchar(78) COMMENT 'Total gas used by transactions in the block',
block_timestamp timestamp(3) NOT NULL COMMENT 'Timestamp of when the block was mined',
transaction_count bigint COMMENT 'Number of transactions included in the block',
base_fee_per_gas varchar(78) COMMENT 'Base fee per gas unit for transactions in the block',
withdrawals_root varchar(66) COMMENT 'Root hash of the Merkle Patricia Trie for withdrawals',
parent_beacon_block_root varchar COMMENT 'The hash tree root of the parent beacon block for the given execution block',
excess_blob_gas bigint COMMENT 'The blob gas pricing.',
blob_gas_used bigint COMMENT 'The total amount of blob gas consumed by transactions in the block'
);
```
Developers need to define the schema of the result table, including field names, field types, and field descriptions.
## Data Types
| Data Type | Remarks for Data Type |
| --------------- | ----------------------------------- |
| `CHAR` | |
| `VARCHAR` | |
| `STRING` | |
| `BOOLEAN` | |
| `BINARY` | |
| `VARBINARY` | |
| `BYTES` | |
| `DECIMAL` | Supports fixed precision and scale. |
| `TINYINT` | |
| `SMALLINT` | |
| `INTEGER` | |
| `BIGINT` | |
| `FLOAT` | |
| `DOUBLE` | |
| `DATE` | |
| `TIMESTAMP` | |
| `TIMESTAMP_LTZ` | |
## Operators
### SELECT & WHERE clause
The general syntax of the `SELECT` statement is:
```sql
select select_list from table_expression [where boolean_expression]
```
The `table_expression` refers to any data set in Chainbase Network. It could be an existing table, or VALUES clause, the joined results of multiple existing tables, or a subquery. The following would read all rows from `blocks`.
```sql
select * from blocks;
```
The `select_list` specification `*` means the query will resolve all columns.
Instead, a `select_list` can specify a subset of available columns or make calculations using said columns. For example, if `token_transfers` has columns name `token_id`, `token_value` and `token_decimal` you could write the following query:
```sql
select token_id, token_value / token_decimal from token_transfers;
```
Rows can be filtered based on a `WHERE` clause:
```sql
select * from ethereum.blocks where block_number = 19938860;
```
### ORDER BY clause
The `ORDER BY` clause causes the result rows to be sorted according to the specified expression(s). If two rows are equal according to the leftmost expression, they are compared according to the next expression and so on. If they are equal according to all specified expressions, they are returned in an implementation-dependent order.
```sql
select * from blocks order by block_timestamp, block_number;
```
### LIMIT clause
`LIMIT` clause constrains the number of rows returned by the `SELECT` statement. In general, this clause is used in conjunction with `ORDER BY` to ensure that the results are deterministic.
The following example selects the latest 10 blocks on blocks table.
```sql
select * from blocks order by block_timestamp limit 10;
```
### SELECT DISTINCT
If `SELECT DISTINCT` is specified, all duplicate rows are removed from the result set (one row is kept from each group of duplicates).
```sql
select distinct contract_address from token_transfer;
```
### Group Aggregation
An aggregate function computes a single result from multiple input rows. For example, there are aggregates to compute the `COUNT`, `SUM`, `AVG(average)`, `MAX(maximum)` and `MIN(minimum)` over a set of rows.
```sql
select count(1) from blocks
```
The standard `GROUP BY` clause is also supported for aggregating data.
```sql
select count(*) from token_transfer group by contract_address
```
### Joins
INNER Equi-JOIN:
```sql
select *
, token_metas.token_decimal
from token_transfer
inner join token_metas
on token_transfer.contract_address = token_metas.contract_address
```
OUTER Equi-JOIN:
```sql
select *
, token_metas.token_decimal
from token_transfer
left join token_metas
on token_transfer.contract_address = token_metas.contract_address
```
### INSERT Statement
`INSERT` statements are used to add rows to a dataset.
Syntax:
```sql
insert into table_name select_statement
```
Examples:
```sql
create table latest_10_blocks (
block_number bigint NOT NULL COMMENT 'Block number uniquely identifying the block',
hash varchar(66) NOT NULL COMMENT 'Hash value representing the unique identity of the block(with bloom filter)',
parent_hash varchar(66) NOT NULL COMMENT 'Hash value of the parent block(with bloom filter)',
nonce varchar(78) COMMENT 'Nonce value associated with the block',
sha3_uncles varchar(66) NOT NULL COMMENT 'SHA3 hash of the blocks uncle data(with bloom filter)',
logs_bloom varchar COMMENT 'Logs bloom filter for events emitted in transactions',
transactions_root varchar(66) NOT NULL COMMENT 'Root hash of the Merkle Patricia Trie for transactions(with bloom filter)',
state_root varchar(66) NOT NULL COMMENT 'Root hash of the Merkle Patricia Trie for the state(with bloom filter)',
receipts_root varchar(66) NOT NULL COMMENT 'Root hash of the Merkle Patricia Trie for receipts(with bloom filter)',
miner varchar(42) NOT NULL COMMENT 'Address of the miner who mined the block(with bloom filter)',
difficulty varchar(78) NOT NULL COMMENT 'Difficulty value representing the mining difficulty',
total_difficulty varchar(78) COMMENT 'Total accumulated difficulty of the blockchain',
size bigint COMMENT 'Size of the block in bytes',
extra_data varchar NOT NULL COMMENT 'Extra data included in the block',
gas_limit varchar(78) COMMENT 'Maximum gas limit allowed for transactions in the block',
gas_used varchar(78) COMMENT 'Total gas used by transactions in the block',
block_timestamp timestamp(3) NOT NULL COMMENT 'Timestamp of when the block was mined',
transaction_count bigint COMMENT 'Number of transactions included in the block',
base_fee_per_gas varchar(78) COMMENT 'Base fee per gas unit for transactions in the block',
withdrawals_root varchar(66) COMMENT 'Root hash of the Merkle Patricia Trie for withdrawals',
parent_beacon_block_root varchar COMMENT 'The hash tree root of the parent beacon block for the given execution block',
excess_blob_gas bigint COMMENT 'The blob gas pricing.',
blob_gas_used bigint COMMENT 'The total amount of blob gas consumed by transactions in the block'
);
insert into latest_10_blocks
select * from blocks order by block_number desc limit 10;
```
## GPL
For experienced alchemists, a General-perpose Programming Language (GPL), such as Python or JavaScript, can be used to extract and process data. GPL will provides the most flexible and powerful data extraction capabilities
**Coming Soon…**
# 2. Create a manuscript
Source: https://docs.chainbase.com/core-concepts/manuscript/QuickStart/create_manuscript
## 1. 🏄🏼 Getting Started
Great news! You’ve decided to create your first Manuscript. 🎉To make it easier for developers to get started with Manuscript, we've introduced a [GUI](https://github.com/chainbase-labs/manuscript-core) tool.
Built on top of the existing CLI, this tool provides intuitive graphical interfaces to explore the extensive blockchain data available on the Chainbase network.
After installing the GUI tool, you can run the binary file locally straight away.
``` ➜ ~ ./manuscript ``` ## 2. 🚴🏼♂️ Selecting Data Once the tool has loaded, you’ll be greeted with the GUI interface shown below.
The left-hand panel allows you to select your desired blockchain. 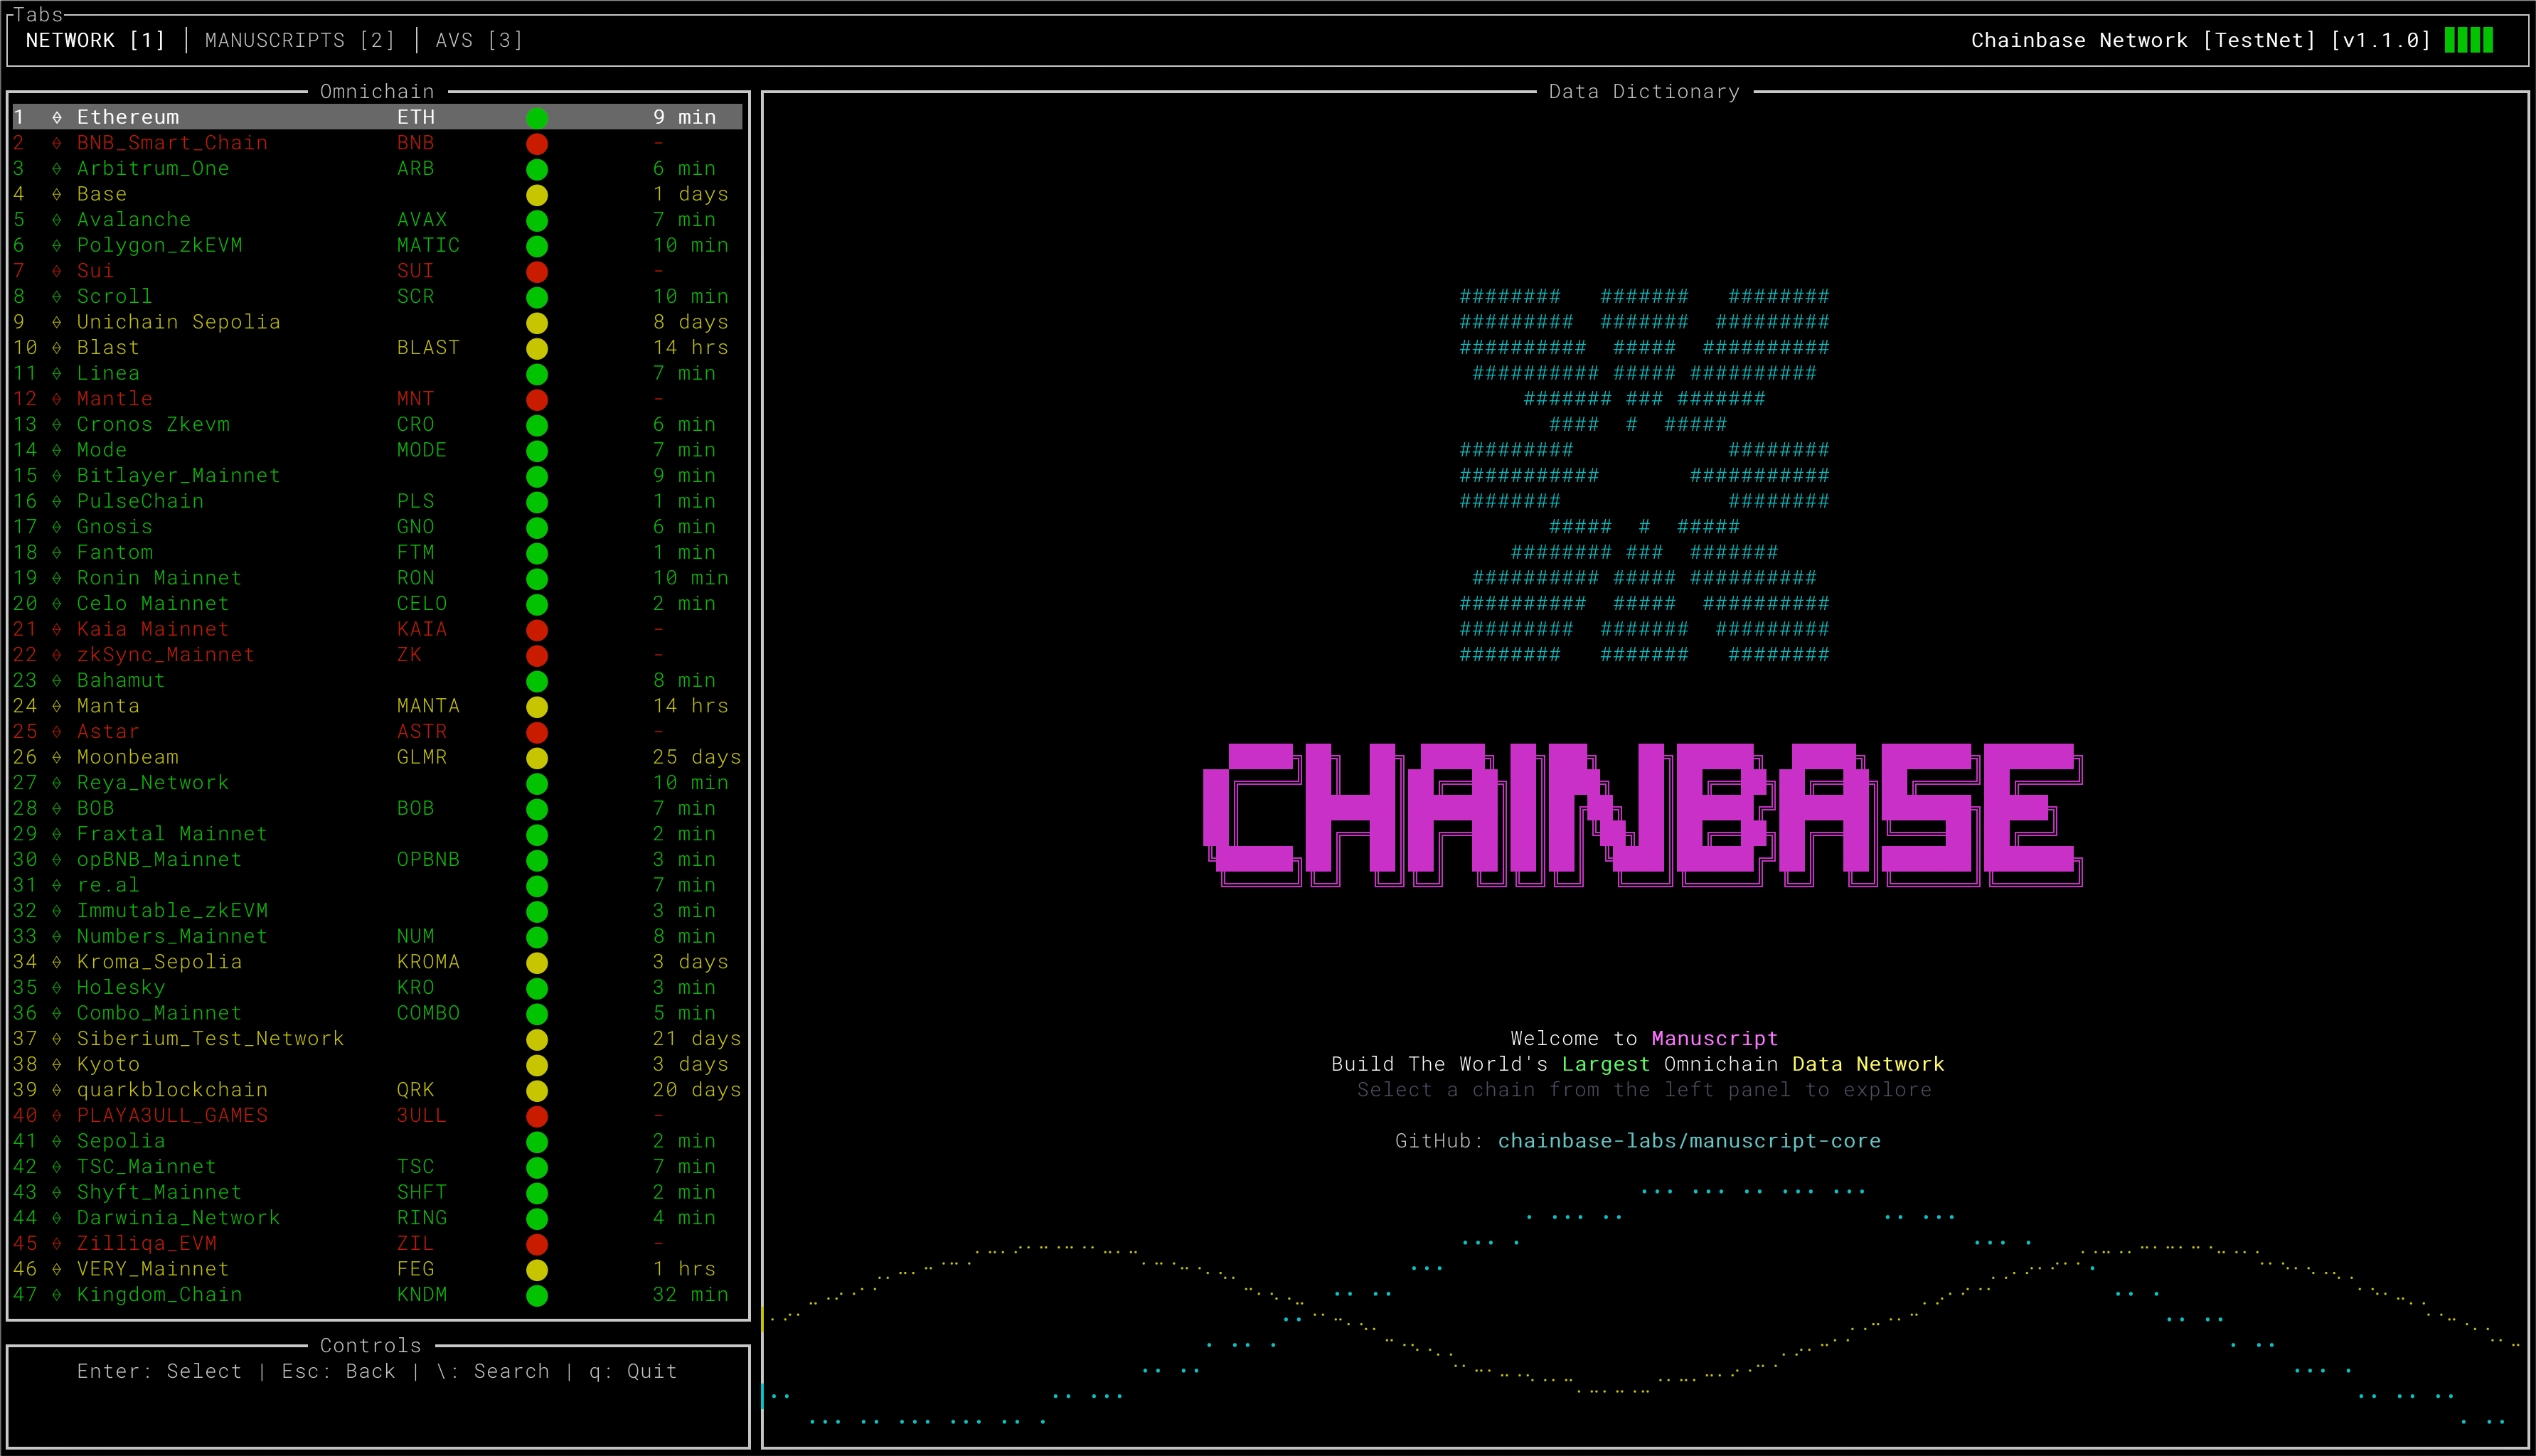 The Chainbase network’s DA layer data is displayed here, and over time, even more valuable datasets will be added. It’s worth noting that much of this data has been developed using Manuscript. You’re encouraged to create your own datasets or share your data requirements and suggestions with the community. ## 3. 🤽🏼 Choosing Table A dataset refers to either a raw data table or an abstract table.
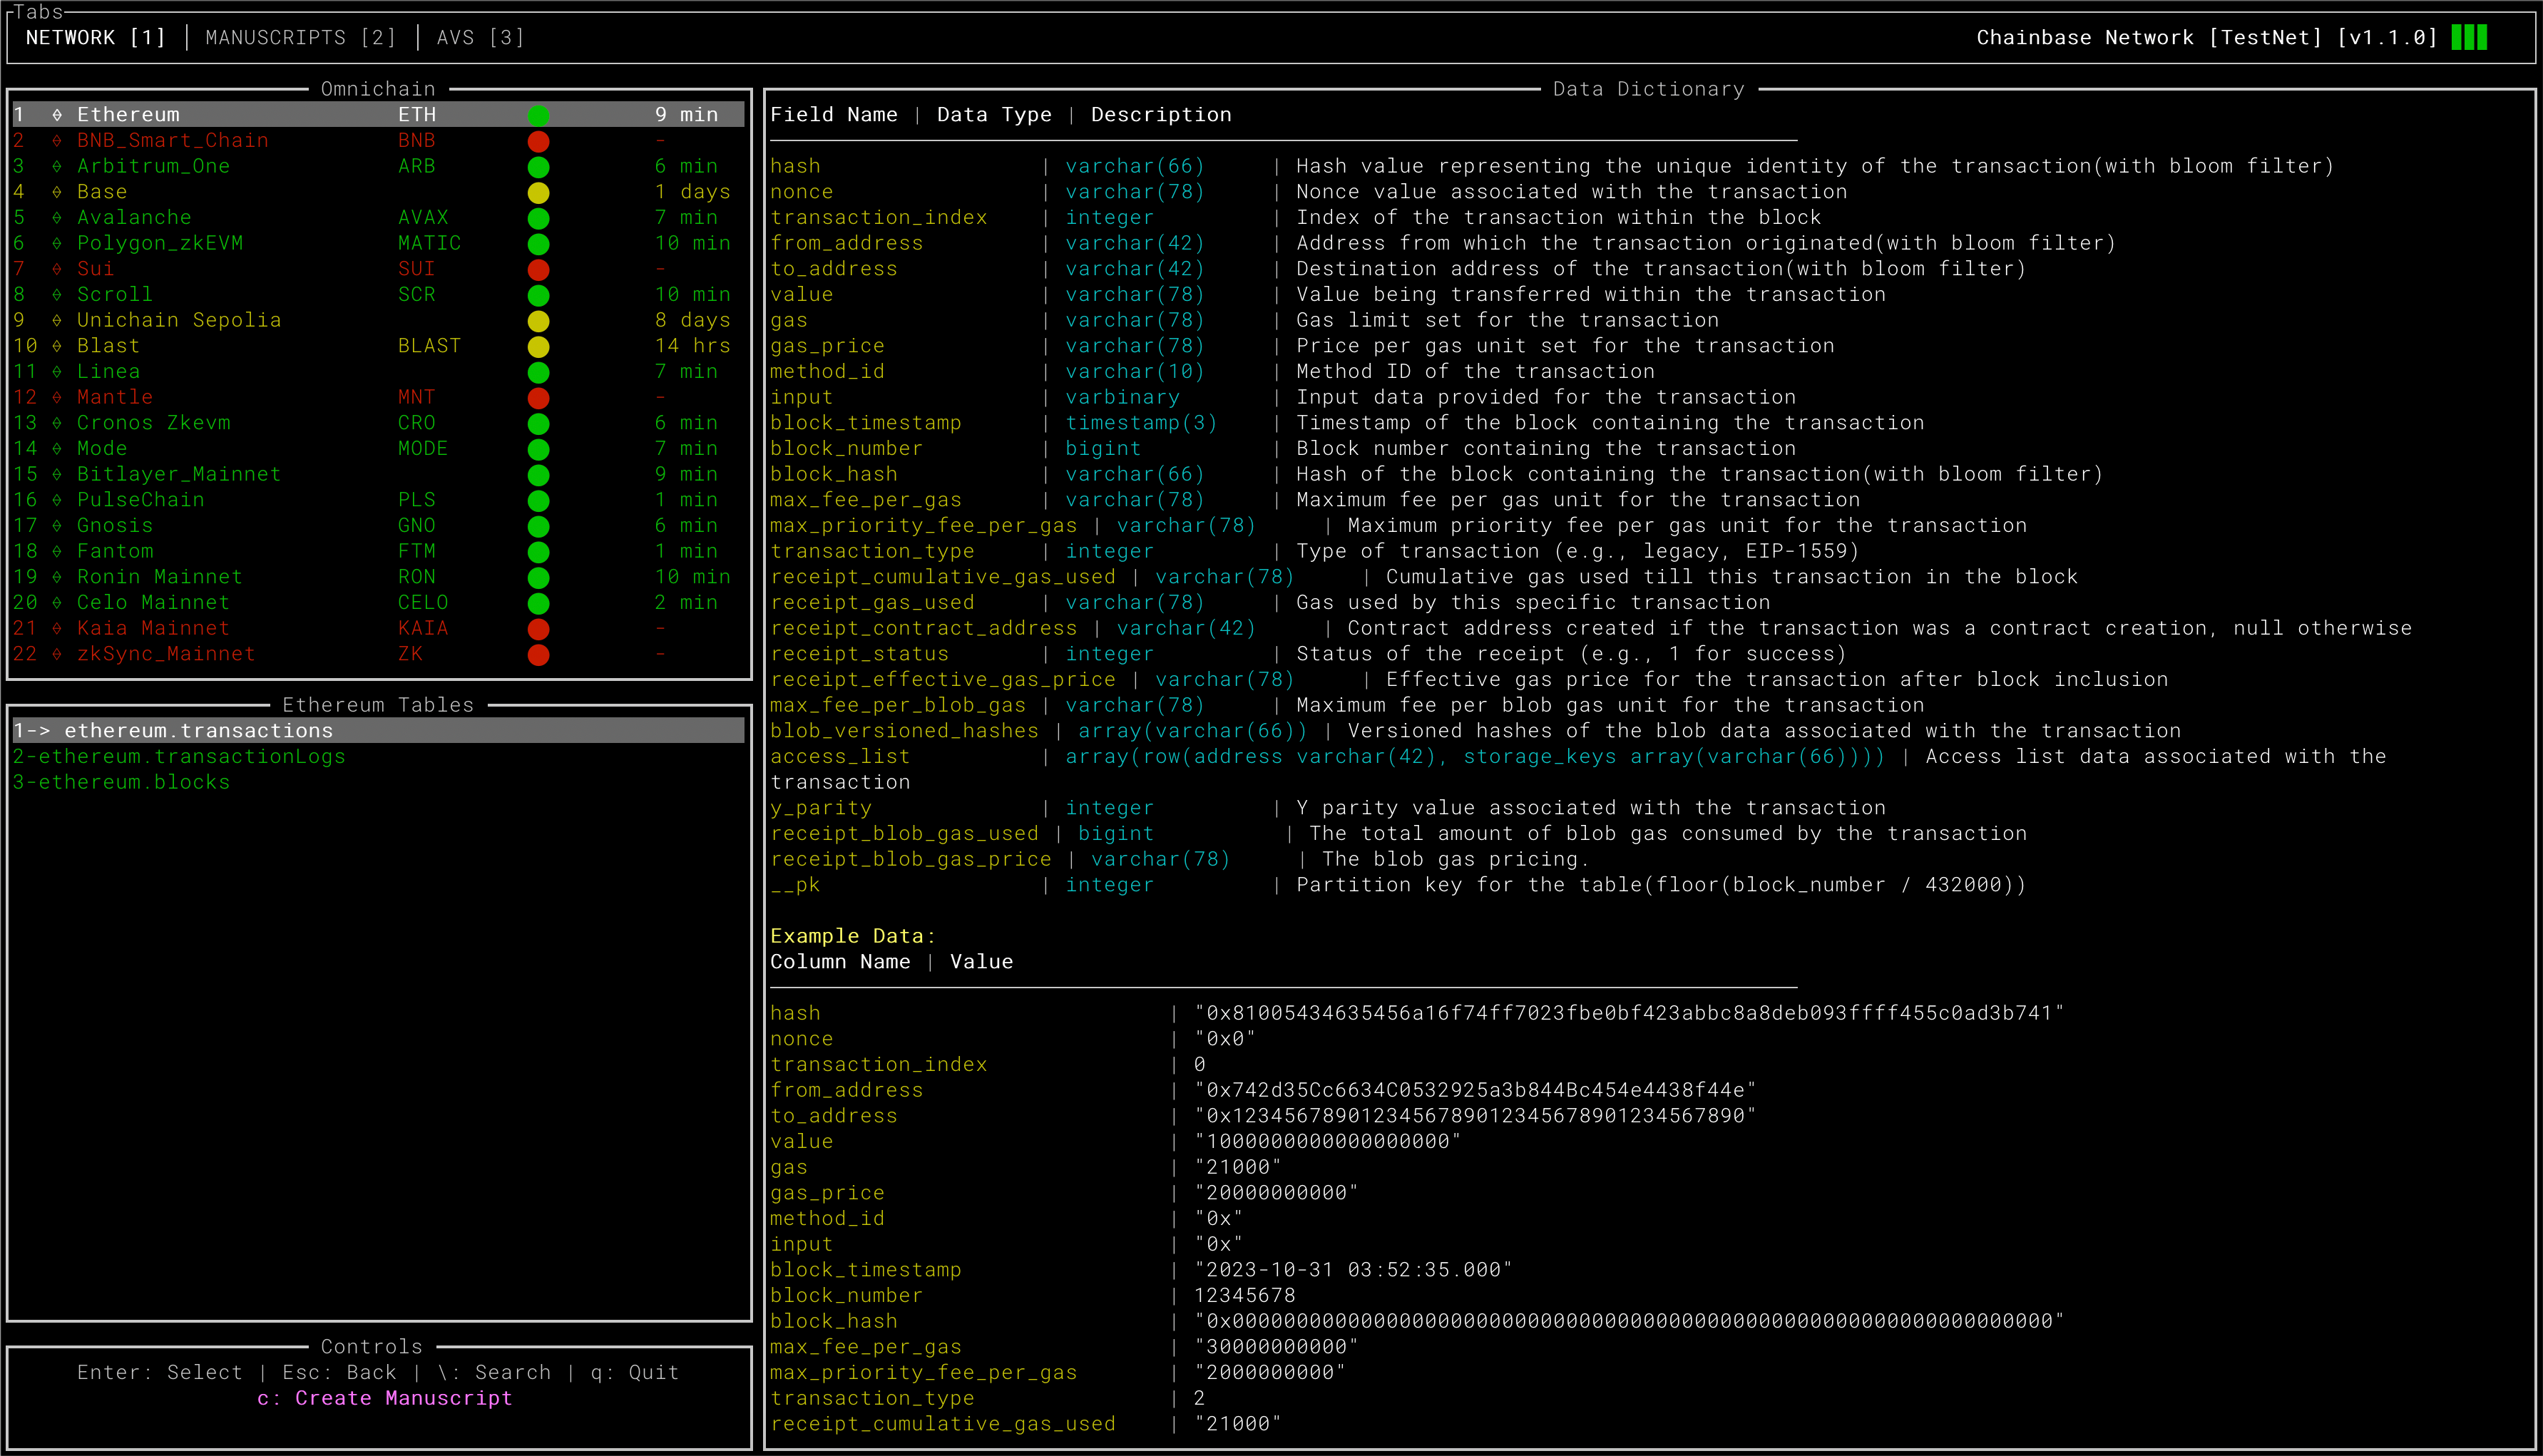 ## 4. 🏊🏼♂️ Creating a Manuscript You can use the `c` shortcut key to create your Manuscript YAML file. 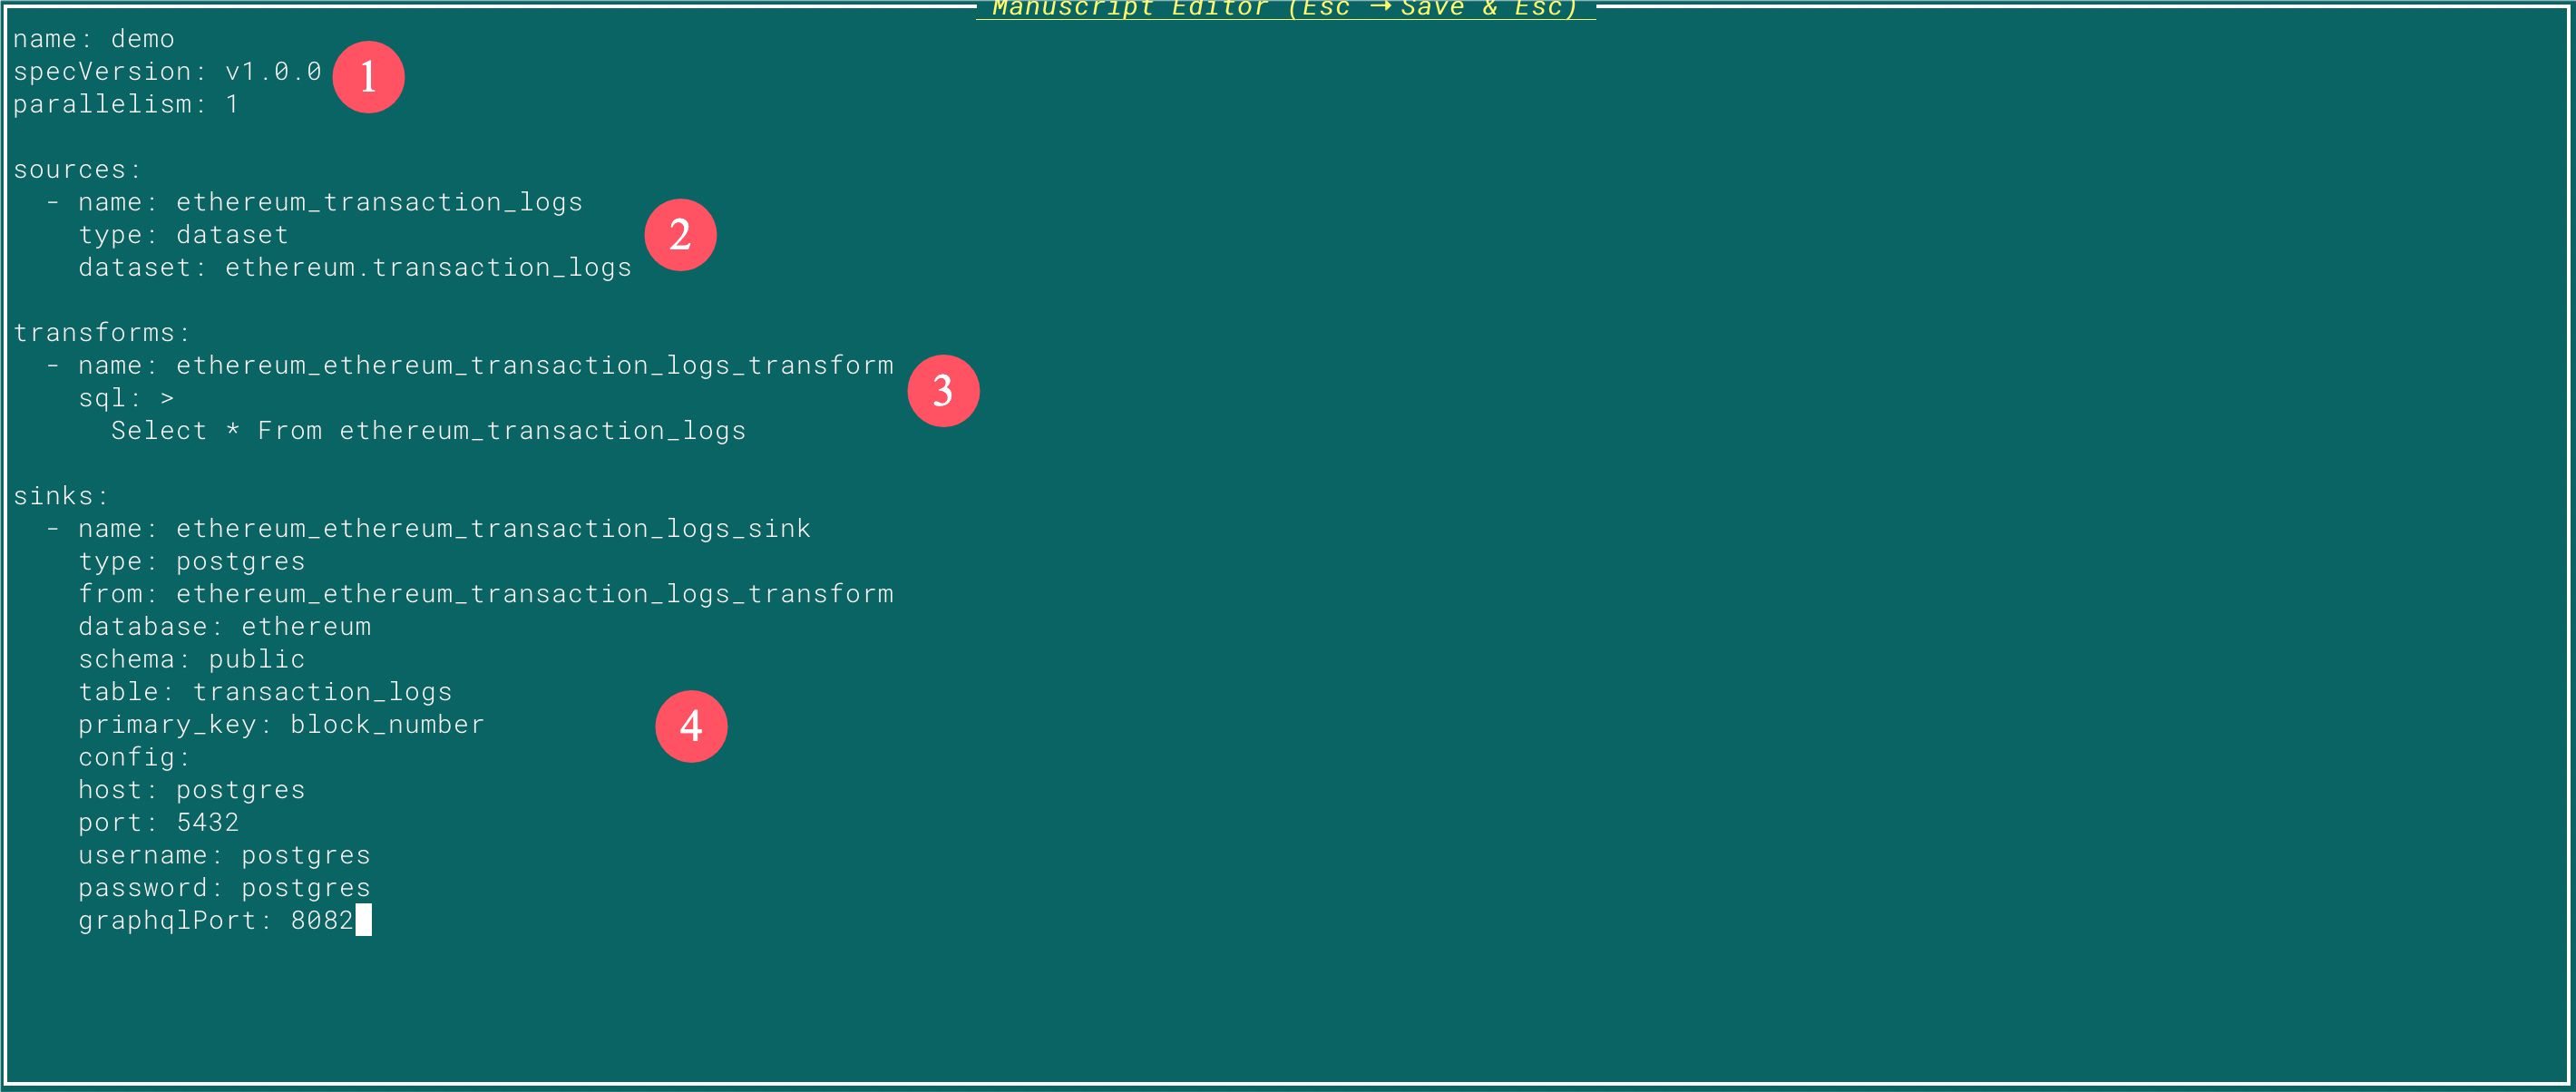 * **Data Sources**
Here, you’ll define your data source, which can include various options. In this demonstration, we’ve used the DA layer from Chainbase, though custom RPC endpoints and other sources are equally supported. * **Data Transformation**
For data transformations, this demonstration uses SQL queries, a familiar and widely-used method. The tool is compatible with standard SQL syntax as well as popular Flink SQL functions. * **Data Slink**
In this example, the data is exported to a local PostgreSQL database, complete with support for GraphQL queries. ## 5. 🚣🏼♂️ Debugging and Deployment 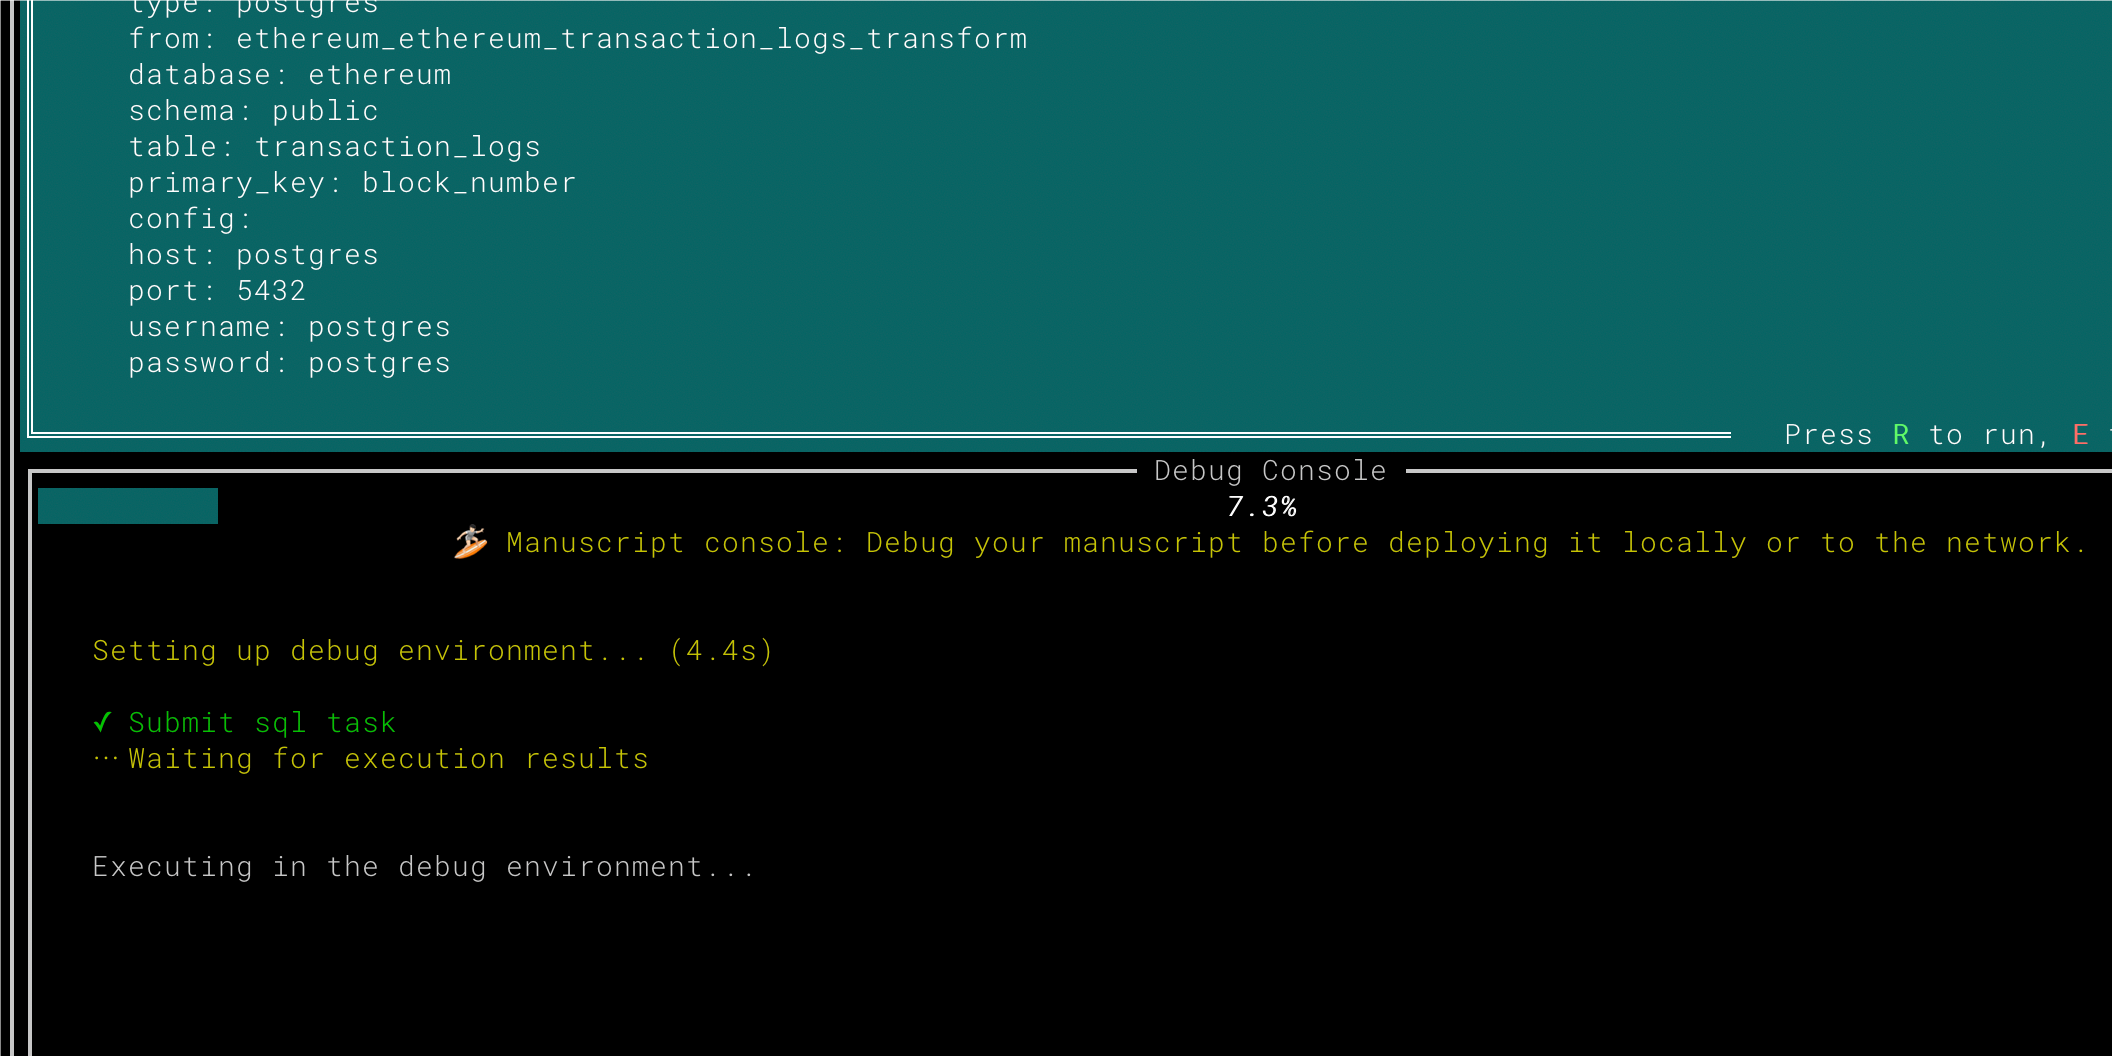 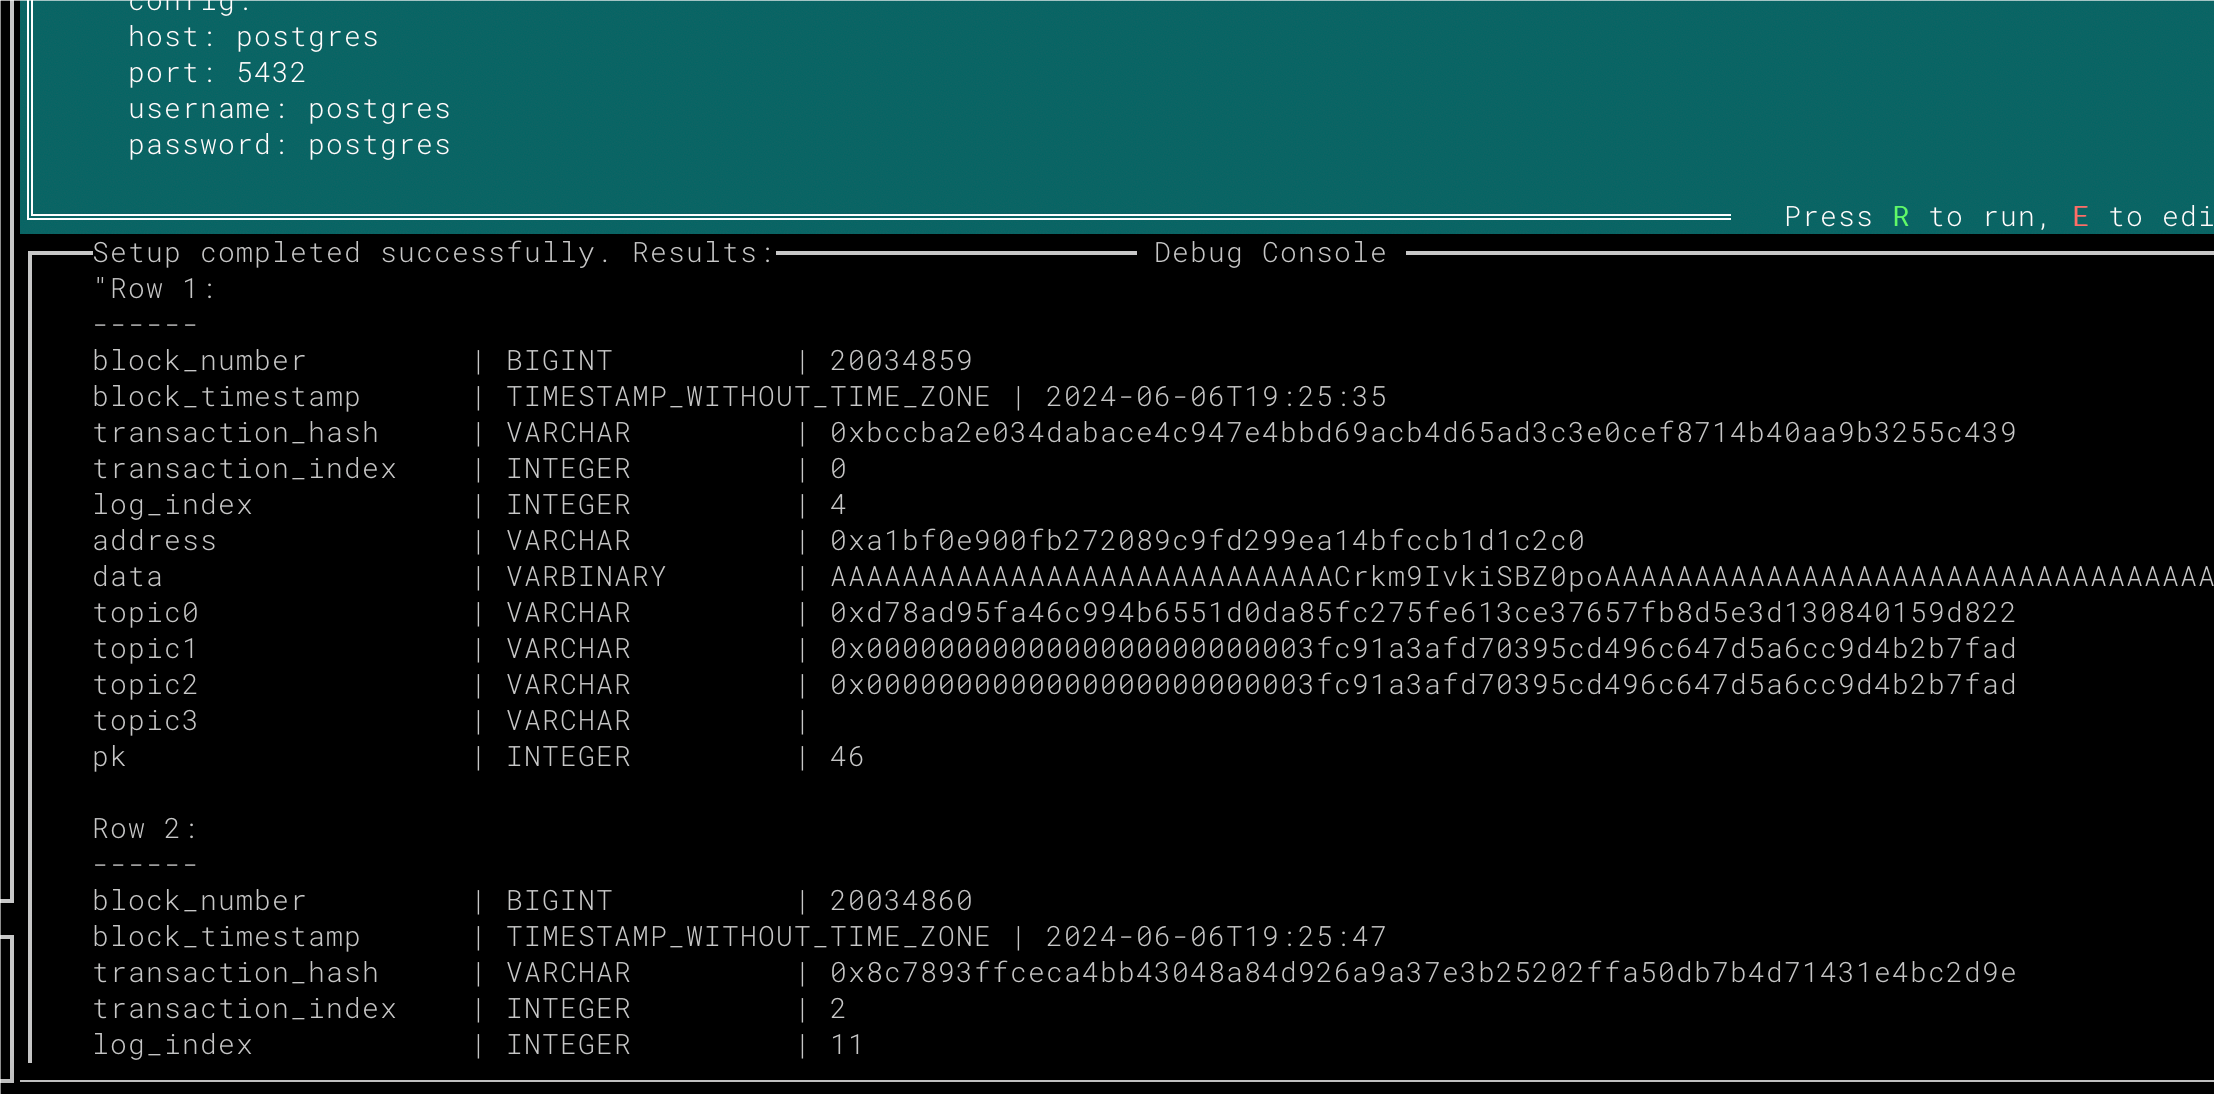 Once you’ve finished editing, you can run the debug environment to verify that the Manuscript works as expected and outputs the required format.
After confirming the results, you’ll be able to deploy the Manuscript locally or to the Chainbase network. Congratulations! You’ve successfully created your first Manuscript. 🚀🚀 # 1. Install GUI Source: https://docs.chainbase.com/core-concepts/manuscript/QuickStart/prerequisites # 1. Mansucript GUI Installation Download GUI binary for latest release, run: ``` curl -fsSL https://github.com/chainbase-labs/manuscript-core/raw/main/install-gui.sh | bash ``` # 2. Mansucript Requirements ### Docker Ensure that Docker is properly installed and functional on your system, as it is essential for the Manuscript environment setup. Docker enables deployment and management of isolated containers required by Manuscript's ecosystem. For detailed installation instructions, please refer to the [Docker documentation](https://docs.docker.com/get-started/get-docker/). ### Docker Compose Alongside Docker, Docker Compose is required and should be correctly installed and configured. Docker Compose enables the orchestration of multi-container applications, making it easier to deploy and manage Manuscript's dependencies. For setup guidance, refer to the [Docker Compose documentation](https://docs.docker.com/compose/install/). ### Linux Environment Manuscript is designed for compatibility with Linux environments only. Ensure that you have access to a Linux-compatible system, such as macOS, CentOS, or Fedora. either directly or through a Linux-based container setup in Docker, to proceed with the installation and operation of Manuscript. # 3. Checking for Requirements On a native Linux system, you can use the `uname -a` command to obtain information about your Linux distribution. If you are not using a native Linux system and need a Linux environment through Docker, you can check if Docker is installed by following these steps: 1.Open a terminal or command prompt. 2.Run the following command to verify that Docker is installed and operational: ``` docker --version docker compose version ``` # 3. Run a manuscript Source: https://docs.chainbase.com/core-concepts/manuscript/QuickStart/run_manuscript ## Deploy Target ### 1. 📗 Local You can use our GUI tool to quickly deploy Manuscript locally.  ### 2. 📚 Network We are about to launch the Chainbase network Manuscript environment, allowing users to deploy Manuscript directly to the Chainbase network. ## Deployment Options There are three ways to deploy your Manuscript: ### 1. 🚗 Using the GUI Tool Edit and deploy your Manuscript directly within the GUI. This is the most straightforward and efficient method. ### 2. 🚌 Using Docker Compose Copy the docker-compose file from the [Manuscript-Core](https://github.com/chainbase-labs/manuscript-core/tree/main/examples) repository to deploy it locally. ### 3. 🚅 Using Manuscript-Lib (Coming Soon) Deploy your Manuscript with a single click through the Manuscript-Lib browser. # null Source: https://docs.chainbase.com/core-concepts/manuscript/overview # Manuscript 
Download: Chainbase: The Decentralized hyperdata network for Open AGI Economy

| Chain | Network ID |
|---|---|
| Ethereum | 1 |
| Polygon | 137 |
| BSC | 56 |
| Avalanche | 43114 |
| Arbitrum One | 42161 |
| Optimism | 10 |
| Base | 8453 |
| zkSync | 324 |
| Merlin | 4200 |
{[
{
link: "https://platform.chainbase.com/assets/rpcService/multiChain/Ethereum.png",
name: "Ethereum",
},
{
link: "https://platform.chainbase.com/assets/rpcService/multiChain/Polygon.png",
name: "Polygon",
},
{
link: "https://platform.chainbase.com/assets/rpcService/multiChain/BSC.png",
name: "BNB Chain",
},
{
link: "https://platform.chainbase.com/assets/rpcService/multiChain/Fantom.png",
name: "Fantom",
},
{
link: "https://platform.chainbase.com/assets/rpcService/multiChain/Avalanche.png",
name: "Avalanche",
},
{
link: "https://platform.chainbase.com/assets/rpcService/multiChain/Arbitrum.png",
name: "Arbitrum",
},
{
link: "https://platform.chainbase.com/assets/rpcService/multiChain/Optimism.png",
name: "Optimism",
},
{
link: "https://platform.chainbase.com/assets/rpcService/multiChain/zkSync.png",
name: "zkSync",
},
].map((v) => (
 {v.name}
))}
{v.name}
))}
# Overview
Source: https://docs.chainbase.com/platform/features/datacloud/overview
## What is Data Cloud
* DataCloud is a powerful online platform designed for on-chain data processing. It is tailored to provide extensive capabilities in data querying, analysis, and processing. This platform enables developers to swiftly and effectively analyze on-chain data, facilitating the creation of high-performance, low-latency APIs for streamlined Web3 application development.
* This platform significantly simplifies the process from analyzing on-chain data to building high-performance APIs, especially suitable for applications requiring real-time data monitoring and dynamic data analysis.
* DataCloud supports a wide range of users, from exchanges and DeFi application operators to market analysts, offering powerful tools to focus more on innovation and optimizing Web3 application features.
## Features
* **Unified Datasets (Raw / Decoded / Abstracted)**: The datasets have been unified, providing a more streamlined and efficient data handling experience.
* **Parameterized Queries**: Introducing parameterized templates for more flexible and efficient data querying.
* **File Explorer**: A new tool to explore and manage saved queries.
* **Task API**: Replacing the SQL API, this new feature allows for more advanced and customizable data handling tasks.
## QuickStart
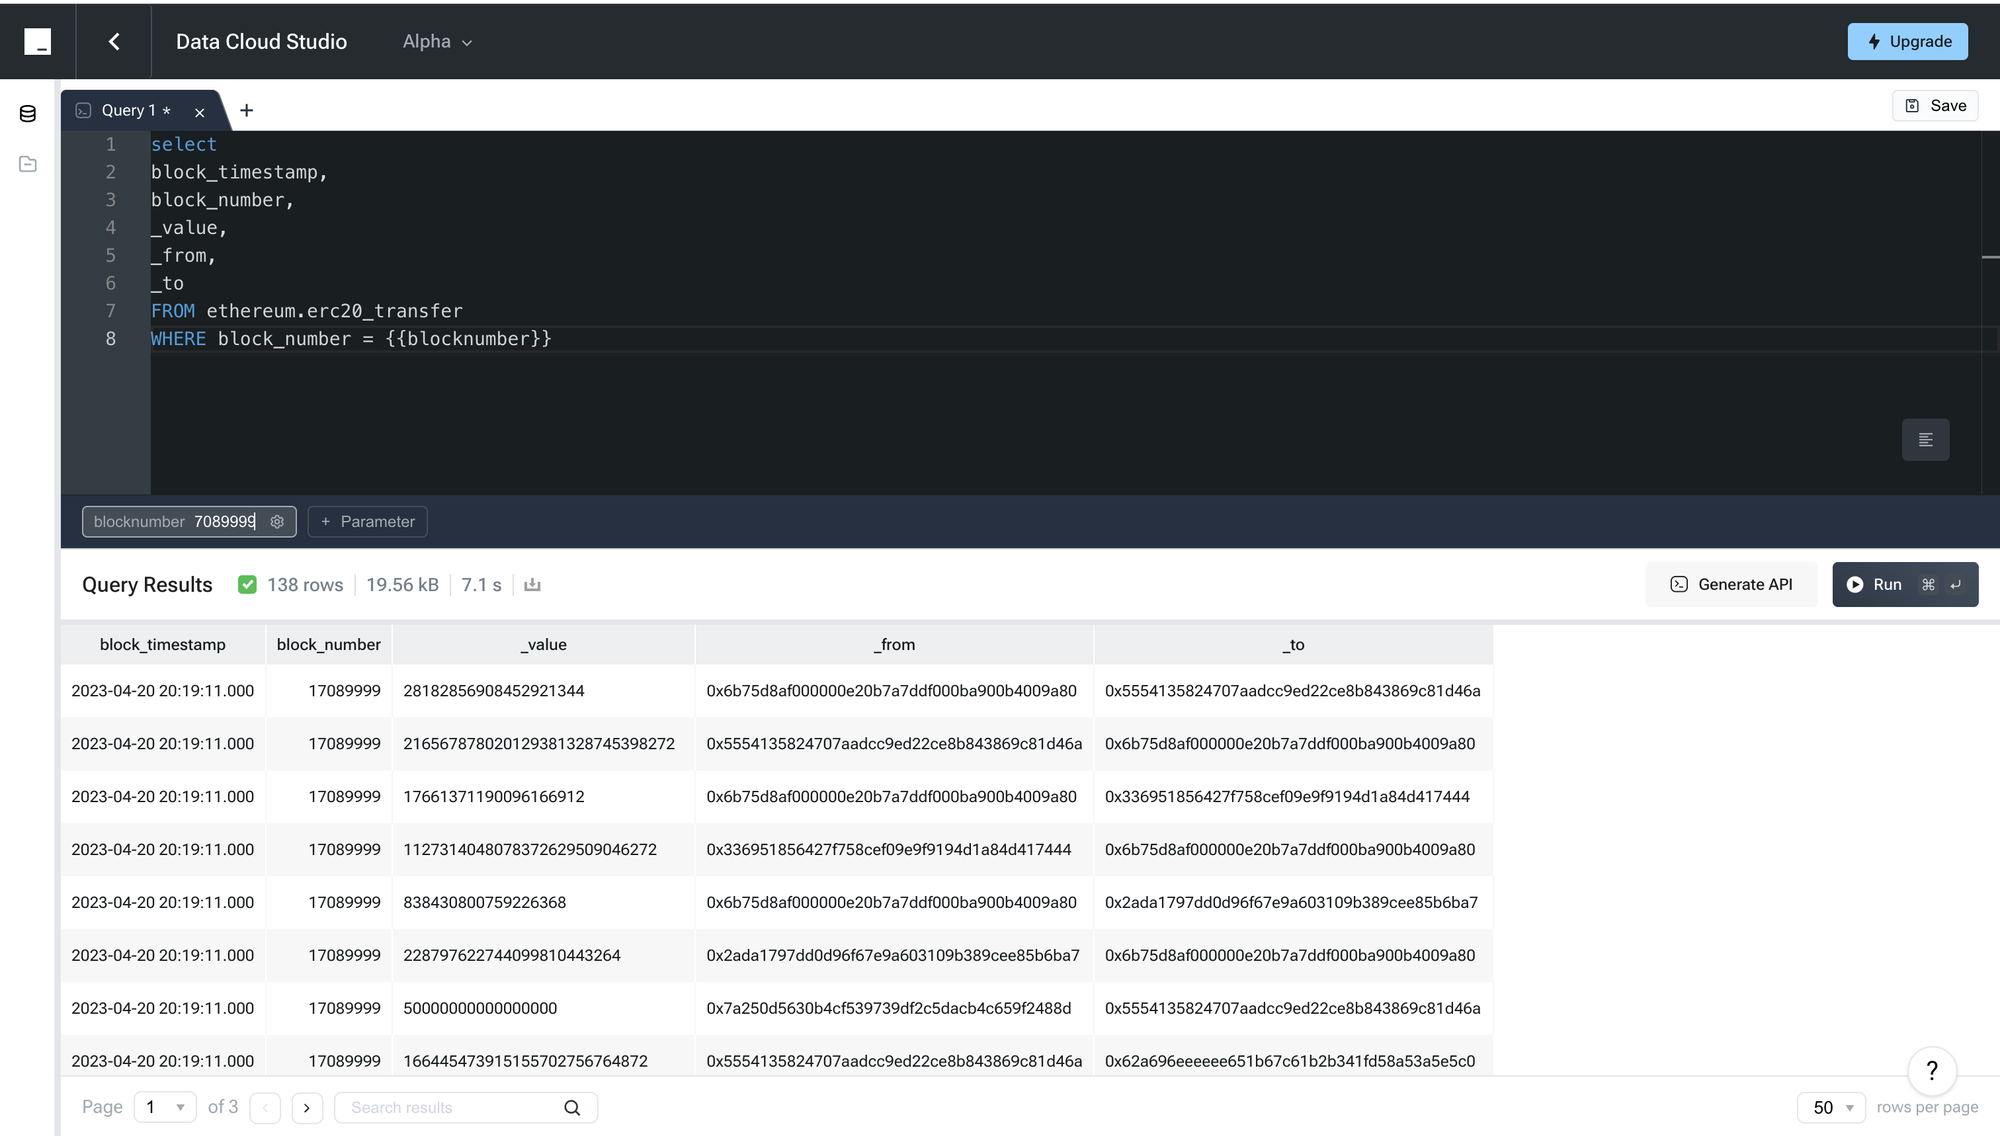
**Enter Data Cloud**: Access the [Data Cloud](https://console.chainbase.com/dataCloud) interface to start your data exploration.
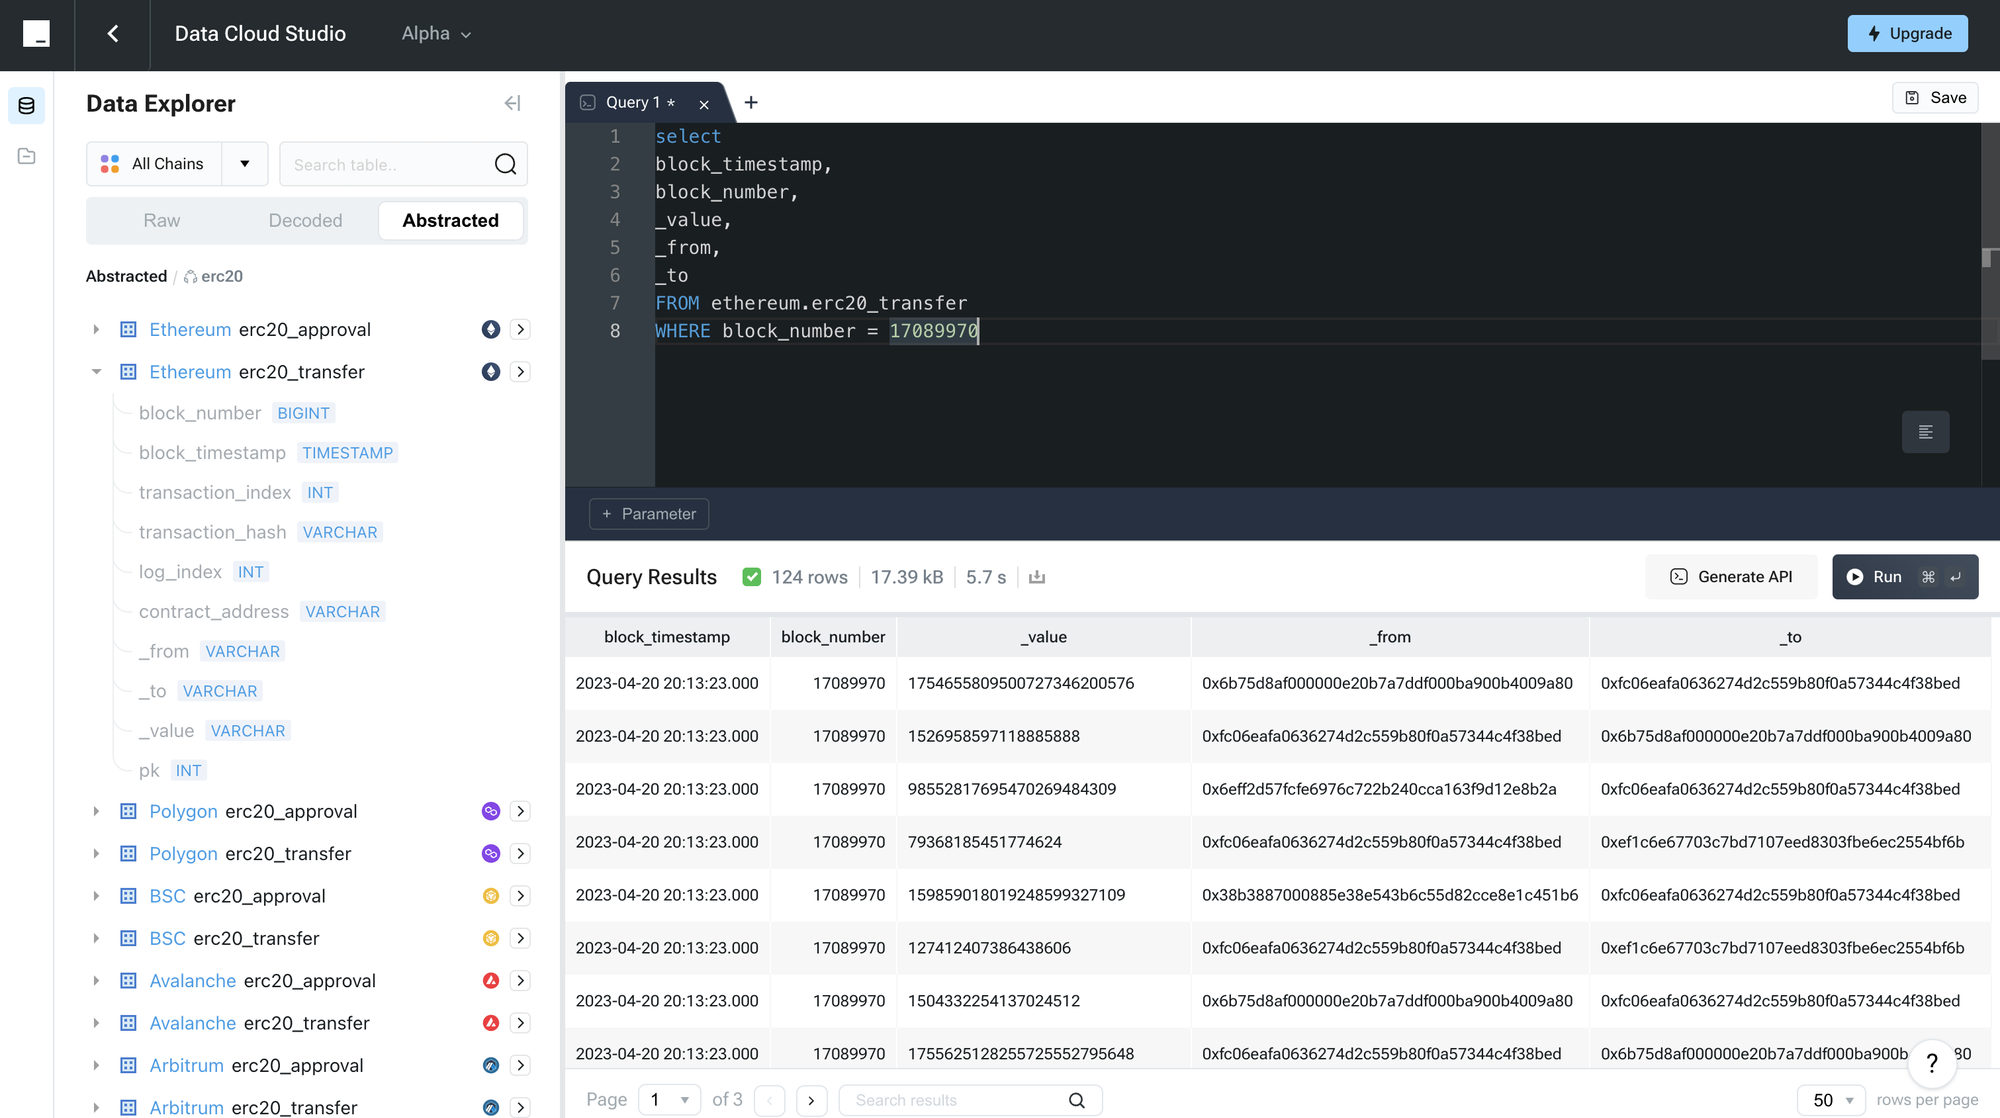
**Input a Simple SQL Query**: Use the following SQL query in the Data Cloud to extract information from Ethereum transaction data, focusing on a specific block number:
```sql
select
block_timestamp,
block_number,
_value,
_from,
_to
FROM ethereum.erc20_transfer
WHERE block_number = 17089970
```
This query retrieves details such as the timestamp of the block, block number, originating address, transaction value, and the transaction hash, specifically targeting transactions in block number 17089970 on the Ethereum blockchain.
**Execute the Query**: Run this query within Data Cloud to pull the specified data from the Ethereum blockchain.
**Introduction to Custom Parameters**: In Data Cloud, you have the ability to use a dedicated parameter input box, which allows for the customization of query parameters. This feature enhances the flexibility and user-friendliness of SQL queries.
**Setting Up a Query with Custom Parameters**: Here’s an example of how you can structure an SQL query using a custom parameter for the block number:
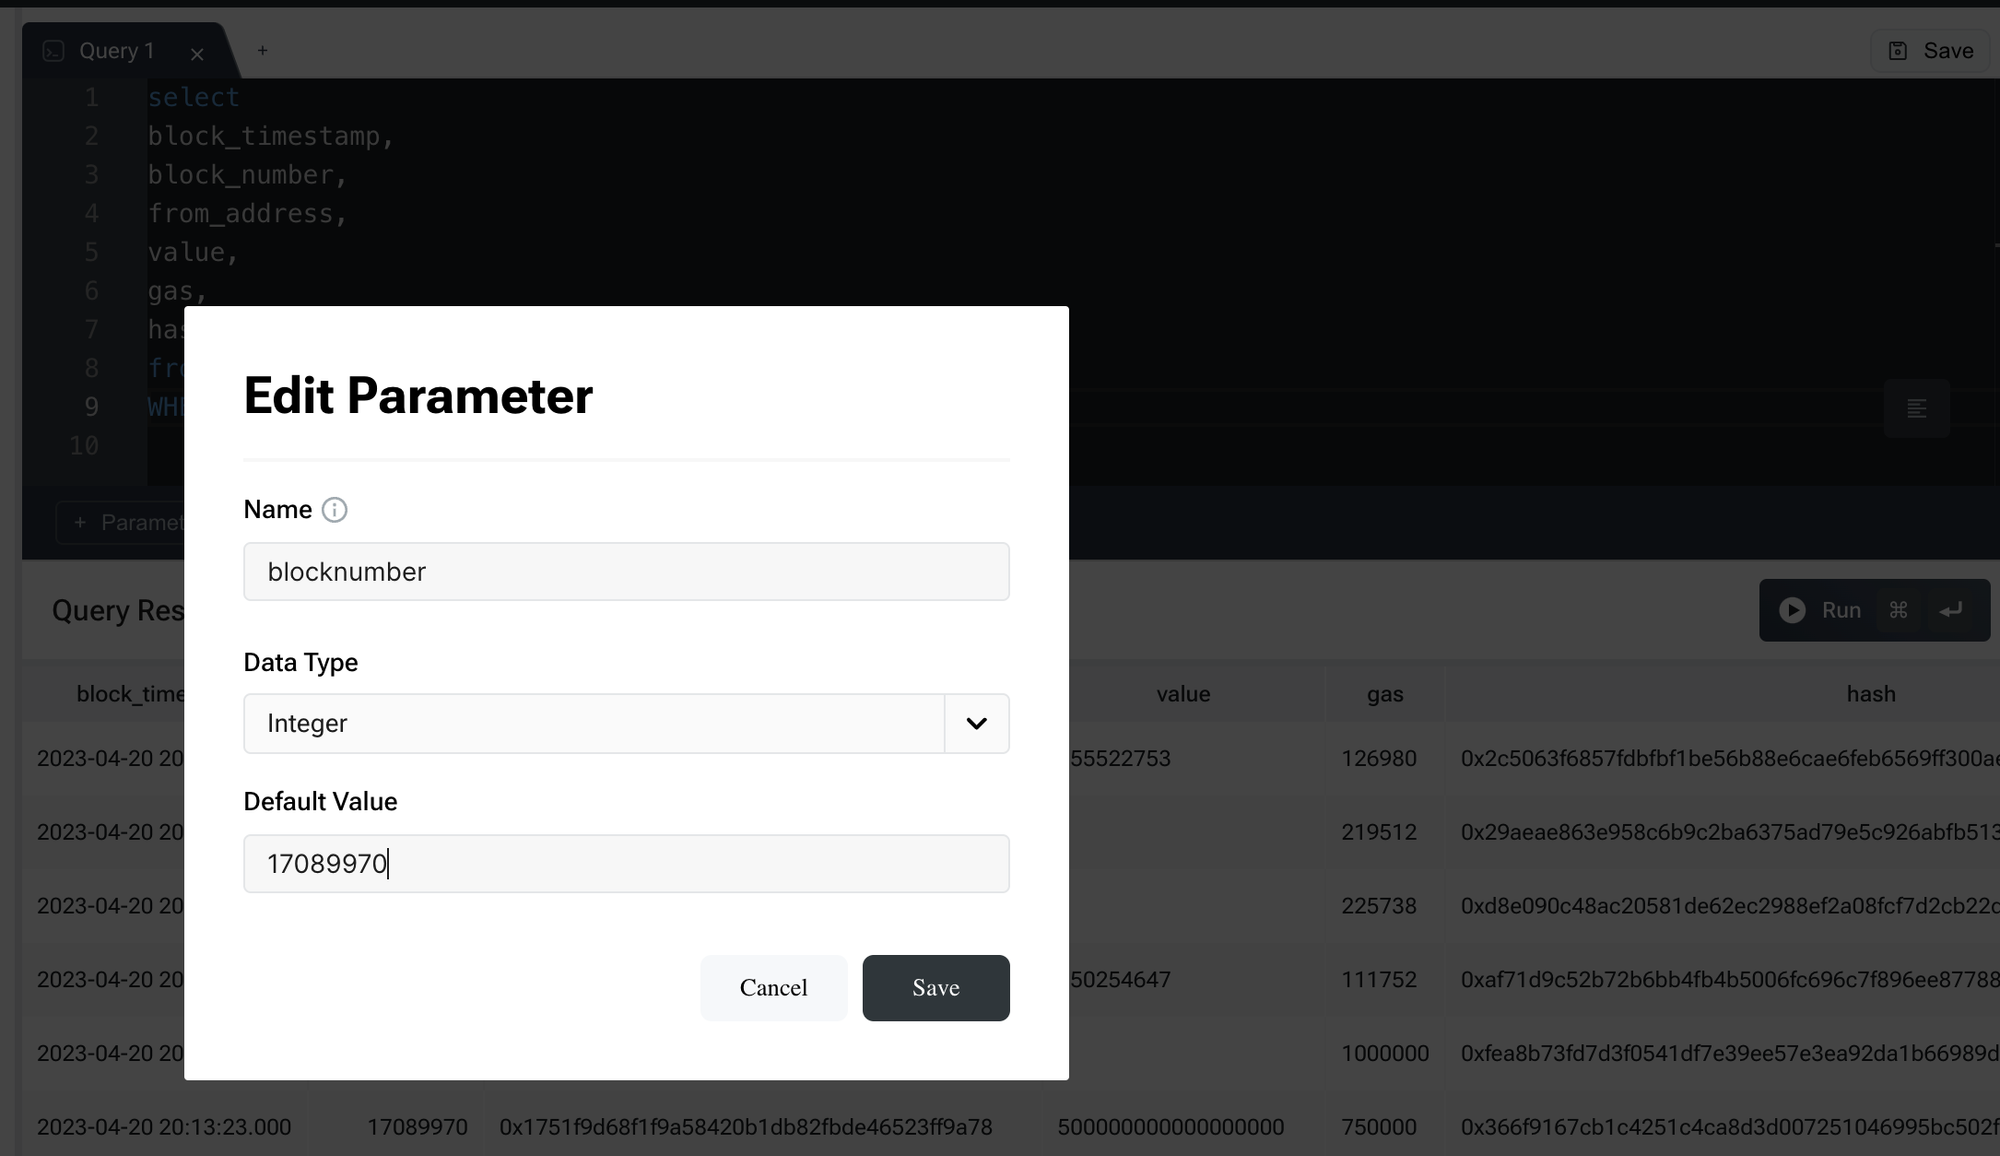
```sql
SELECT
block_timestamp,
block_number,
from_address,
value,
gas,
hash
FROM ethereum.transactions
WHERE block_number = {blocknumber}
```
**Using the Custom Parameter Box**: When you run this query, use the custom parameter box to input or select the desired block number. This input will replace the {blocknumber} placeholder in the query, allowing you to retrieve data for that specific block on the Ethereum blockchain with ease.
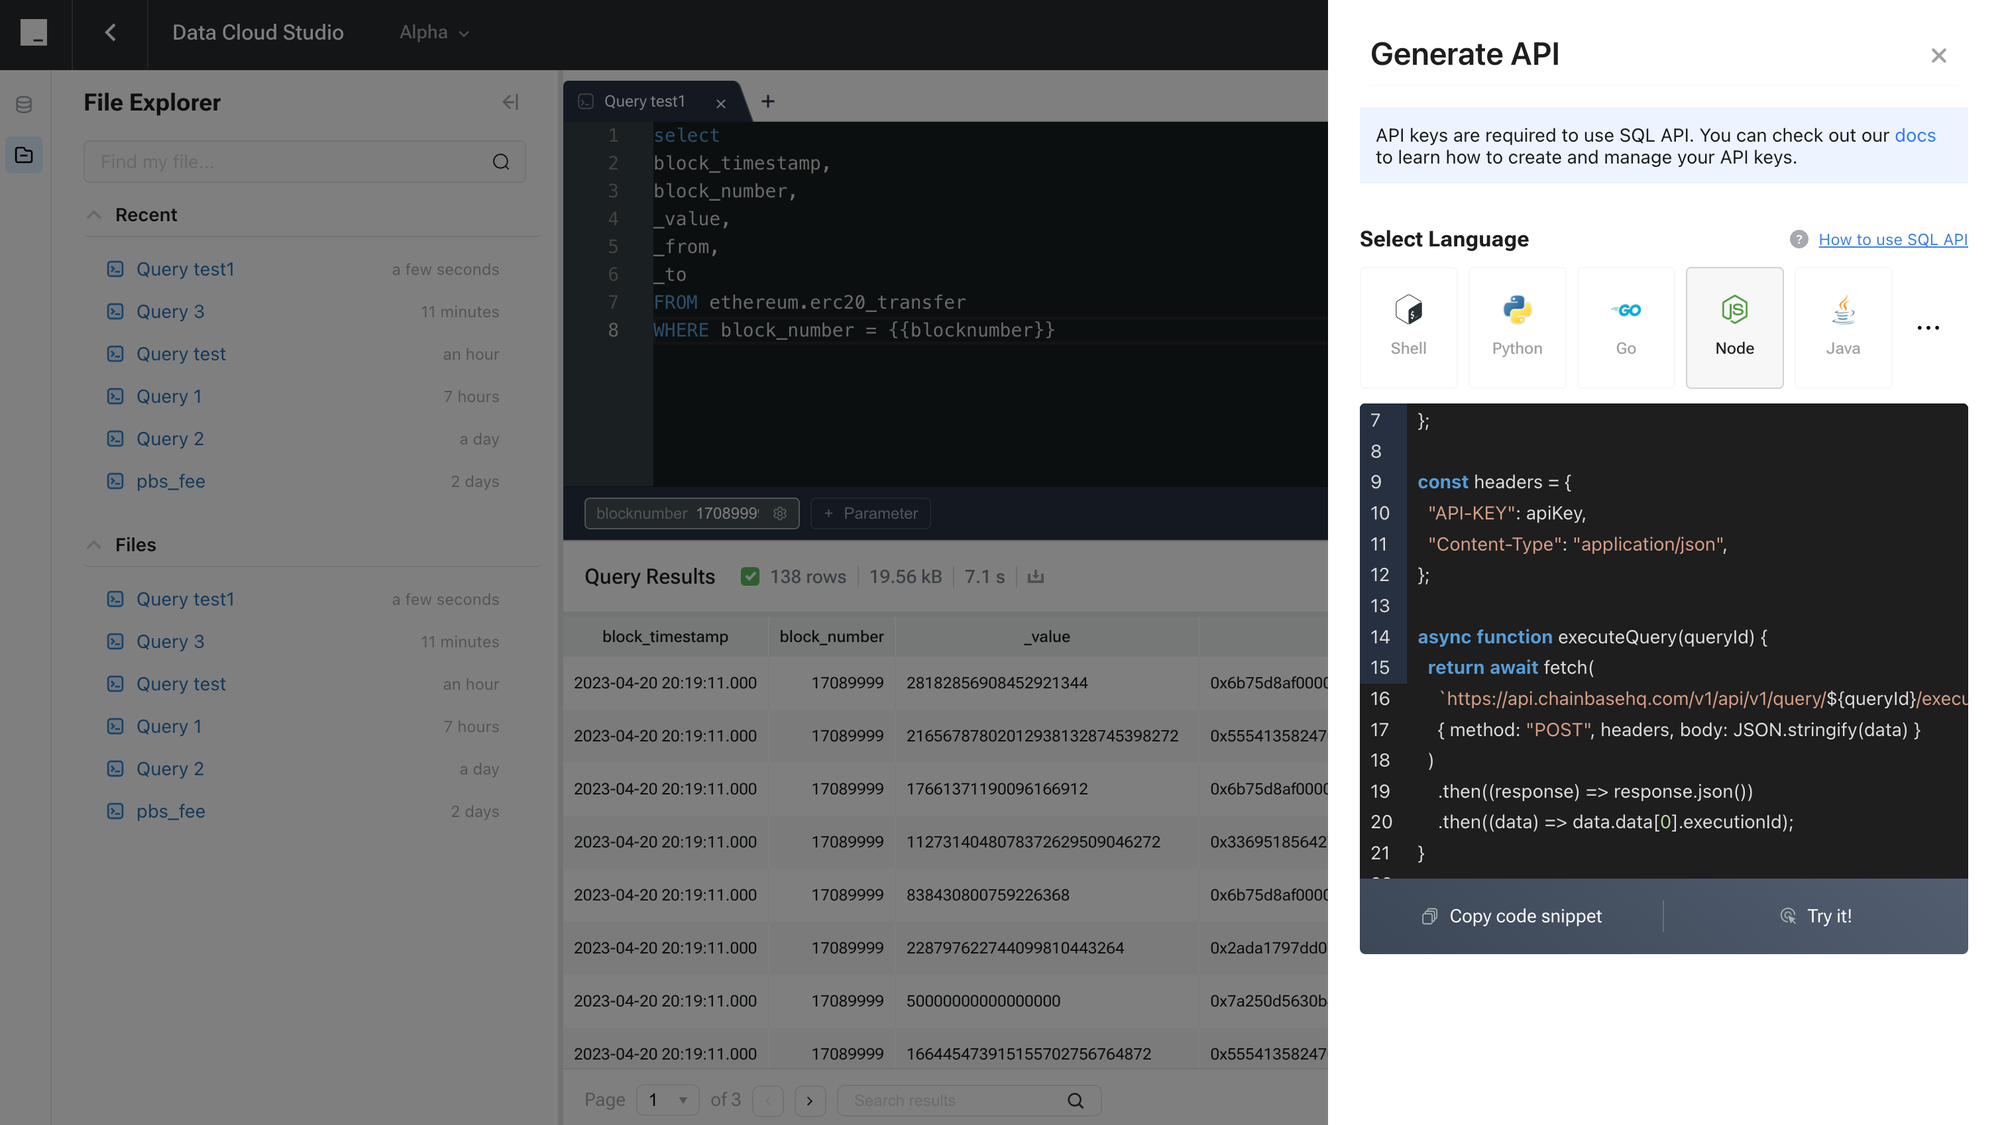
**Save your query to File Explorer:**
After saving your SQL query, it will be visible and accessible at any time within the "File Explorer" on the left side. This tool is meticulously designed to simplify your navigation and management of saved queries. With easy access to these entries in the file management panel, complemented by the search functionality at the top, you can quickly locate and retrieve previously saved queries, significantly enhancing the efficiency of your development workflow in data analysis and database management. The "File Explorer" serves as a centralized platform for viewing and organizing SQL queries, further enabling developers to manage and execute data operations with great efficiency.
Finally, by clicking on "Generate API," you can create an API endpoint that allows you to invoke the data seen in Data Cloud within your own programs, offering a 'what you see is what you get' convenience. Additionally, you have the flexibility to select from different programming languages according to your tech stack, ensuring seamless integration into your development environment.
```typescript
const apiKey = "your-api-key";
const queryId = "424242";
const headers = {
"API-KEY": apiKey,
"CONTENT-TYPE": "application/json",
};
async function executeQuery(queryId) {
return await fetch(
`https://api.chainbasehq.com/v1/query/${queryId}/execute`,
{ method: "POST", headers }
)
.then((response) => response.json())
.then((data) => data.data[0].executionId);
}
async function checkStatus(executionId) {
return await fetch(
`https://api.chainbasehq.com/v1/execution/${executionId}/status`,
{ headers }
)
.then((response) => response.json())
.then((data) => data.data[0].status);
}
async function getResults(executionId) {
return await fetch(
`https://api.chainbasehq.com/v1/execution/${executionId}/results`,
{ headers }
).then((response) => response.json());
}
async function main() {
const executionId = await executeQuery(queryId);
let status;
do {
status = await checkStatus(executionId);
await new Promise((resolve) => setTimeout(resolve, 1000));
} while (status !== "FINISHED" && status !== "FAILED");
return await getResults(executionId);
}
main().then(console.log);
```
## SQL Example
**Query the total cross-chain amount for a user:**
```sql
SELECT
'out' as type,
project,
token,
from_chain,
to_chain,
sum(cast(amount as decimal(38, 0))) as total
FROM
bridge_ethereum.transfers
WHERE
"from" = '0xf99d58e463a2e07e5692127302c20a191861b4d6'
group by
project,
token,
from_chain,
to_chain
UNION ALL
SELECT
'in' as type,
project,
token,
from_chain,
to_chain,
sum(cast(amount as decimal(38, 0))) as total
FROM
bridge_ethereum.transfers
WHERE
"to" = '0xf99d58e463a2e07e5692127302c20a191861b4d6'
group by
project,
token,
from_chain,
to_chain
```
This query consists of two parts: one part calculates the total amount of funds sent from a specific address (marked as 'out'), and the other part calculates the total amount of funds sent to that address (marked as 'in'). The two parts are combined using UNION ALL to provide a complete view of the total cross-chain transfer amount.
**Query the total liquidity provided by the user for each liquidity pool.**
```sql
select
project,
pool,
token_address,
sum(cast(amount as decimal(38, 0)))
from
dex_ethereum.liquidity
where
"from" = '{{UserAddress}}'
or "to" = '{{UserAddress}}'
group by
project,
pool,
token_address
```
**Query for token holdings**
```sql
select
*
from
ethereum.erc20_balances b
left join ethereum.token_metas t on t.contract_address = b.contract_address
where
wallet_address = '0x2e12979da9ad061ccc204c00d0e3a477a8cc4aea'
limit
10
```
**Query the total amount of loans and collateral for a user.**
```sql
with
lending_raw as (
select
project,
asset,
category,
sum(cast(amount as decimal(38, 0))) as total_amount
from
lending_ethereum.feeds
where
account = '{{UserAddress}}'
group by
project,
asset,
category
)
select
project,
asset,
category,
total_amount / t.decimals as volume,
t.name
from
lending_raw l
left join ethereum.token_metas t on t.contract_address = l.asset
```
DataCloud fundamentally transforms how we interact with blockchain data, offering unprecedented flexibility and efficiency for all Web3 developers. As you embark on this journey of exploration and innovation, Chainbase will be your ultimate partner, guiding you through the ever-evolving realm of Web3 development.
# Write Efficient Queries
Source: https://docs.chainbase.com/platform/features/datacloud/write-efficient-queries
## Tips for writing efficient queries
When you write a query, you want to make sure it runs as efficiently as possible. Here are some tips to help you write efficient queries:
1. **Limit the columns in the `SELECT` clause**: Only request the columns you need, as it reduces the amount of data the query engine needs to process.
2. **Use the `LIMIT` clause**: If you are only interested in a specific number of rows, use the `LIMIT` clause to avoid processing more data than necessary.
3. **Filter early and use predicate pushdown**: Apply filters as early as possible in the query to reduce the amount of data being processed. This takes advantage of predicate pushdown, which pushes filter conditions down to the storage layer, reducing the amount of data read from storage. For example, if you only need data from a specific date range, filter on the date column as early as possible.
4. **Use `UNION ALL` instead of `UNION`**: If you’re combining the results of multiple queries, use `UNION ALL` instead of `UNION` to avoid the overhead of removing duplicate rows.
5. **Only order when necessary**: Ordering results can be computationally expensive. If you don’t need ordered results, avoid using `ORDER BY`.
6. **Always use the actual data while filtering**: Do not use functions on the filter columns: For example, if you want to filter on a date, do not use date\_trunc('day', block\_timestamp) > '2022-01-01'. Instead, use block\_timestamp > '2022-01-01'. The first example will not be able to use the min/max values of the block\_time column to skip entire parquet files or row groups within files while scanning through a table, while the second example will. The same goes for other functions, such as substr, lower, upper etc.
7. **Use `UNION ALL` instead of `OR`**: If you need to combine the results of multiple queries, use `UNION ALL` instead of `OR` to avoid the overhead of removing duplicate rows. For example, instead of using `SELECT * FROM table WHERE column = 'value1' OR column = 'value2'`, use `SELECT * FROM table WHERE column = 'value1' UNION ALL SELECT * FROM table WHERE column = 'value2'`.
8. **User lower-case address directly in SQL**: If you are filtering on an address, use the lower-case address directly in the SQL query. For example, instead of using `SELECT * FROM transactions WHERE from_address = lower('0x1234567890ABCDEF')`, use `SELECT * FROM transactions WHERE from_address = '0x1234567890abcdef'`. This allows the query engine to use the min/max values of the from\_address column to skip entire ORC files or row groups within files while scanning through a table.
# Overview
Source: https://docs.chainbase.com/platform/features/sync/overview
## Introduction
Welcome to our Chainbase Sync service tutorial. This service is designed to offer:
1. **Complete and Accurate Historical Data**: Sync-Service ensures full consistency with the tables in DataCloud, providing complete and precise historical data.
2. **Rapid Historical Data Synchronization**: Our service enables quick synchronization of historical data without relying on RPC, streamlining the process significantly.
3. **Up-to-Date Incremental Blockchain Data**: After synchronizing historical data, Sync-Service continuously updates with real-time incremental blockchain data, tailored to your specific needs.
This guide will help you utilize these features to their fullest potential.
## Before You Begin
* Ensure you have a registered Chainbase account.
* Make sure you have a data source and a target data storage system that you wish to synchronize.
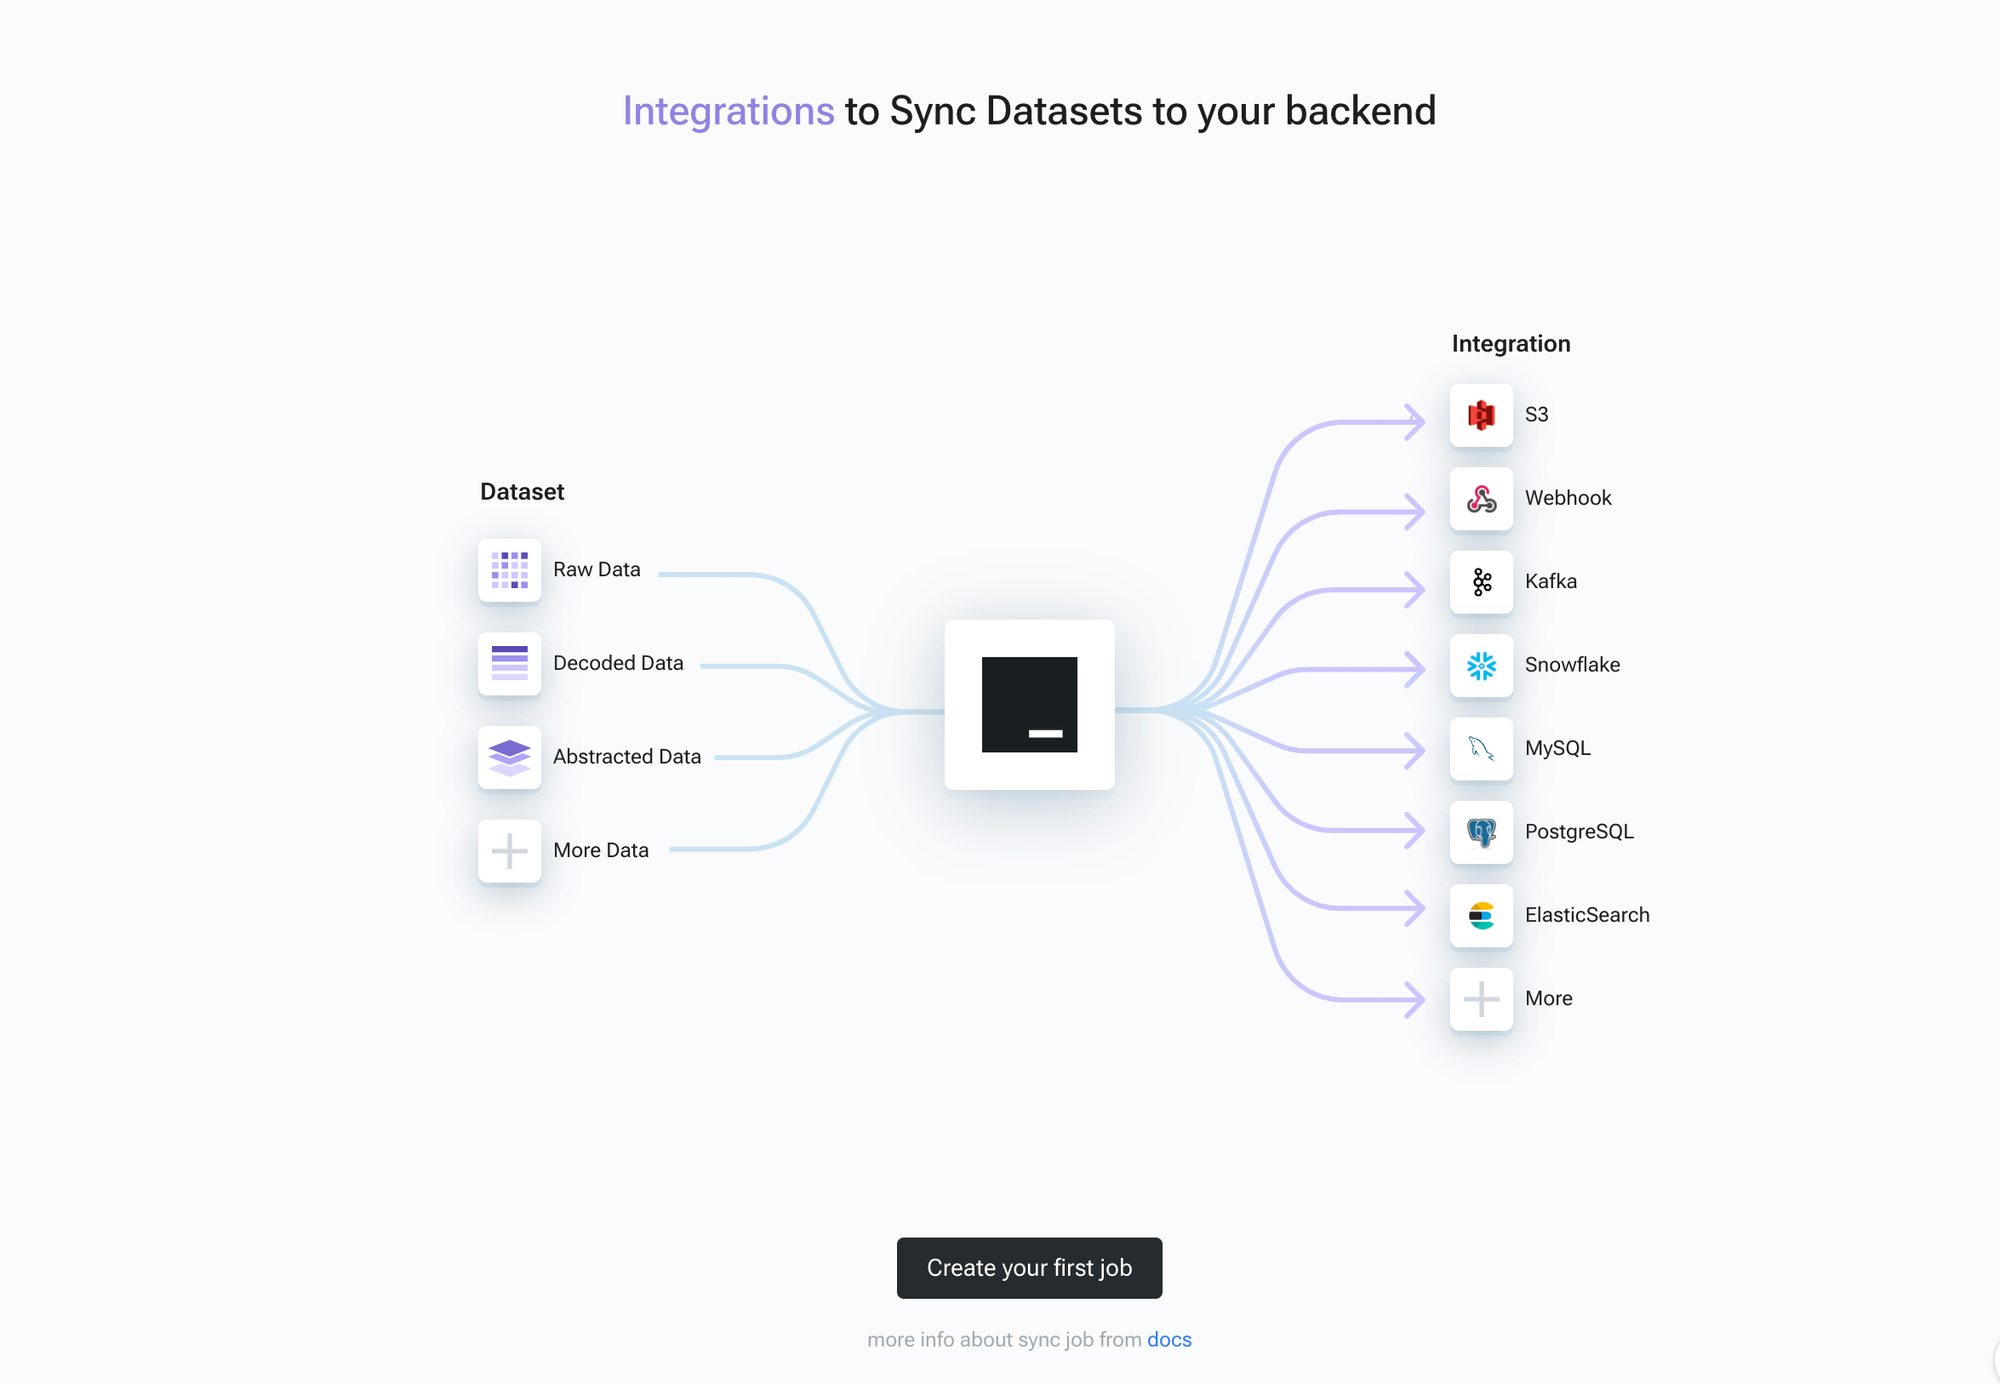
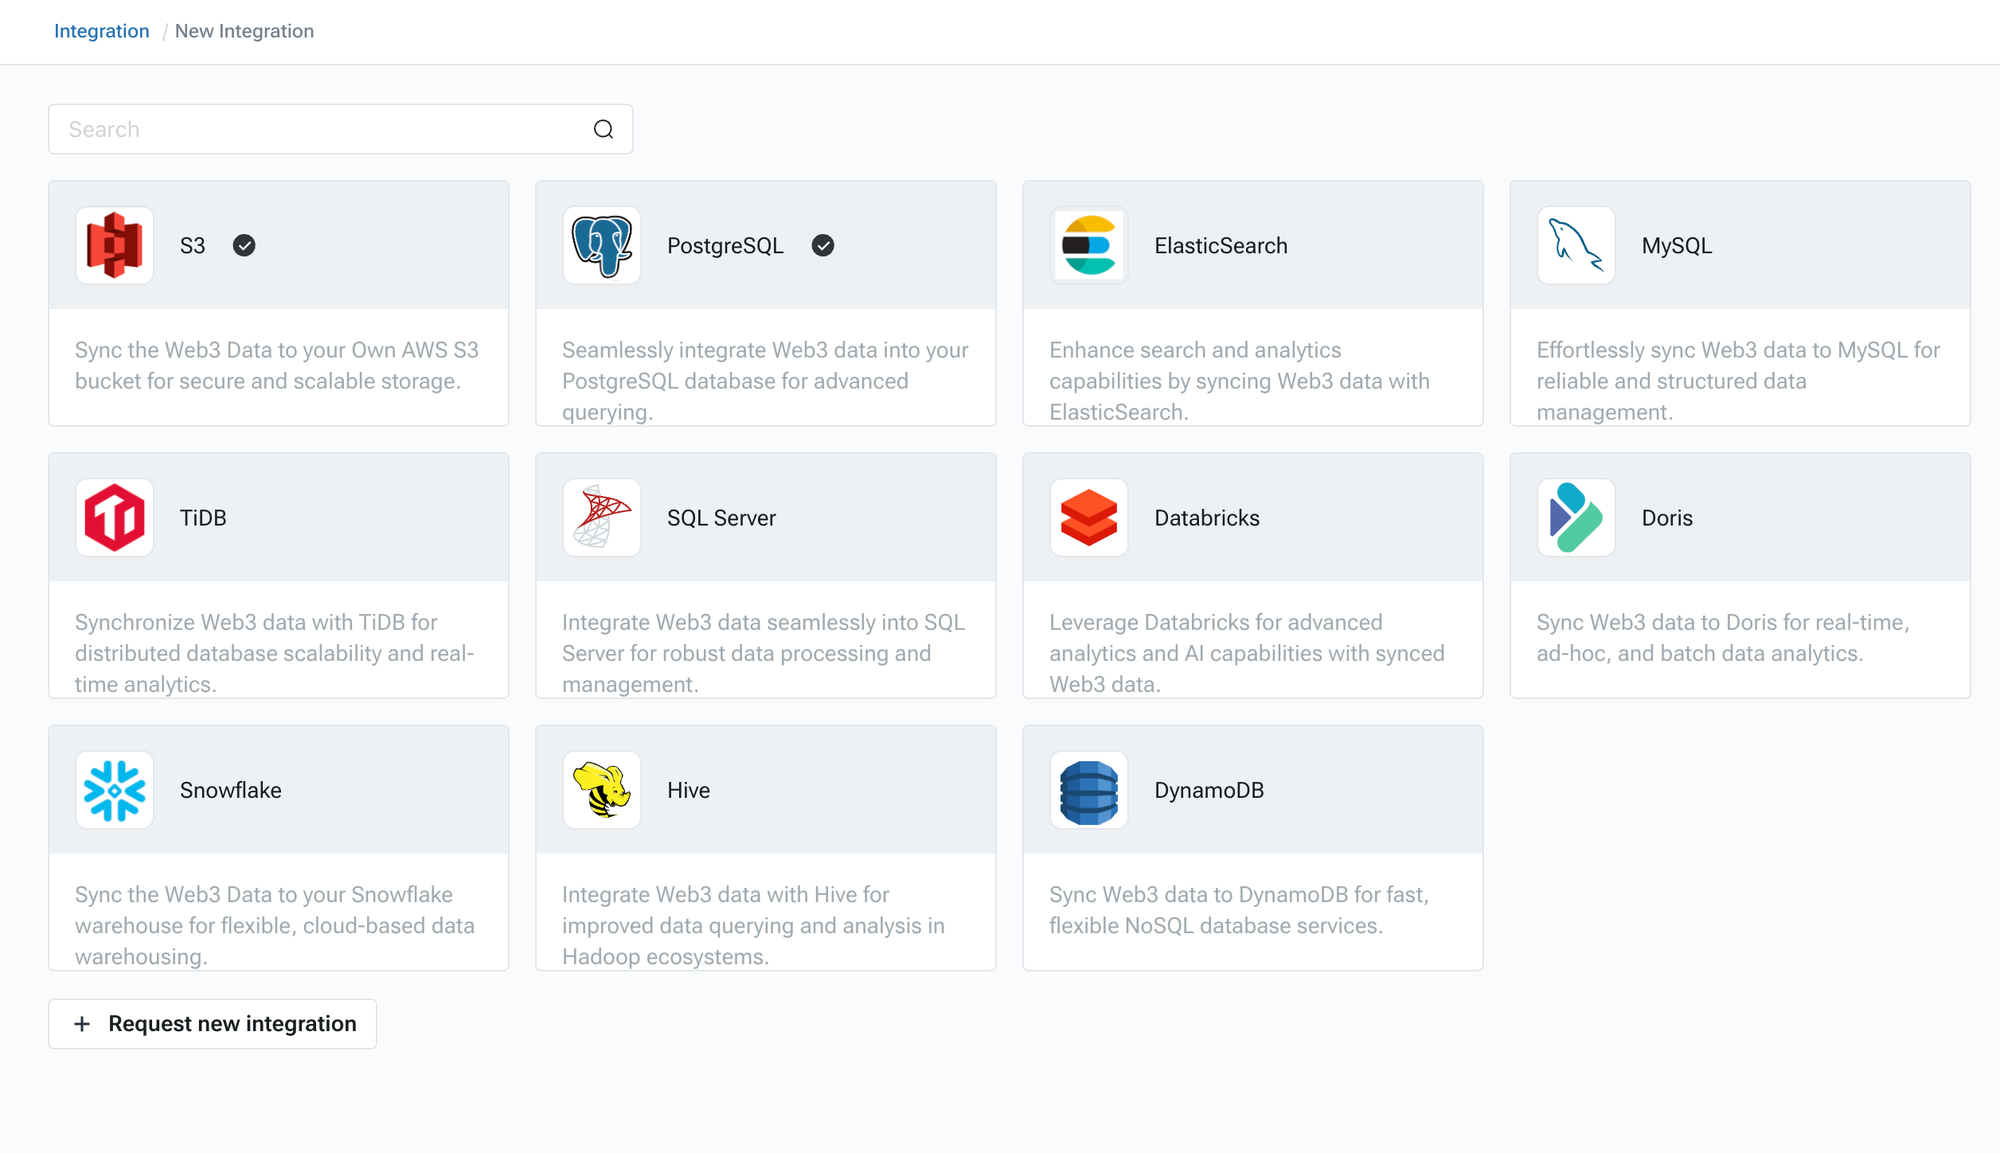
## Step 1: Selecting Your Data Source
* Access the Chainbase Sync-Service interface.
* Choose your data source (e.g., PostgreSQL, MySQL, S3, etc.).
* Enter the details and credentials for your data source.
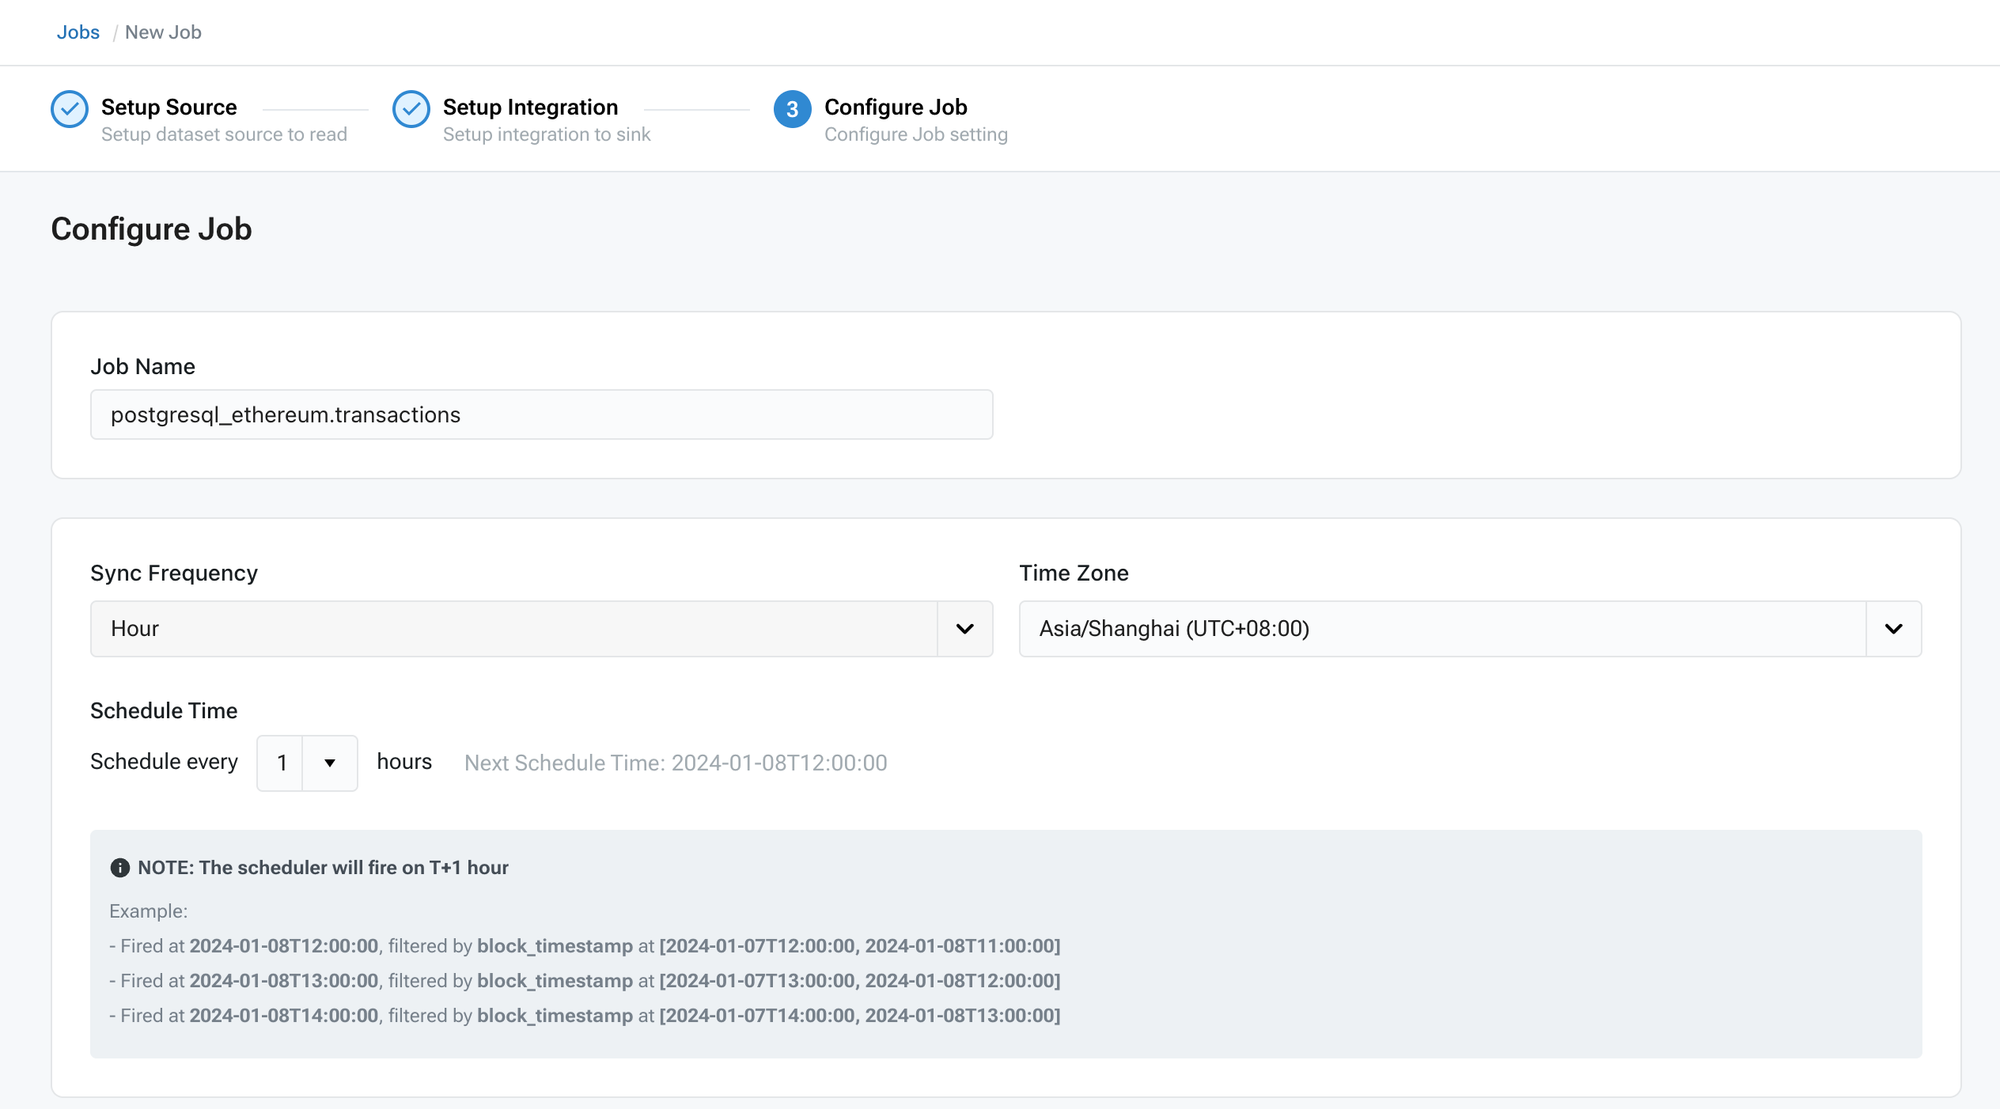
## Step 2: Configuring Data Flow
* Select the type of data to synchronize (raw data, decoded data, or abstracted data).

* Identify the target system, such as a database or object storage system.
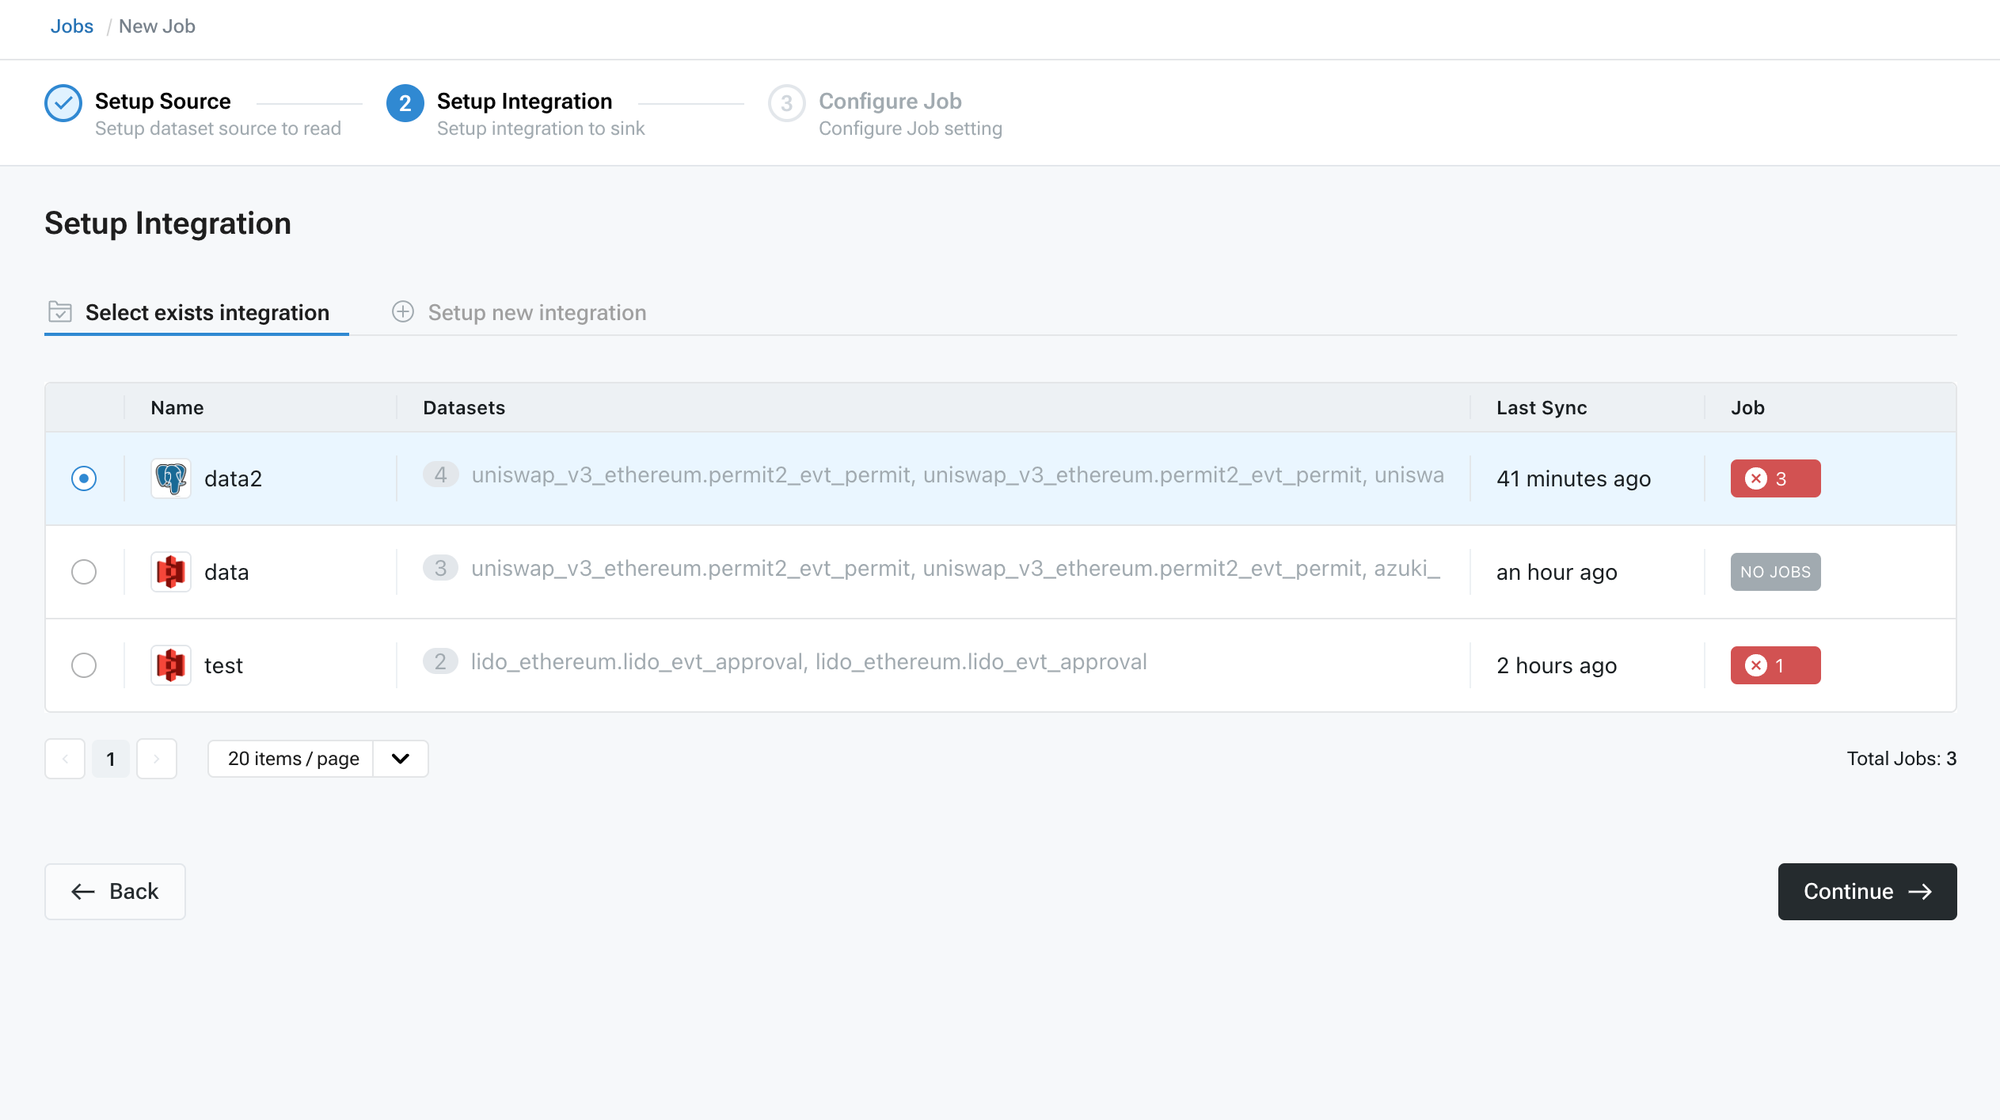
* Set the synchronization frequency and specific data sync options.
## Step 3: Syncing and Monitoring
* Start the data synchronization process.
* Monitor the progress and logs using tools provided by Chainbase.
* Verify the data in the target system to ensure successful synchronization.
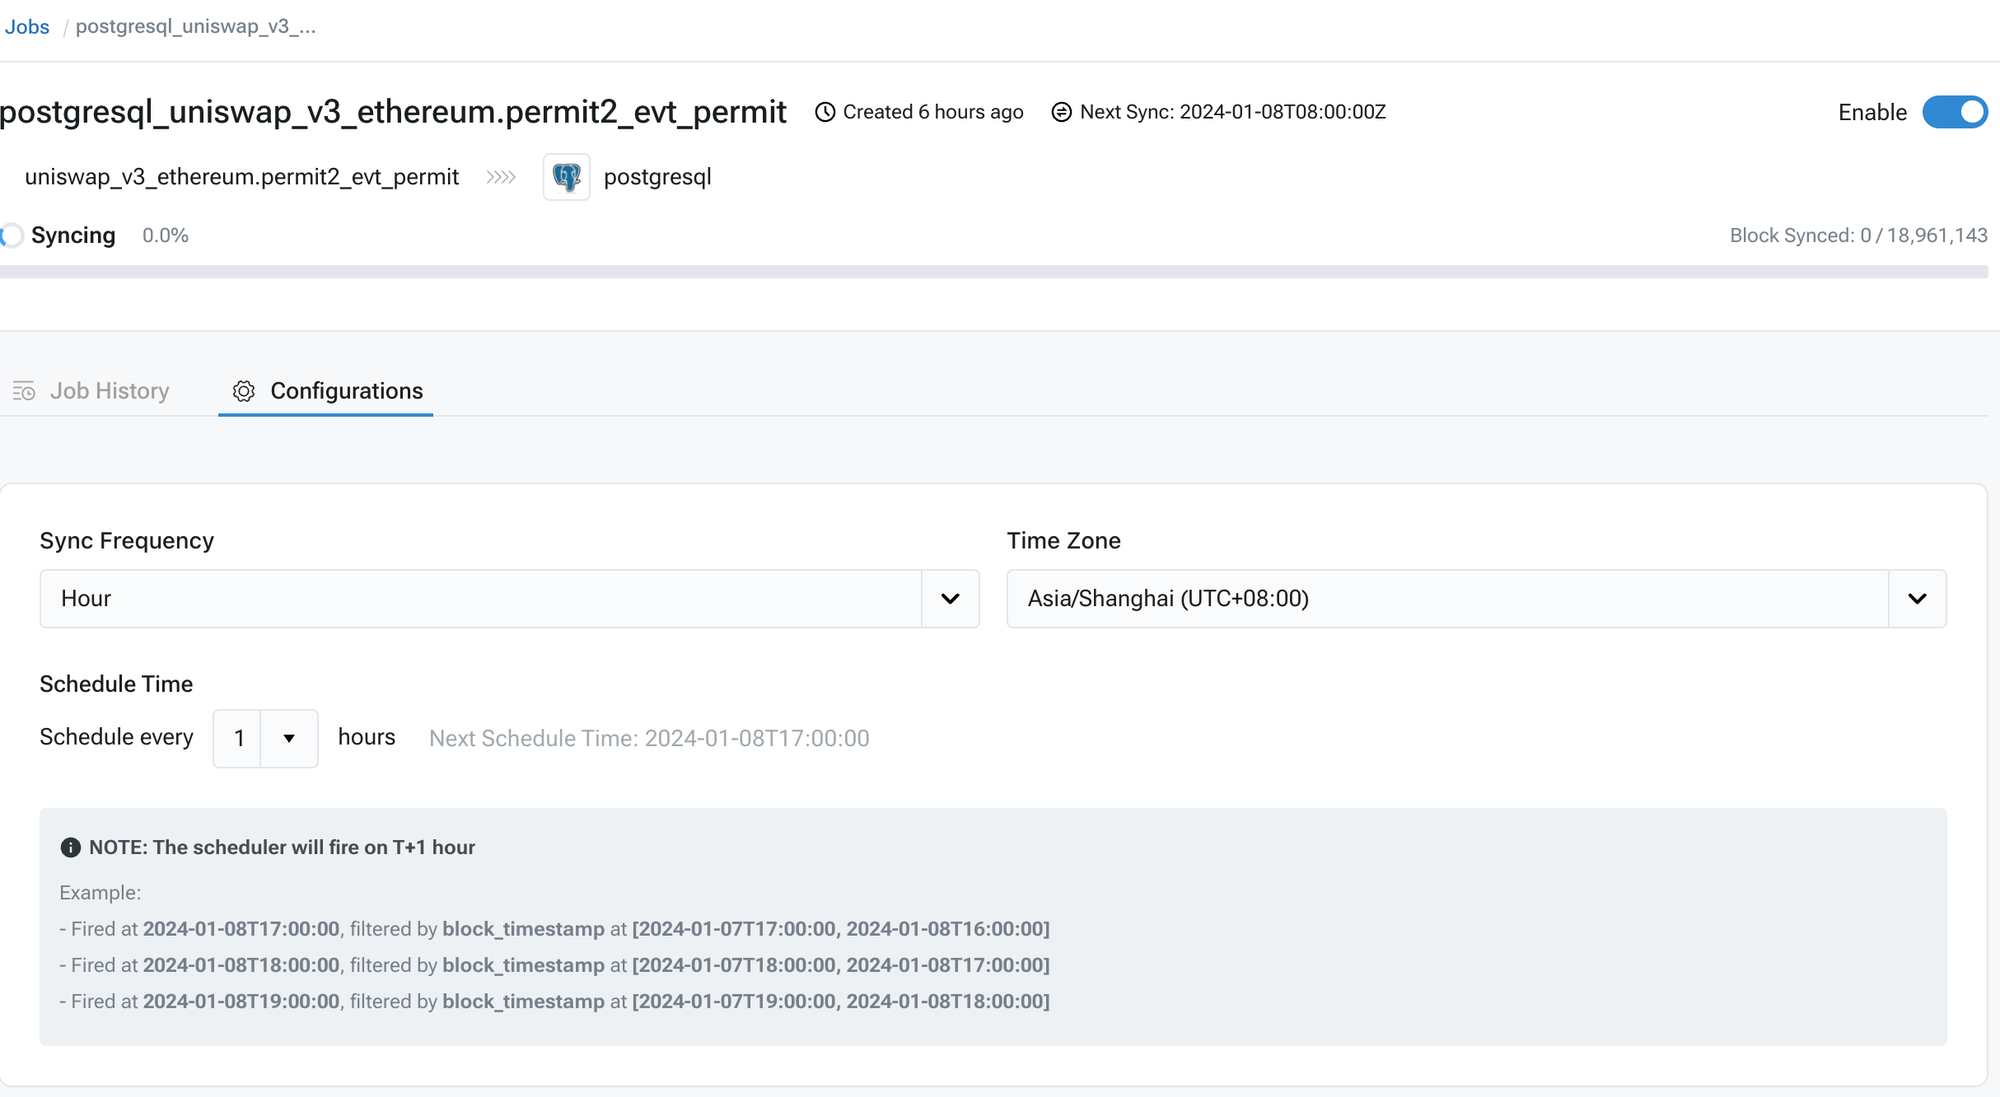
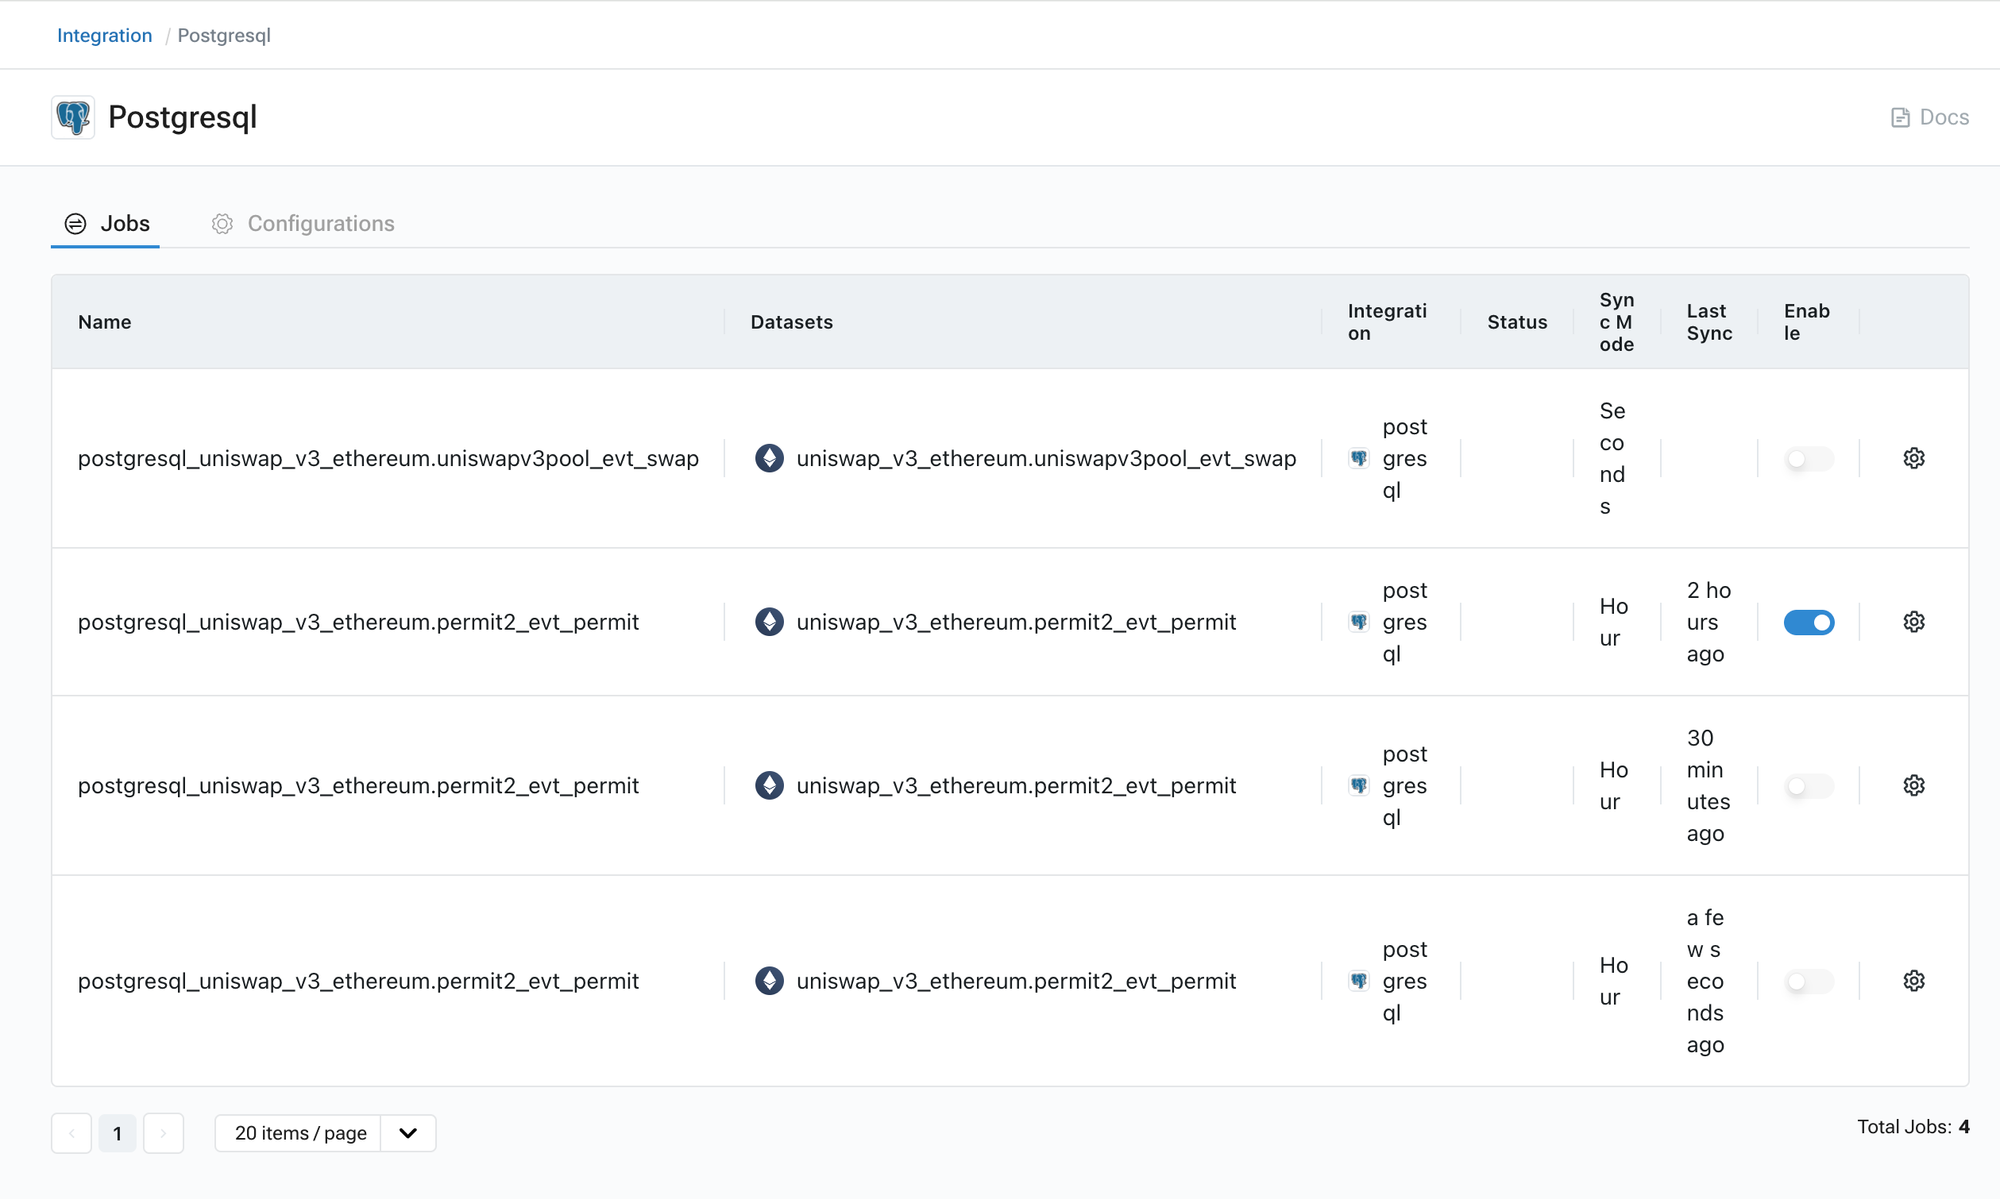
## Step 4: Managing and Maintenance
* In the 'Jobs' section of the integration interface, users can observe the current status of each sync job.
* The interface provides controls to pause and restart sync jobs as needed.
## Conclusion
The Chainbase Sync service streamlines the data synchronization process, enabling users to efficiently set up and maintain their data workflows within just two interface pages. With continuous synchronization, users can receive ongoing data updates after the initial sync is complete. The system's flexibility, scalability, and ease of use are evident in the variety of data sources and tables users can choose from, tailored to their specific needs. Furthermore, the conformity of table data formats with DataCloud standards ensures seamless integration and consistency across platforms. This comprehensive service package empowers users to harness real-time data insights effectively.
## Frequently Asked Questions (FAQs)
1. **Is the data synchronized with Chainbase Sync-Service in real-time?**
Yes, Chainbase Sync service supports real-time data synchronization. As changes occur in your data source, they are immediately captured and updated in your target system, ensuring that the data you access is always current.
2. **How is the pricing for synchronization calculated?**
The pricing for synchronization with Chainbase Sync-Service is based on several factors, including the volume of data being synchronized, the frequency of sync jobs, and the number of data sources and destinations configured. For detailed pricing information, please refer to our pricing page or contact our [sales team](https://chainbase.com/contact).
3. **Can I choose to start synchronization from a specific block?**
Currently, the ability to begin synchronization from a specific block index is a feature exclusive to our enterprise users. If you require this level of synchronization control, please reach out to our [sales team](https://chainbase.com/contact) for assistance and information on our enterprise solutions.
# Overview
Source: https://docs.chainbase.com/platform/overview
Welcome to Chainbase Data Platform docs. All-in-one web3 data infrastructure for indexing, transforming, and utilizing large-scale on-chain data.
## What is Chainbase Data Platform?
Chainbase Data Platform is an all-in-one data infrastructure for Web3 that allows you to index, transform, and utilize large-scale on-chain data. It is a platform that provides a suite of tools and services to help you build, manage, and scale your Web3 applications.
By leveraging enriched on-chain data and streaming computing technologies across one data infrastructure, Chainbase Data Platform automates the indexing and querying of blockchain data, enabling developers to accomplish complex data tasks with ease.
## Products & Features
### API - Indexed Data
Chainbase Data Platform provides a powerful API that allows you to access indexed data from the blockchain. The API is designed to be easy to use and provides a wide range of features to help you get the data you need.
### Datasets
Chainbase Data Platform supports a wide range of raw, decoded, and abstracted datasets for you to build next-level apps with cutting-edge protocols today and tomorrow.
### Data Cloud
Data Cloud lets you run your low-latency queries through an endpoint to leverage all our indexed datasets for your custom needs.
### Data Sync - Stream data to your backend
With Data Sync, you can stream the data you need into your own infrastructure in real-time, and then use it to build powerful applications.
# Pricing
Source: https://docs.chainbase.com/platform/pricing/pricing
# Support
Source: https://docs.chainbase.com/platform/support
# Supported Networks
Source: https://docs.chainbase.com/platform/supported-networks/supported-networks
We support the following networks in real-time across multiple data types. More chains and types are being onboarded and will coming soon.
| **Ecosystem** | **Blockchains Supported** | **Node RPC** | **Raw** | **Decoded** | **Abstracted** | **Web3 API** |
| ------------- | ------------------------- | ------------ | ------- | ----------- | -------------- | ------------ |
| **EVM** | Ethereum | ✔ | ✔ | ✔ | ✔ | ✔ |
| | Binance Smart Chain (BSC) | ✔ | ✔ | ✔ | ✔ | ✔ |
| | Polygon | ✔ | ✔ | ✔ | ✔ | ✔ |
| | Avalanche (C-Chain) | ✔ | ✔ | ✔ | ✔ | ✔ |
| | Fantom | ✔ | ✔ | ✔ | | |
| | Arbitrum | ✔ | ✔ | ✔ | ✔ | ✔ |
| | Optimism | ✔ | ✔ | ✔ | ✔ | ✔ |
| | Base | ✔ | ✔ | ✔ | ✔ | ✔ |
| | Blast | ✔ | ✔ | ✔ | ✔ | |
| | ZkSync | ✔ | ✔ | ✔ | ✔ | ✔ |
| | Merlin | ✔ | ✔ | | | ✔ |
| **Non EVM** | Bitcoin | | \* | | ✔ | |
| | Sui | ✔ | | | ✔ | |
| | Ton | ✔ | ✔ | ✔ | ✔ | |
| | Tron | ✔ | ✔ | | | |
| | *Solana\** | | \* | \* | \* | \* |
# Get native token balances by address
Source: https://docs.chainbase.com/platform/usecases/balance-api/get-native-token-balances
Getting the token balances of an account is an essential task when dealing with cryptocurrencies, as it allows you to know the amount of tokens that an account holds. The Web3 APIs from Chainbase provide the ability to get all transactions and account balances in a straightforward way. By following the steps below, you can seamlessly get the native token balances of an account on a certain chain through a single API call using Chainbase API.
## Overview - Tools you need to work with Chainbase
1. A free account at [Chainbase](https://www.chainbase.com) with an API key.
2. An IDE. Our examples are shown in JavaScript, you can use [VS Code](https://code.visualstudio.com/) as your IDE for example.
3. A known wallet address as your input.
## Step 1: Set up a free account at Chainbase
To better leverage the ability that Chainbase provides, you can register [here](http://www.chainbase.com/register) for a free account and access to different APIs and data cloud.
After logging into Chainbase, visit the [dashboard](https://console.chainbase.com/) to get an overview. Create a new project in the console and get an API key.

## Step 2: Write script using Chainbase API
1. Using `fetch` in JavaScript.
```jsx
network_id = '1'; // See https://docs.chainbase.com/reference/supported-chains to get the id of different chains.
wallet_addr = '0xd8dA6BF26964aF9D7eEd9e03E53415D37aA96045'; // Take Vitalik's wallet address as an example.
fetch(`https://api.chainbase.online/v1/account/balance?chain_id=${network_id}&address=${wallet_addr}`, {
method: 'GET',
headers: {
'x-api-key': CHAINBASE_API_KEY, // Replace the field with your API key.
'accept': 'application/json'
}
}).then(response => response.json())
.then(data => console.log(data.data))
.catch(error => console.error(error));
```
2. Using `axios` in JavaScript. You need to install `axios` using `npm install axios --save` in the terminal first.
```jsx
network_id = '1'; // See https://docs.chainbase.com/reference/supported-chains to get the id of different chains.
wallet_addr = '0xd8dA6BF26964aF9D7eEd9e03E53415D37aA96045'; // Take Vitalik's wallet address as an example.
const axios = require('axios');
const options = {
url: `https://api.chainbase.online/v1/account/balance?chain_id=${network_id}&address=${wallet_addr}`,
method: 'GET',
headers: {
'x-api-key': CHAINBASE_API_KEY, // Replace the field with your API key.
'accept': 'application/json'
}
};
axios(options)
.then(response => console.log(response.data.data))
.catch(error => console.log(error));
```
## Step 3: Print native token balances
Chainbase API [Get native token balances](/api-reference/web3-api/balance/token-balances/get-native-token-balances) takes the chain id and wallet address as parameters, and returns the value of native token balances.
To get data printed, run command `node